Author’s Update: I originally published this article in March of 2020, just as the world was heading into lockdown. At the time, remote work in post production was much less common and this workflow helped make remote collaboration more accessible and affordable to editors around the globe.
I’m happy to report that times have changed and this workflow has since evolved into a simple software-only solution. Please check out the new version right here!
This is a long one, so I’m going to cut right to it: this article will teach you how to edit collaboratively in real time, anywhere in the world, using just a laptop and a stable internet connection (including wifi!), all for under $600.
Yep, that’s right. No subscription costs here.
I’ve used this workflow on tons of feature films, both high and low budget. It’s also the workflow I talked about with Steve Hullfish on Art of the Cut as well as on the No Film School Editors’ Roundtable podcast.
Note: This workflow has been redesigned using the AJA U-Tap. Previous versions of this article referenced the Blackmagic Web Presenter as the primary hardware.
Table of Contents
So what’s the workflow?
Real-time remote editing uses a combination of low-cost hardware and software to allow an editor and director to work together remotely in a virtual editing room.
As a narrative feature editor, working in real time with the director is an absolute must. But with the industry split between coasts (or the rise of a global pandemic), it’s just not always possible.
Enter real-time remote editing.
This article will teach you how to convert the playback output from Premiere into a high quality, low-bandwidth web camera signal that can be streamed via video chat to collaborators anywhere in the world.
How well does it work?
Very well.
Many directors say they prefer it over being in the edit room because it gives everyone a bit more freedom and privacy.
So what makes this method better than just sharing your screen?
- Sync! Simply put, the audio and video stay in sync. That means you can accurately gauge an actor’s performance, figure out exactly where a music cue should end, or decide if you need to trim a few frames off the end of a clip.
- Low Latency! Of course, there’s a small amount of latency (up to about half a second), but the lag doesn’t affect the picture sync. The playback that the editor watches is always in sync, and the playback that the director watches is always in sync.
- Two-way audio! You can always hear exactly what’s playing out of the NLE, as well as each other’s voices, simultaneously and with no feedback.
- Video chat! Want to see each other too? You can do that!
- It just works! Once you’re up and running, this setup is rock solid.
How did you come up with this?
Believe it or not, Final Cut Pro 7 is the inspiration behind this set up.
Way back when, FCP 7 had an amazing feature called iChat Theater that was capable of encoding and live streaming your edit right over iChat to anyone you invited to see it.
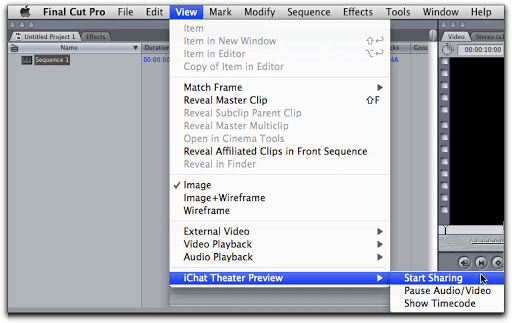
Yes, that’s right. This technology existed over 10 years ago, required no additional hardware, and was nearly flawless.
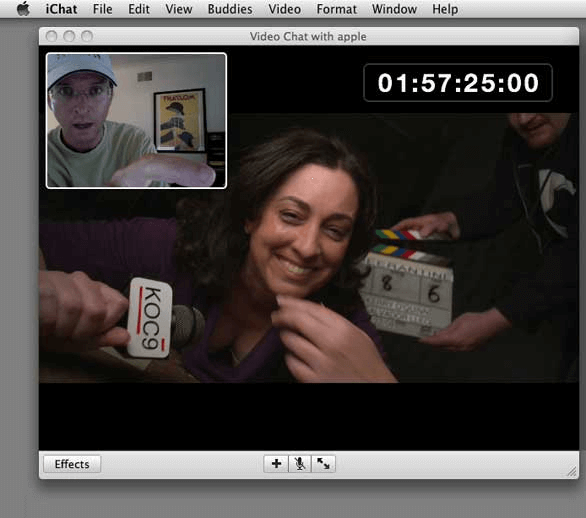
For some perspective, I used iChat Theater on a Powerbook (remember those?) with 4GB RAM to remotely cut one of my very first features.
How’d Apple do it back then? I have no idea, but I sure wish they’d bring this feature back to FCP X.
What equipment do I need?
For starters, a MacBook Pro or higher will do the trick. I recommend at least 16GB of RAM – I’ve got 32GB on my system. The more robust the graphics card, the better.
Everything else can be bought on Amazon and you likely already have some of this stuff (like HDMI cables and a headset) at home.
Here’s the list (some of these may be affiliate links):
Required:
- AJA U-Tap HDMI, $439 (recommended): The star of this workflow, this tiny bus-powered capture card converts an HDMI signal into a webcam stream. It’s portable, rugged, reliable, and compatible with pretty much any software that will recognize a webcam. AJA also makes an SDI version of the U-Tap if that’s your preference.
Or… - Blackmagic Web Presenter HD or 4K, $495 or $675: In previous versions of this article, the Web Presenter was my top choice of hardware because it handles the video encoding, rather than your computer. Then Blackmagic removed the HDMI input, so I switched to the AJA U-Tap. If using an SDI doesn’t bother you, then absolutely go for the Web Presenter! Just make sure to grab a power cable, since it doesn’t come with one.
- The Blackmagic ATEM Mini ($280) is also a great choice for this workflow. The ATEM mini also takes HDMI sources and feeds them into your computer as a web camera signal. It also has multiple HDMI ports in back as well as PIP options, allowing you to plug in an external camera, set it up as a PIP, and have simultaneous video chat on both sides of the collaboration. Just note that it’s much larger than the U-Tap and isn’t bus powered. The ATEM Mini Pro ISO ($495) works great as well, if you have a use for its additional features.
- USB-C to HDMI cable, $15.99: Connects the video source (in this case, Premiere’s playback output) to the U-Tap.
- USB-B to USB-C cable, $6.99: Connects the U-Tap to the computer as a webcam.
- Loopback, $99: A powerful audio routing software for Mac, with many uses beyond this particular workflow.
- Zoom Video Conferencing, $0 (or subscription options for more features): A powerful free cross-platform conferencing service with unparalleled video and audio features. Your collaborators can be on Mac or PC, desktop, smartphone, or tablet.
Optional:
- Headphones with Microphone, $19.95: Any headset will do, though I highly recommend some sort of gaming headset with a built-in mute button that’ll be comfortable to wear for hours at a time. I’ve been loving this lightweight set with a detachable microphone for its comfort and portability.
- MuteMe Physical Mute Button, $39: Just trust me on this one! It may seem unnecessary, but I love this mute button. It makes long edit sessions so much easier and gives me a visual cue every time I’m muted.
Tip: If you’re nervous about taking the plunge and buying the hardware, remember that most retailers have a return policy if things don’t work out.
Before we begin…
Let’s get a few disclaimers out of the way:
- Zoom has many robust security features, and while many studios security-cleared Zoom meetings during the early months of the pandemic, it may not be approved for use by all major studios. Please do your research (including thoroughly reading Zoom’s whitepaper on security) and stream sensitive video content at your own risk. You can also check out Zoom’s current security certifications here.
- This article details setting up a real-time remote editing workflow on MacOS. Can this same setup be done on a PC too? Probably! With the exception of Loopback (which is Mac-only), there’s nothing stopping this workflow from working on a PC. If you have a PC and are able to make this setup work for you, please let me know in the comments – I’d love to hear about it.
- I’ll be covering this workflow primarily in Premiere Pro since it’s my most-used NLE. But you can use this method with Avid (see Appendix A: Avid Media Composer Setup), FCP X, or Resolve, too. Just apply the same input/output concepts to your chosen NLE.
Now, let’s do this!
1. Set Up AJA U-Tap
This little box from AJA is the key to our workflow. As described on the product page:
“U-TAP HDMI offers easy, cost effective and portable solutions for plug and play capture that is compatible with Windows, macOS and Linux operating systems and a broad range of creative applications. From video conferencing, streaming, social media, gaming and more, U-TAP HDMI offers powerful functionality without requiring any third party driver software.”
Pretty cool! So how do we use it?
Note: If you’re using alternative hardware like the Web Presenter or ATEM Mini, install any needed software or firmware as described in your hardware’s manual, and then follow the same directions outlined here, replacing “U-Tap” with your device.
Update the Firmware
First, download the latest firmware and updater application from the AJA website. Open up the Updater Application and then connect the U-Tap to your computer using your USB-B to USB-C cable.
Click the “Scan for U-Taps” button to connect to your device. Once detected, you’ll see the update screen:
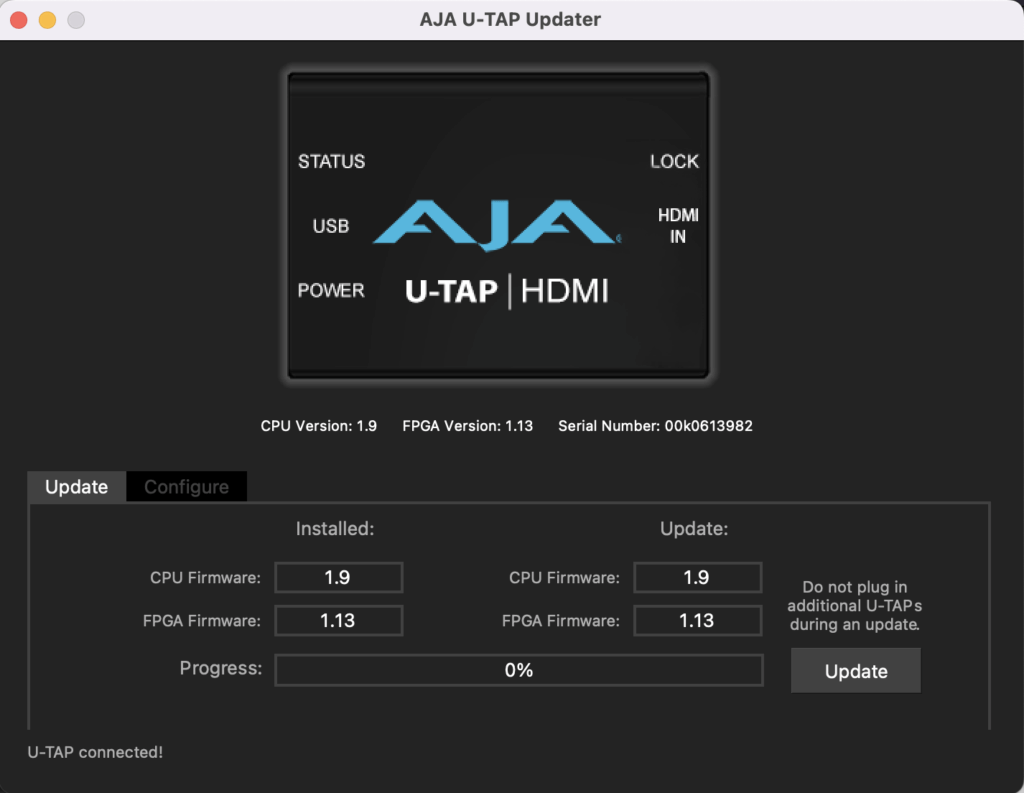
Go ahead and click “update” to update the firmware. Once the firmware update is complete, reboot the U-Tap by unplugging and replugging it into your computer.
Configure Loss of Signal
The U-Tap Updater Application also allows you to configure what to display if you lose video signal during a capture. With your U-Tap connected to the computer and detected by the software, click on the “Configure” tab and choose from the following options:
- Black (default)
- Blue Matte
- 100% Color Bars
Click the “Set” button to save your selection. I keep mine set to black.
Set the U-Tap as a Second Monitor
Via its USB cable, the U-Tap essentially appears to MacOS like any other USB webcam would. But unlike any other webcam, the U-Tap doesn’t have a camera, which means we need to feed it a video source.
That video source will ultimately be our playback from Premiere Pro.
But first things first. Make sure you have the U-Tap plugged into your computer via the USB-B to USB-C cable. Now grab your USB-C to HDMI cable. Plug one end into the HDMI IN port on the U-Tap, and the other end into an available USB-C port on your computer.
You’ll notice that MacOS behaves as if you’ve just plugged in a second monitor (ie – your display will blink for a moment). In a sense, that’s exactly what we’ve done since we’re feeding an HDMI video signal from our computer into the U-Tap.
In fact, if you go ahead and open up System Preferences > Displays, you’ll see that you can set up the U-Tap as you would any second monitor, including choosing whether it mirrors your primary display, works as an extension, or becomes your primary display.
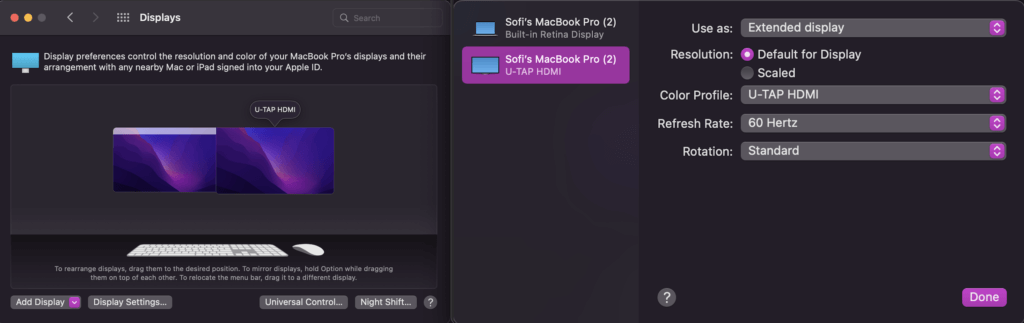
You can see in the above image that I’ve set the U-Tap’s resolution to default, which is 1080p, since that’s the type of footage I’ll be feeding it from Premiere. You can adjust these settings as needed.
I also set it as an extended display so that the U-Tap acts as an extension of my desktop, rather than mirroring my primary screen. Just remember that as a second display, you can actively move your mouse onto the U-Tap’s “desktop,” even if you can’t see it. So if your pointer disappears all of a sudden, that’s where to find it!
Now that we’re successfully feeding a video signal into the U-Tap we can go ahead and open up Premiere to set up our video output.
Premiere Video Output Settings
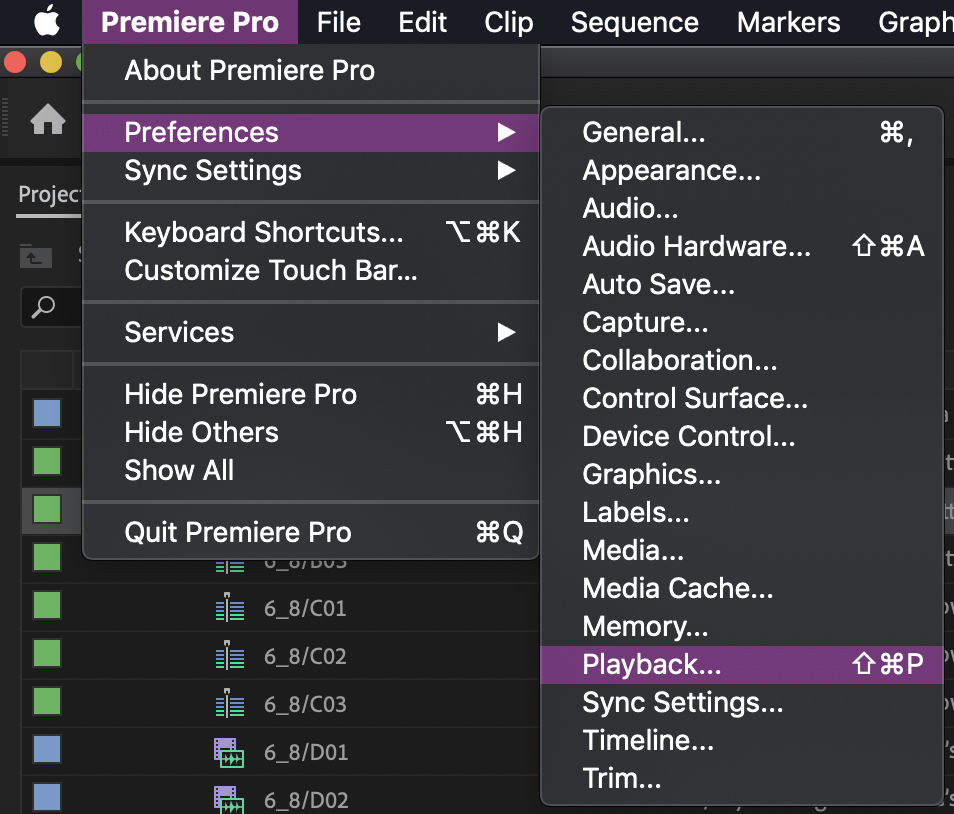
Open up your project in Premiere and head over to Premiere Pro > Preferences > Playback.
In the dialogue box, you’ll likely see a couple of different monitor options to choose from.
Choose the monitor that matches the size you selected in the MacOS display settings box. In my case, it’s “Adobe Monitor 2: 1920×1080.”
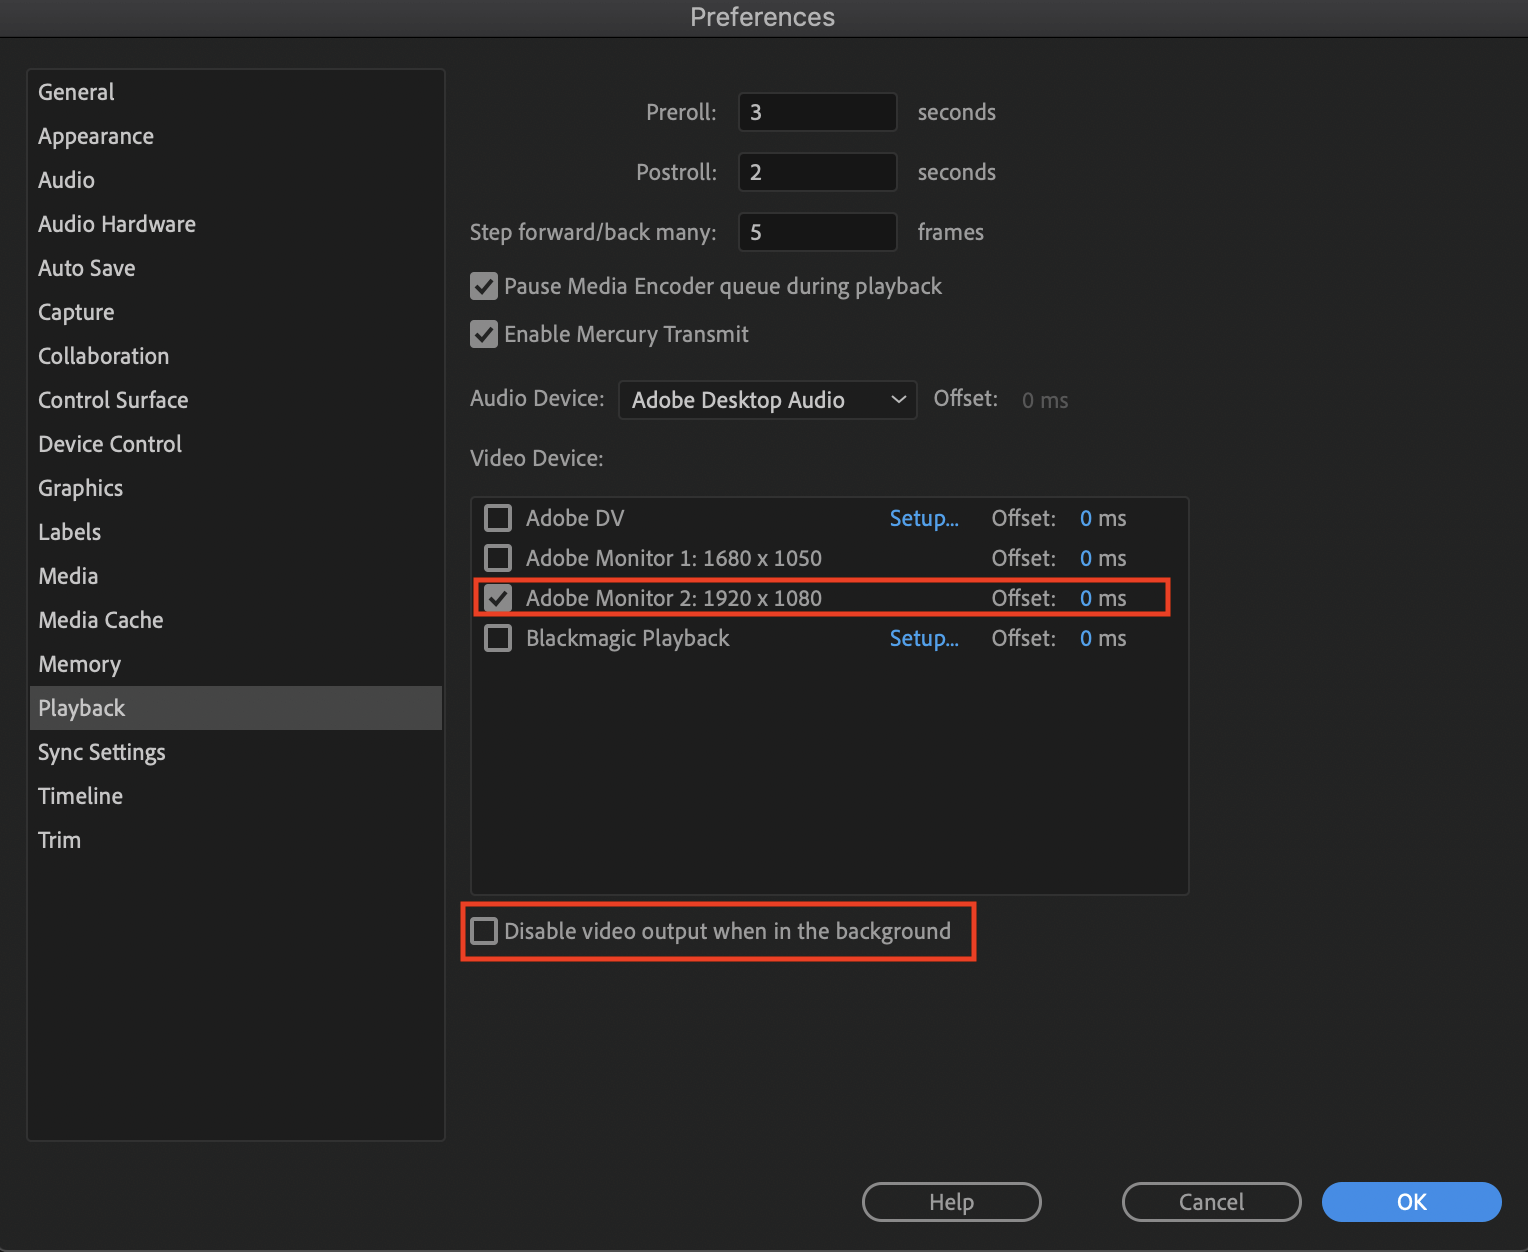
I also like to uncheck the “Disable video output when in the background” option, so that when I’m switching between apps or browsing through the Finder on my computer, my collaborators will continue to see a paused frame from Premiere rather than an extension of my desktop.
When you’re all set, click OK. There’s no monitor on the U-Tap, so we’ll have to open up our conferencing software to confirm that our picture is coming through successfully.
But first…
2. Create Virtual Audio Devices in Loopback
Let’s take a step back and consider the audio component of our workflow.
Our workflow requires two very specific audio setups:
- Audio must feed out of Premiere into both the U-Tap and the editor’s headphones. This setup allows for the editor to hear the working audio from Premiere AND simultaneously feed it into the U-Tap for streaming.
- Audio must feed into Zoom from both the U-Tap and the editor’s microphone. This setup allows both the playback from Premiere AND the editor’s voice to simultaneously stream in the video chat.
Let’s take a look at our audio options in Premiere.
Navigate to Premiere Pro > Preferences > Audio Hardware and click on the Default Output dropdown. It’ll look something like this:
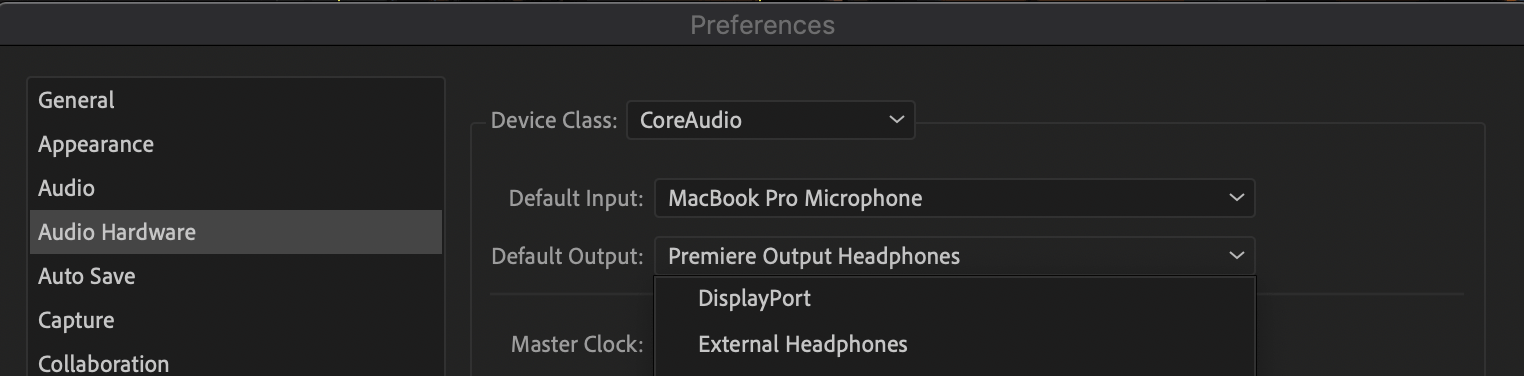
You’ll see that we have output options for External Headphones and DisplayPort, among others.
Tip: Remember that DisplayPort is also our HDMI connection since it’s a combined computer port.
We can choose one or the other, but we need both.
This is where Loopback comes into play – we can easily create two devices that accomplish our above tasks.
First, download and install Loopback as instructed. Once you’ve got it, open up the program.
Tip: You can start with the free trial if you want to test everything out, but the trial version degrades audio quality after 20-minutes of continuous use.
Create Loopback Device #1
Let’s create the virtual device that sends audio out of Premiere into both the U-Tap and our headphones.
In Loopback, click on “+ New Virtual Device” in the lower left hand corner. A new “Loopback Audio” device will pop up.
Name this device “Premiere to U-Tap/Monitor On.”
Now, click the little + sign to the right of “Sources.” Under “Running Applications,” select “Adobe Premiere Pro.”
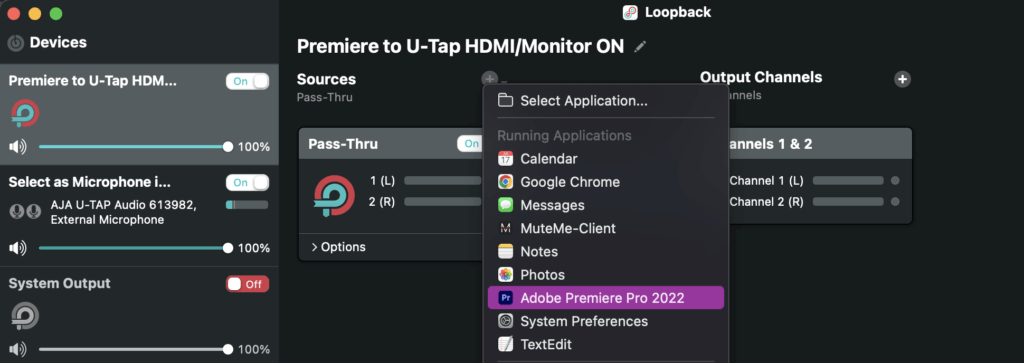
Tip: If you don’t have Premiere running, you can still select it under “Select Application…”
Premiere Pro will now populate a new source box. In that box, twirl open the “Options” and uncheck “Mute when capturing.”
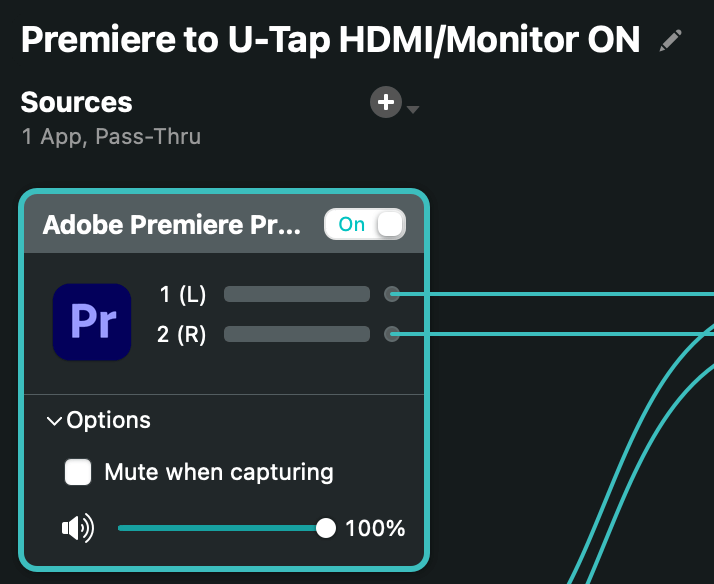
Unchecking this option will make sure we can still hear audio playback from Premiere in our headphones when it’s running through our virtual device.
Now, we just need to feed the audio from Premiere into the U-Tap.
Click the + sign to the right of “Monitors.” Under “Audio Devices” select “U-TAP HDMI,” which represents the HDMI output that’s feeding into the U-TAP from our computer.
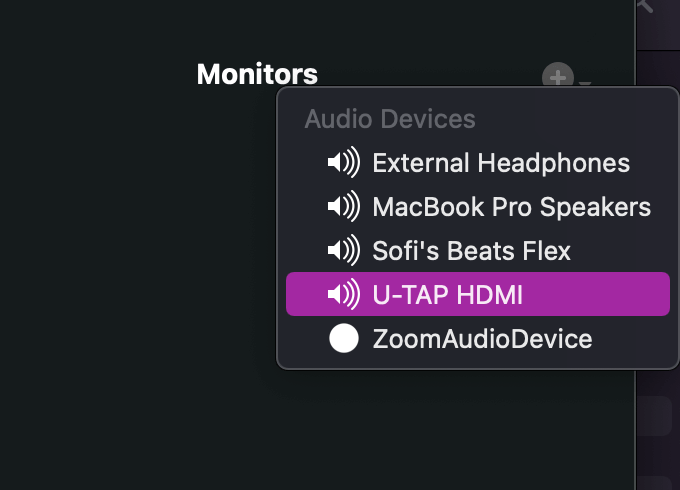
Tip: If you don’t see the “Monitors” area, click “Show Monitors” in lower right hand corner of the app.
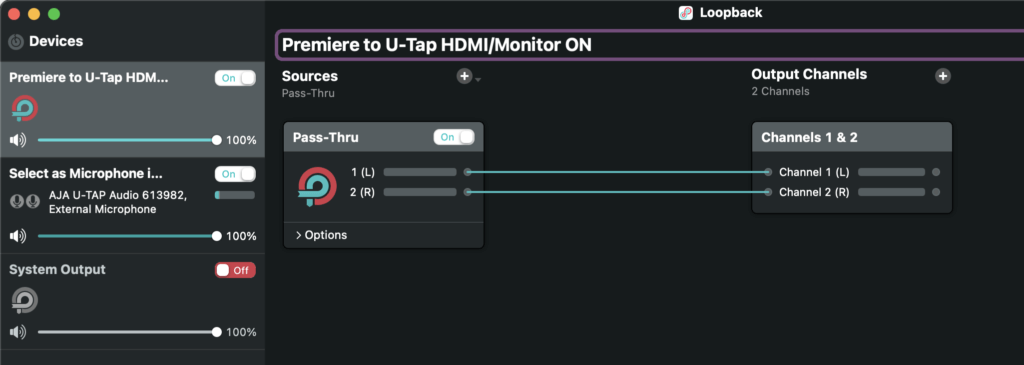
Your final setup for this device should look like this:
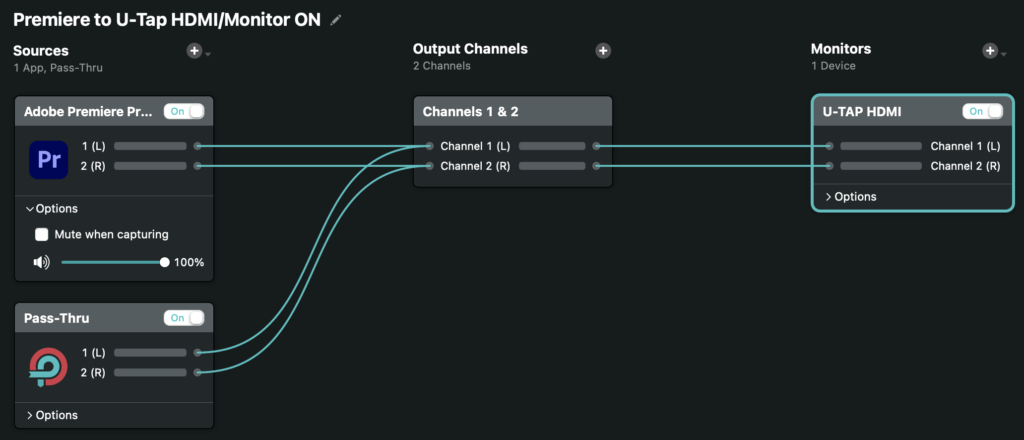
We’ve just created a virtual device that feeds audio from Premiere right into the U-Tap via our computer’s HDMI port. Great!
Enjoying this article? Subscribe for more exclusive content!
Create Loopback Device #2
Now let’s create the virtual device that combines our headset microphone with the audio from the U-Tap, allowing us to stream audio from Premiere while simultaneously chatting with collaborators.
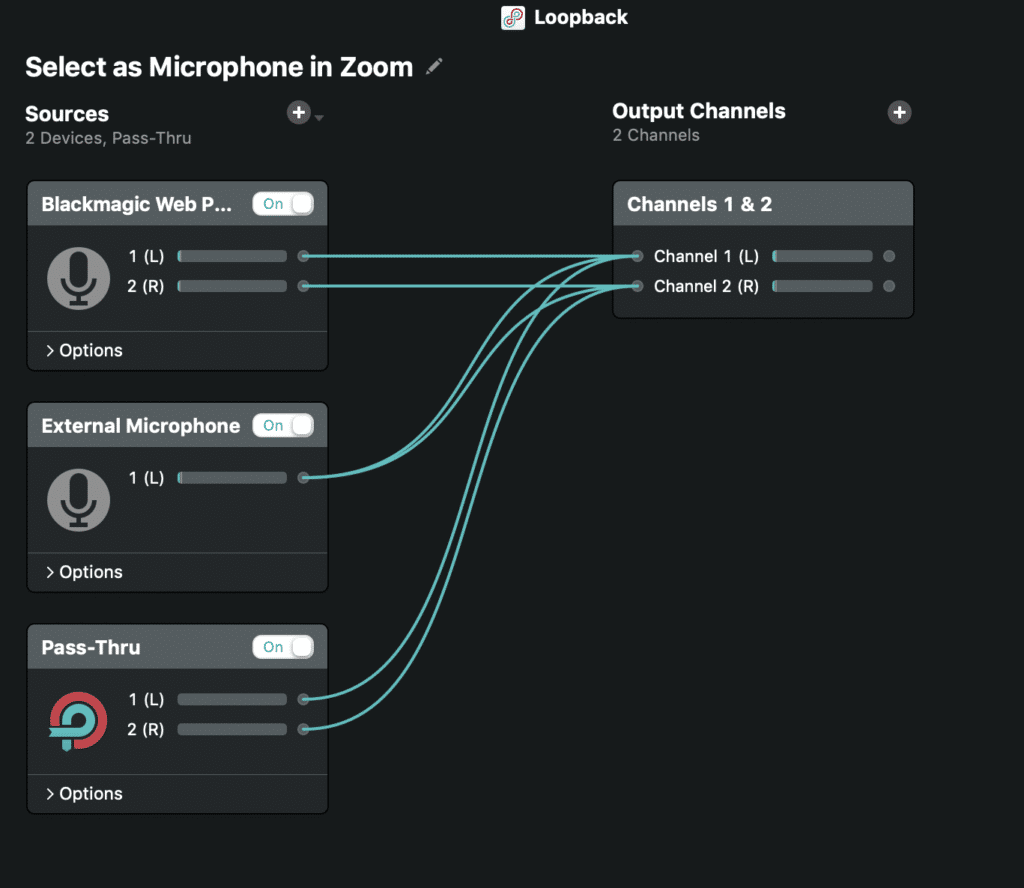
Click again on “+ New Virtual Device” in the lower left hand corner. Name the new device “Select as Microphone in Zoom.”
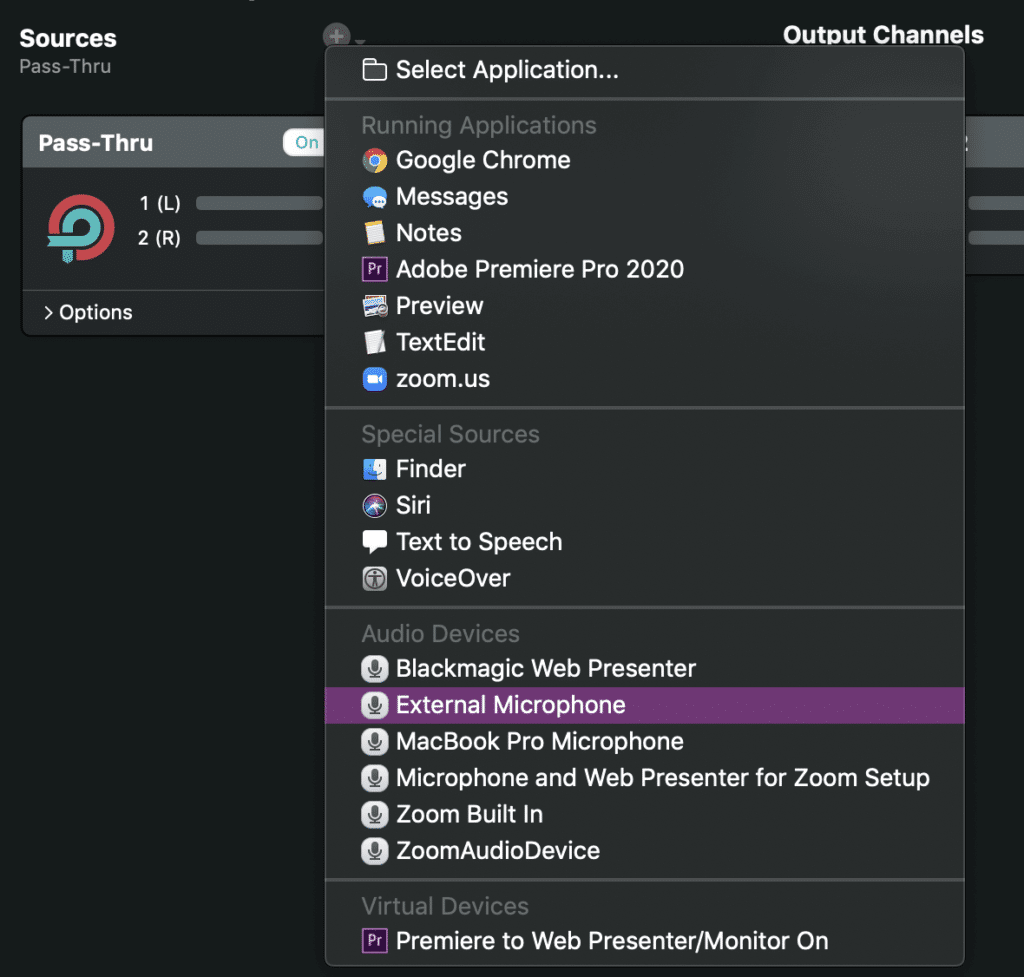
Make sure your headset is plugged into the computer and then click the + sign to the right of “Sources.” Choose “External Microphone” as the source. You’ll see it populate a source box.
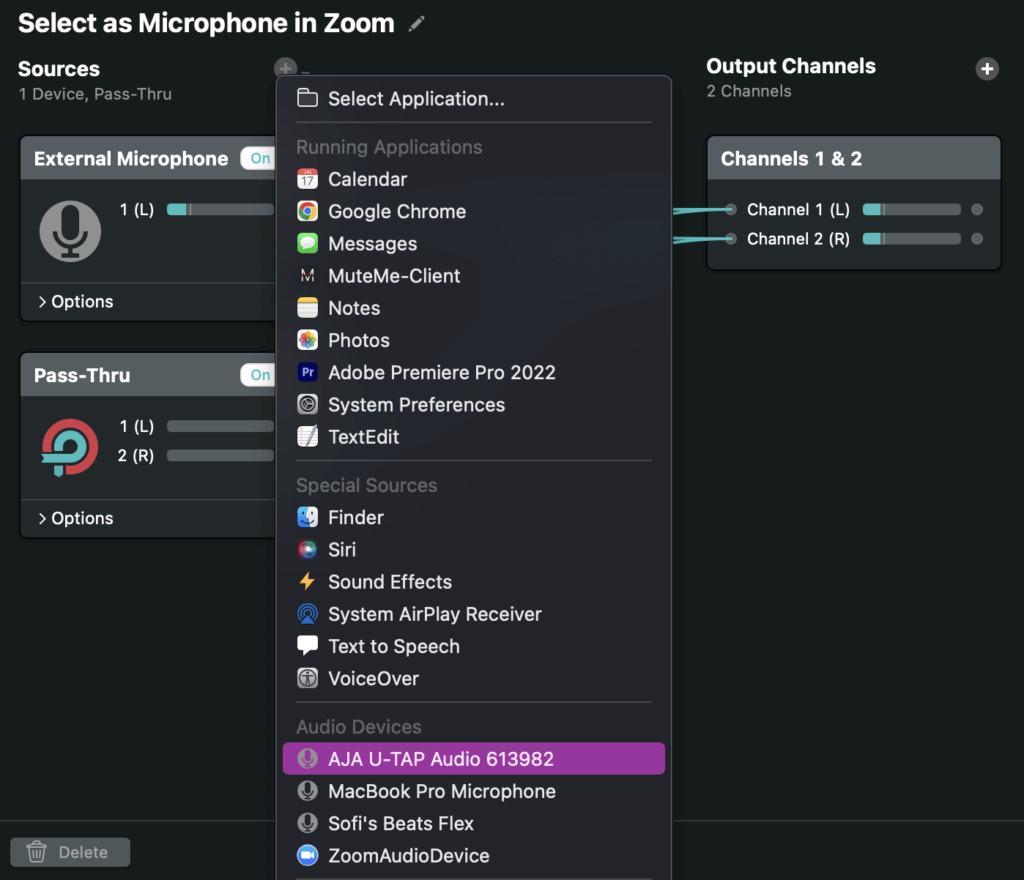
Now we’re simply going to add one more source to the device – the U-Tap.
Go ahead and click the + sign again, this time choosing “AJA U-Tap” as the source. You’ll see a second source box populate with the U-Tap.
We don’t need to add a monitor to this device since we’ll be using it directly as our microphone input in our Zoom meeting.
Your final setup for this device should look like this:
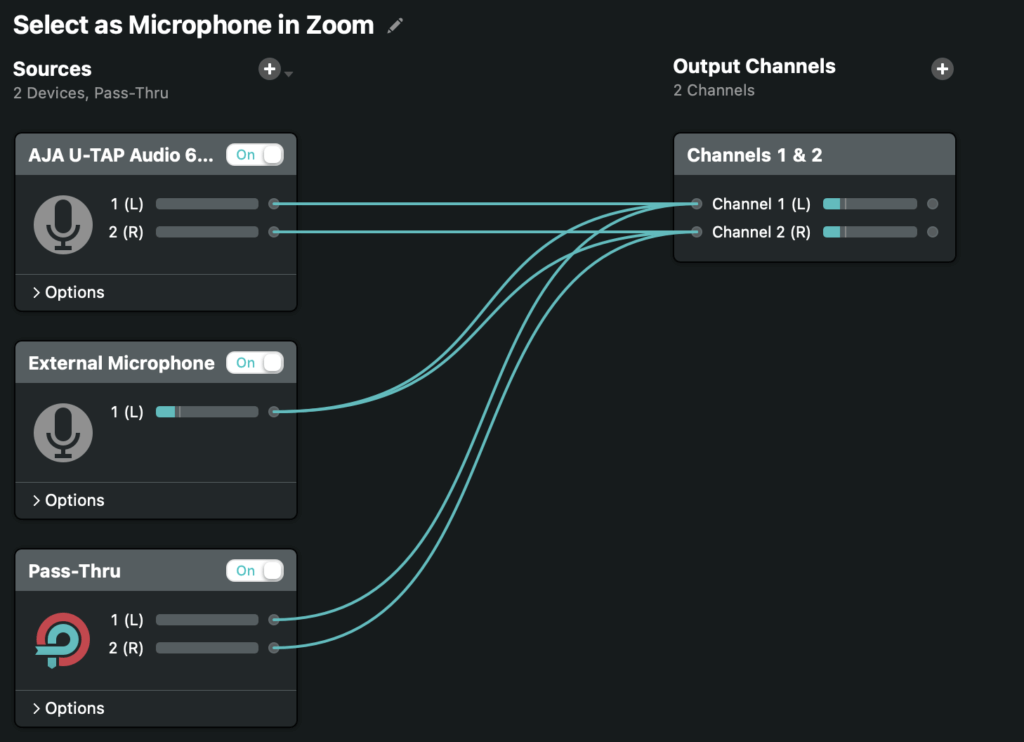
Go ahead and speak in your headset mic, and you should see the audio meters bouncing in the “External Microphone” Source box.
Tip: The teal lines running from the “Source” boxes on the left to the “Output Channels” box in the middle represent channel mapping. For example, if you look at the “External Microphone” source box in the image above, you’ll see that it’s a mono audio signal, but the teal lines show it’s being mapped to both stereo channels for output. That’s great! It means our collaborators will hear our voice in both ears. You can alter channel mapping by clicking and dragging new teal lines, or clicking existing lines and deleting them via the trash can icon towards the bottom of the app.
That’s it! We’re done setting up virtual devices and have fulfilled both of the audio requirements we outlined at the top of this section:
- Audio must feed out of Premiere into both the U-Tap and the editor’s headphones.
- Audio must feed into Zoom from both the U-Tap and the editor’s microphone.
Now let’s move onto Zoom!
3. Zoom Settings
All we need to do now is select the appropriate audio and video sources in Zoom and then we’re ready to invite collaborators into our remote editing session.
Start a new meeting, and then locate the microphone and camera icons in the bottom left of the window.
This is where we’ll select our sources. First, click the up arrow next to the microphone icon. Under “Select a Microphone” you should see your Loopback device called “Select as Microphone in Zoom” – select it

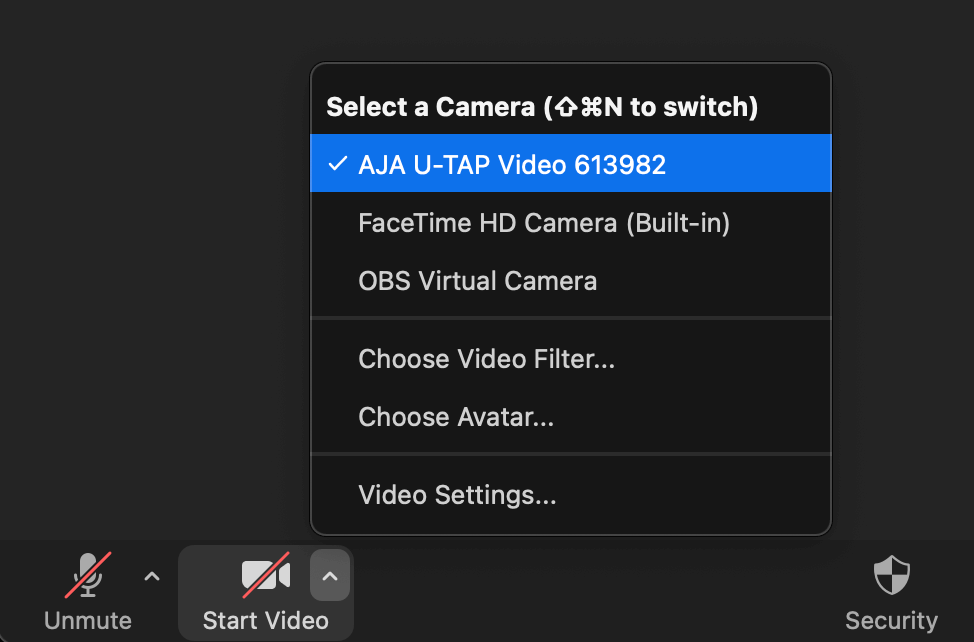
Next, click the up arrow next to the video camera icon. Here you’ll select the AJA U-Tap:
Now you’re ready to unmute the audio (click the microphone icon to unmute) and enable the video (click the video camera icon to enable).
You should now see whatever frame the playhead is parked on in Premiere as your Zoom video source!

Pretty cool, right?
Let’s run a quick little test to make sure both the audio and video are playing back correctly.
First, simply speak into your headset mic and you should see the green audio meters jump up in the microphone icon.
Now, hop back over to Premiere, load up a clip that’s a minute or longer and hit play.
Click back over to Zoom without stopping playback (either by using alt+tab to switch applications, or just by clicking the Zoom icon in the MacOS dock) and you should see your video from Premiere playing back in Zoom.
Success!
Audio Settings in Zoom
There are just a couple more settings to go over in Zoom to make sure you have the best experience possible.
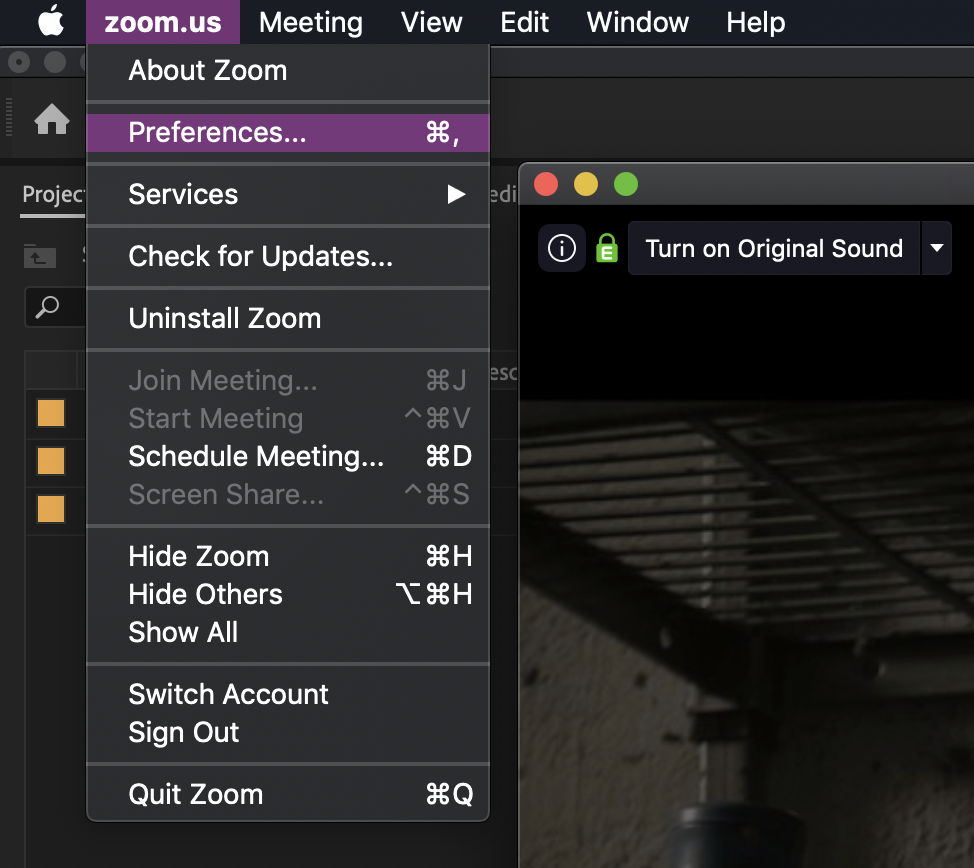
First, navigate to zoom.us > Preferences > Audio tab
Tip: You can set your audio inputs and outputs in this tab in addition to setting them directly in the meeting screen as we did earlier.
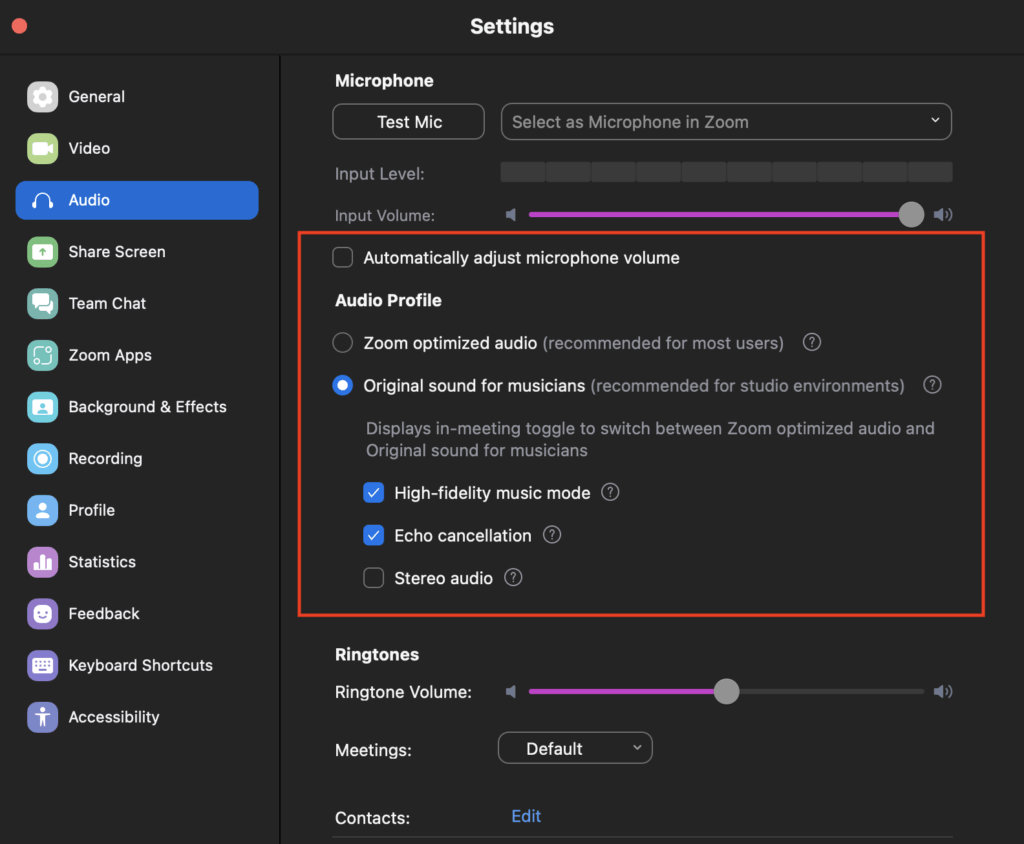
There are a few important settings here are:
- Automatically adjust microphone volume. I always work with this option disabled because it tends to distort loud sounds and the films I cut generally have a lot of added sound effects that are meant to be loud.
- Original sound for musicians. I always work with this setting enabled because allows you to preserve the sound directly from your microphone without using Zoom’s audio-enhancing features at all. Remember, our “microphone” includes our audio playback from Premiere, so this setting is especially useful if you find that your Premiere audio is coming through distorted. Once you enable this setting, you’ll have the follow options as well:
- High fidelity music mode. This option optimizes the stream for high quality music playback – very useful once you’ve got music/score tracks cut into your edit.
- Echo cancellation. Experiment with this one and see if you need it.
- Stereo Audio. If you enable stereo, you’ll be able to properly hear all panned audio and sound effects from your Premiere timeline. Just note that enabling stereo greatly increases CPU usage on both ends of the meeting. If you’re experiencing sluggish performance, or if stereo sound isn’t particularly important to you, try turning it off.
Just remember that you have to manually turn on “Original sound for musicians” at the start of each Zoom meeting. As long as this audio profile is enabled in Zoom’s settings, you’ll see the option to turn it on or off in the top left corner of your Zoom meeting.

Tip: If it seems like your NLE playback audio isn’t coming through into Zoom, make sure “Original sound for musicians” is enabled. Depending on your edit, Zoom may be noise cancelling most, if not all, of your intended audio.
Video Settings in Zoom
Now that we’re done setting up audio, let’s go over a couple of video settings to keep in mind.
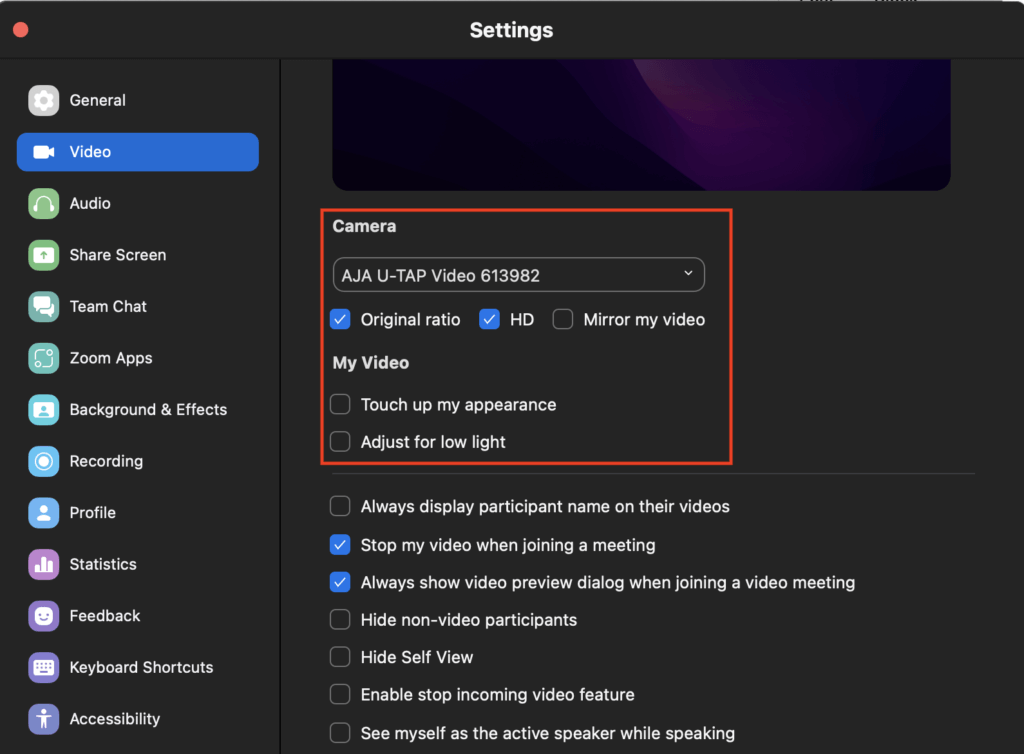
Navigate to zoom.us > Preferences > Video tab
Tip: You can set your video source in this tab in addition to setting it directly in the meeting screen as we did earlier.
The important settings to select here:
- Original ratio. This will preserve the original aspect ratio coming through your webcam feed – in our case, the U-Tap is 1080p and 16×9.
- Enable HD. This enables HD video streaming, but only if specific requirements are met.
- Touch up my appearance and Adjust for low light. Make sure to uncheck these options so Zoom doesn’t alter the appearance of your video feed.
Now go ahead and invite your collaborators to start your remote editing session!
Tips for Success
Now that you understand the different components of this real-time remote editing workflow, here are a few tips to keep in mind if you choose to use it:
- In any Zoom meeting, you can click the MacOS minimize button on the top left corner (yellow circle), and Zoom will shrink down to a small window that stays on top of any other active apps running. This can be really useful if you want to see your collaborators while you’re working in Premiere.

Tip: You may notice a small lag (mine is less than 500ms) between the playback streaming via Zoom and the playback in Premiere’s viewer. This is normal and does not affect picture sync on the other end. - You can change your video and audio sources at any time in Zoom, so if you want the director to see you while you chat for a few minutes, just go ahead and set the camera source back to your usual web camera. You can also use the keyboard shortcut shift+apple+n.
- The free version of Zoom is limited to 40-minute meetings. You can always restart your meeting, but if that gets tedious, you can choose to upgrade to a paid plan.
- If you’d prefer to stream your entire computer screen so that collaborators can see the Premiere interface, simply set up the U-Tap to mirror your desktop (under System Preferences > Displays) and skip the step in Premiere where you set your Video Playback to a second monitor.
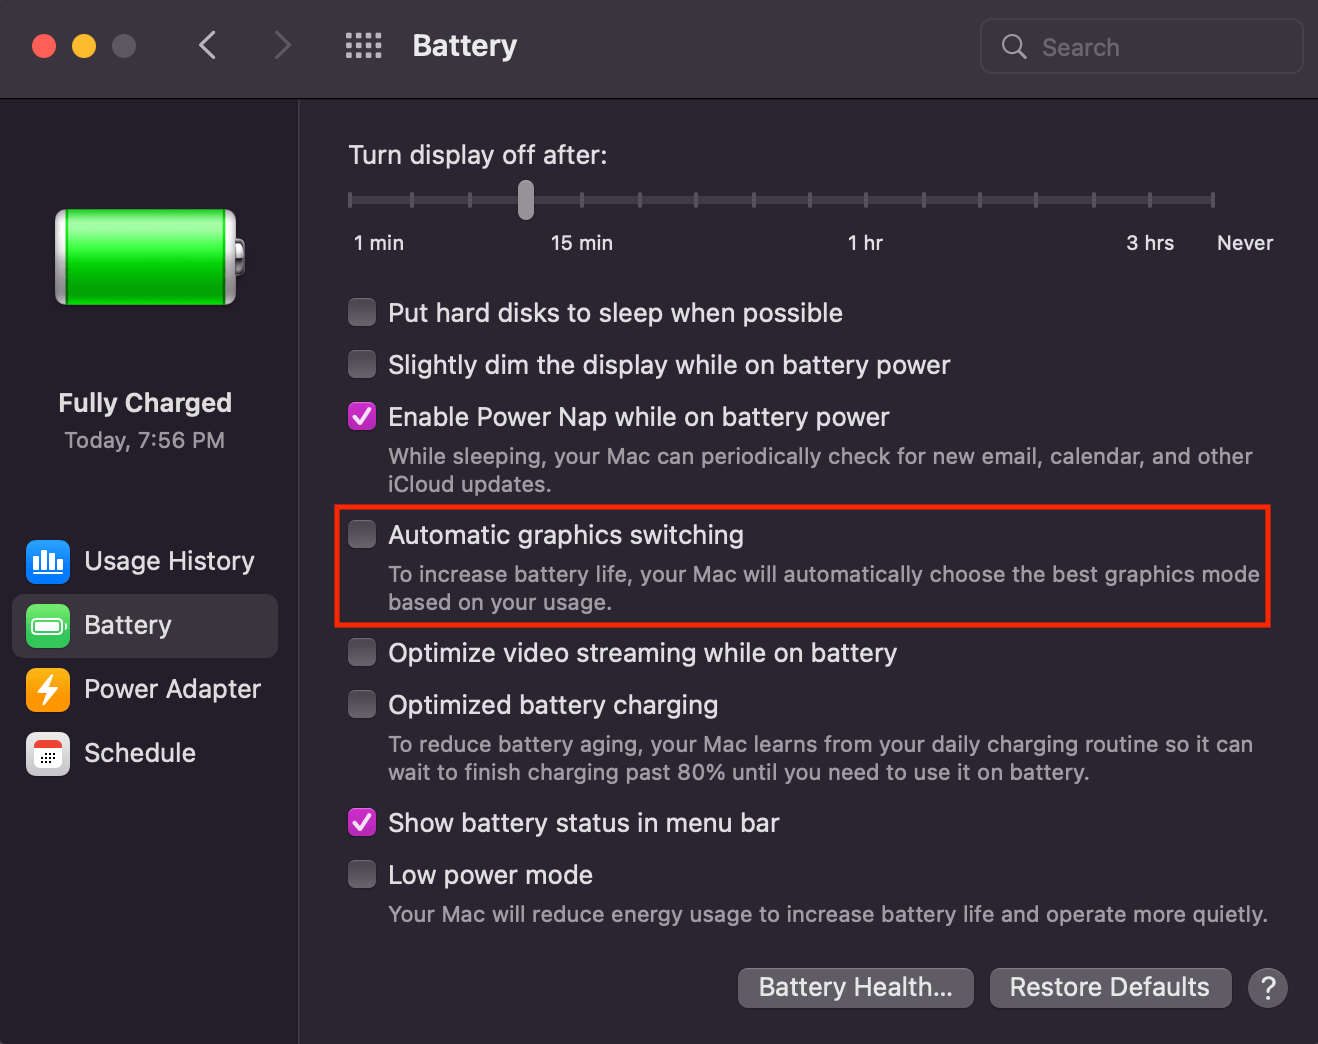
- I recommend heading to System Preferences > Battery and switching off “Automatic graphics switching.” That will make sure you’re always using the high performance graphics card.
Completing a Remote Workflow
Let’s talk about a few other tools we can use to really make this workflow sing.
- MuteMe Button: This mute button is the icing on the cake for me! Using the MuteMe software, you can set the button to mute just your headset microphone. That way, anytime you’re playing back your edit for your collaborators, you can quickly and easily mute yourself to remove any background noise (or to take a sip of your coffee/bite of your snack). The button flashes red when you’re muted and is green when you’re unmuted, which really cuts back on (but sadly doesn’t eliminate) the amount of times you finish talking only to realize nobody could hear you.
- Frame.io: I love Frame.io for written feedback. I use their integrated Premiere panel to add notes to my cuts as markers right in the timeline, which then translate to timecode stamped comments when I upload to Frame.io. Collaborators can respond directly to my comments or add new comments, which I can then import back into Premiere. I also find their auto-versioning feature very handy.
- Dropbox: If you’re working on a remote project and are periodically sharing project files back and forth, storing your regularly updated media on Dropbox makes life a lot easier. I use Dropbox for shared media that’s constantly updating like music, sound FX, and VFX.
- Open Broadcaster Software (OBS): OBS is powerful open source software for video recording and streaming. OBS allows you to combine multiple video and audio sources for live streams on supported platforms like Twitch, Youtube Live, and Vimeo. You can also use their virtual camera feature to create a video feed for conferencing software like Zoom. If you’re looking for ways to add live switching, color correction, or add video or audio effects to your stream, take a look at the software-only version of this workflow where I detail how to stream from OBS.
- NewTek’s NDI Tools: NDI Tools allow you to virtually route video streams to different software, including OBS and conferencing software like Zoom, without needing any external hardware. NDI Tools come pre-bundled with Avid or you can download them for CreativeCloud from their website. Check out the software-only version of this workflow to learn how to set up NDI.
For more ideas on full-fledged remote workflows, including how to manage dailies creation and delivery, check out 3 Ways to Set up a Remote Dailies Workflow.
Are there apps that will do this for me?
Sort of…
- Evercast, Pac Post Live, and Louper.io are just some of the software-only solutions for real time editing that have sprung up since I originally published this article. While performance isn’t quite as reliable as a hardware based set up, they all work reasonably well and may be a good fit for you, depending on your needs. One clear benefit these services offer is the capacity for and more control over higher resolution streams. You can also add your own hardware to most of these set ups to improve performance, but if you’re already going to buy the hardware, why pay for a subscription as well? The cost of these services varies, with Louper as low as $39/mo for their most basic service and Pac Post Live charging upwards of $600/mo. Despite differences in price, most of these options offer a very similar experience, and require a decent amount of set up since most are built on white-labeled versions of OBS used in conjunction with NDI.
- ClearView Flex is a hardware-based real-time collaboration solution similar to the one outlined in this article. Check out my full review here. It offers top-notch streaming quality and is easy to use, but it falls short when it comes to collaboration. It’s expensive at around $300/wk, but an ideal choice if your primary focus is remote color grading.
For now, I prefer either the real-time remote editing workflow I’ve outlined here, or the newer software-only version of this workflow.
Let me know in the comments below if you’re planning to give this workflow a shot!
Appendix A: Avid Media Composer Set Up with Web Presenter
Note: This Avid setup references the older Blackmagic Web Presenter model with an HDMI input.
In Avid, video and audio routing work a bit differently than in Premiere. Since we can’t choose audio and video output devices separately we can use either an I/O device or Full Screen Playback to route our Avid playback to the Web Presenter.
Output from Avid Using an I/O Device
Huge thanks to Carsten Kurpanek for detailing how to set this up in Avid and testing it himself!
A super easy way to get Avid to output to the Web Presenter is via a supported I/O device, like a Blackmagic UltraStudio Mini Monitor (which I’ll use as the example hardware).
Avid will automatically recognize the Mini Monitor as an output device and will route playback to it. Then, simply connect the HDMI output on the Mini Monitor to the HDMI input on the Web Presenter.
Connect the Web Presenter back to the computer via USB and once you select the Web Presenter as your source in Zoom, you’ll see your Avid playback!
Note: Make sure the Mini Monitor’s “Default Video Standard” is set to match the Avid project or you’ll experience a few frames of latency.
Audio Setup in Loopback
Now we’ll use Loopback to create the audio combinations that we need.
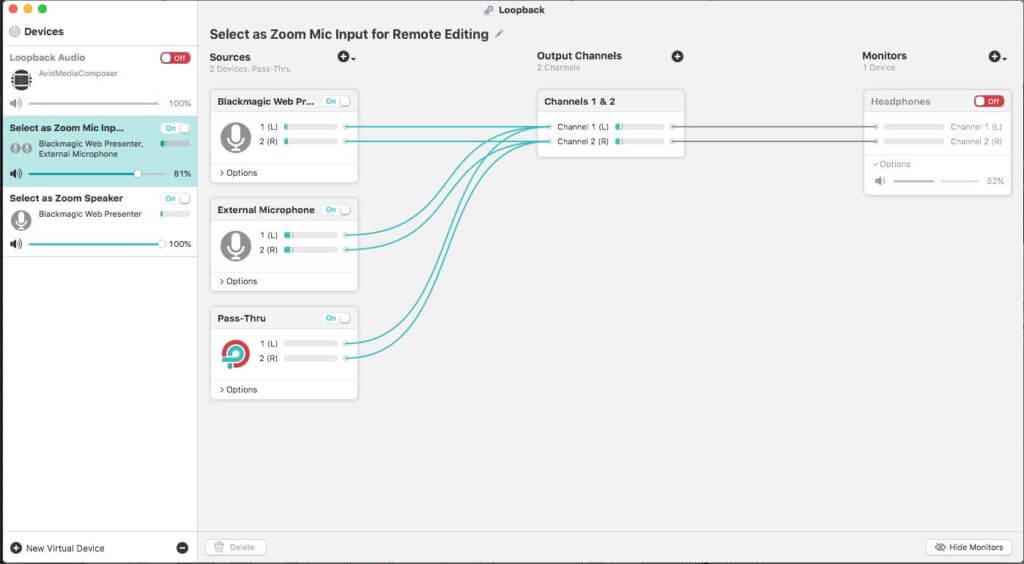
First, we’ll create a device that combines the Web Presenter audio (Avid’s audio output) and our headphone microphone, which we’ll select in Zoom as our microphone input. This device will allow our collaborators to hear both the audio output from Avid and also hear us talking.
In Loopback, click “+New Virtual Device” and add “Blackmagic Web Presenter” and “External Microphone” (your headset mic) as Sources. Name the device “Select as Zoom Mic Input for Remote Editing.” Make sure you have Monitors turned off (or don’t add any to being with).
Now we just need to create one more device that allows us (the editor) to hear the playback from Avid in our headphones.
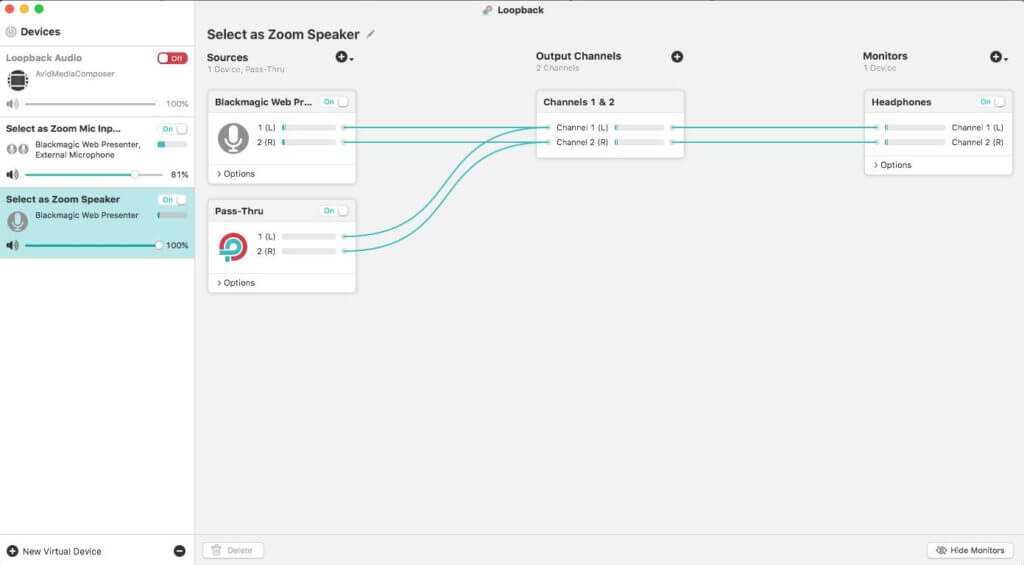
In Loopback, click “+New Virtual Device” and name it “Select as Zoom Speaker” (you’ll select this in Zoom as your speaker output).
Add the “Blackmagic Web Presenter” as a Source and your headphones as a Monitor. This device combines your Zoom collaborator’s audio with the Web Presenter (Avid audio) and routes them both to your headphones.
Output from Avid Using Full Screen Playback
If you don’t have an I/O device, you can simply set up the Web Presenter as a second monitor in Avid via your computer’s HDMI output.
Note: For this method, you’ll need either the Smart Panel or you’ll need to initially hook up the Web Presenter to a monitor (via the HDMI out port on the back) to get set up.
To do this, plug the Web Presenter into your computer via HDMI as well as via USB.
In Avid, navigate to File > Settings > User >Full Screen Playback. The Full Screen Playback dialogue box will open up on the Web Presenter.
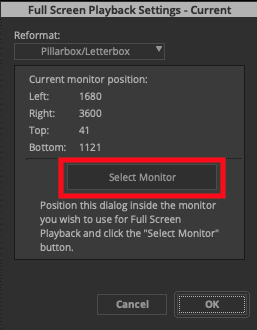
If you have the Smart Panel, the dialogue box will be tiny, but you’ll see it in the middle of the screen. Temporarily hooking up the Web Presenter to a monitor can help with this step, but we really only need to click one button.
Carefully move your mouse over to the Smart Panel screen and select the button in the middle of the dialogue box. You probably can’t see it, but it says “Select Monitor.”
Once you’ve clicked it, either hit OK or enter. Close out of the settings box on your primary monitor.
Now, enable Full Screen Playback by pressing cmd+shift+F on the keyboard. You’ll see your playback pop up on the Web Presenter Smart Panel!
Audio Setup in Loopback
When using Full Screen Playback, follow the steps in the Premiere tutorial for Creating Virtual Audio Devices in Loopback, simply replacing “Premiere Pro” with “Avid Media Composer.”
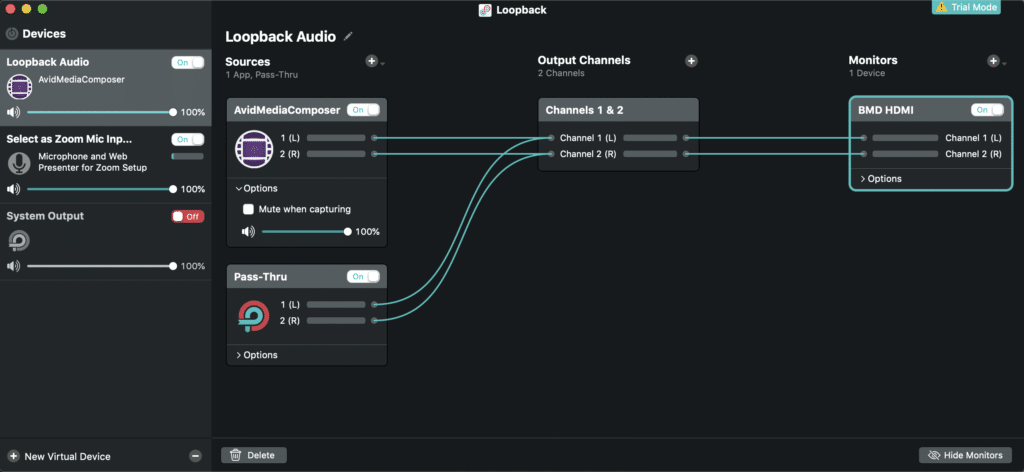
Once you’ve completed those steps, you’ll have created two devices – one that sends audio from Avid into both your headphones and the Web Presenter and another that combines both the audio from the Web Presenter (your Avid playback) and the audio from your headset mic (your voices), so collaborators can hear you speaking in Zoom.
In Loopback, your final devices should look like this:
That’s it!
One of these two methods should get you set up in Avid.
I’ve just tested these steps out myself, but I haven’t sat through hours of real-time remote editing sessions in Avid, so there may be caveats I’m missing. Please report back with any questions/comments/hiccups.


