Three years ago, just as the world plunged into lockdown, I published my article The Ultimate Real-Time Remote Editing Workflow (That Won’t Break the Bank), describing how to stream your timeline over Zoom using hardware like the AJA U-Tap and Blackmagic Web Presenter.
It’s incredible how much the post-production industry has changed since then!
Remote work in particular has come a long, long way, with tons of collaboration options ranging from the hardware-based Clearview Flex to the software-based Evercast, and many more in between.
One thing that hasn’t changed since 2020 is my reluctance to pay a hefty subscription fee for a workflow I can set up myself.
So I’ll let you in on a little secret – the vast majority of these collaboration platforms are built on the same (mostly) free software that anybody can set up.
This article will teach you how to easily stream your timeline for real-time remote editing using just a few simple tools.
Table of Contents
Do I need any hardware?
Nope!
This is a software-only solution, so all you need is your computer (I recommend a MacBook Pro or higher with at least 32GB RAM) and a solid internet connection. With that said, I do recommend two small investments (note that this article contains affiliate links):
- Headphones with Microphone: Any headset will do, though I highly recommend some sort of gaming headset with a built-in mute button that’ll be comfortable to wear for hours at a time. I’ve been loving this lightweight set with a detachable microphone for its comfort and portability.
- MuteMe Button: Just trust me on this one! It may seem unnecessary, but I love this physical mute button. It makes long edit sessions so much easier and gives me a visual cue every time I’m muted.
Is streaming your timeline better than screen sharing?
It’s way better!
Don’t get me wrong, screen sharing has come a long way in the last few years as well, but you’ll get higher quality video, solid audio/video sync, and significantly less lag using this method.
It’s also incredibly customizable once you understand the basics.
So let’s do this!
Note: I’ll be working in MacOS for this tutorial, but will offer tips and ideas for Windows users throughout.
Newtek’s NDI Tools
This workflow is built around Newtek’s NDI Tools. What’s that?
NDI (Network Device Protocol) is a powerful video-over-IP protocol. Rather than using cables or hardware to bring video from point A to point B, NDI sends a high quality, low latency video feed over your local network that can be picked up by a variety of software and hardware.
NDI’s capabilities are pretty wide-ranging so I recommend exploring other fascinating ways to add NDI to your video workflow. (No, this article isn’t sponsored by Newtek.)
So if NDI is so great, why didn’t I use it in my initial real-time remote editing article? At the time, NDI’s plugins for NLEs were very new and didn’t meet my expectations for stability and reliability.
But three years and a few software versions later, and NDI has my enthusiastic stamp of approval!
Install NDI Tools
First things first. Head over to the NDI website and download NDI Tools for Mac (or Windows).
Run the installer package and restart your computer when prompted.
NDI Tools includes everything you need to stream your timeline from Premiere, After Effects, or FCP X.
For Media Composer versions 2018.7 and higher, the Avid NDI plugin automatically installs with the software (unless you manually deselect it), but you’ll still need to install the above NDI Tools to get set up.
NLE video output settings to stream your timline
Premiere Pro
With your project open in Premiere, head over to Premiere Pro > Preferences > Playback.
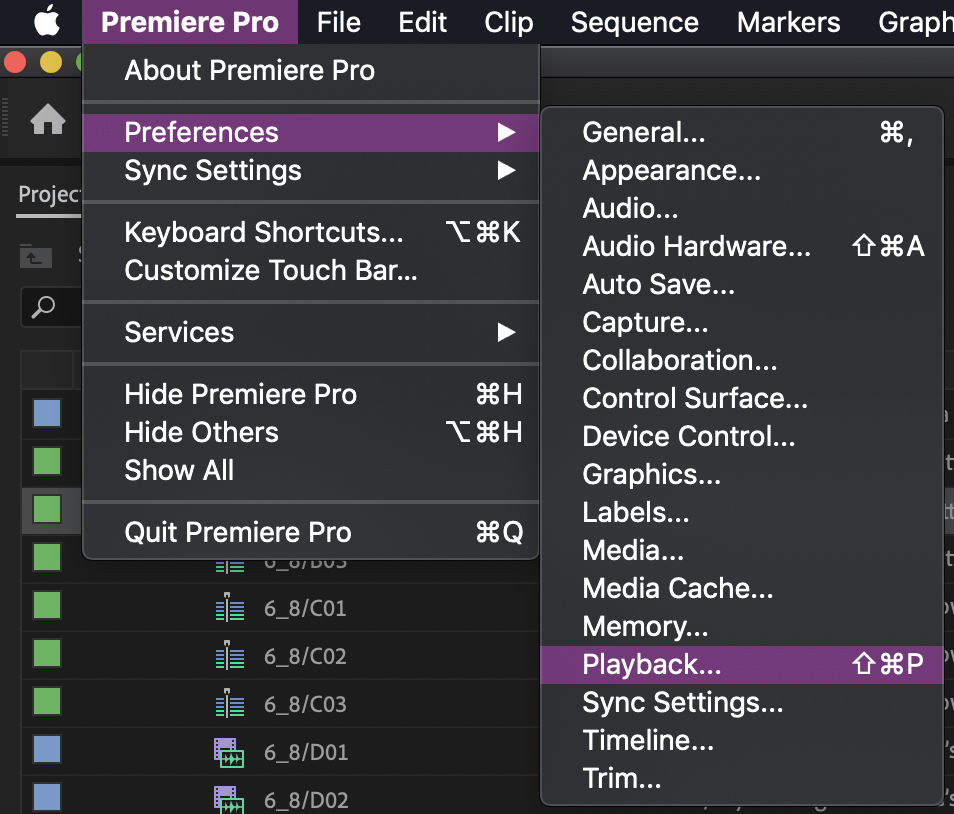
Make sure you have “Enable Mercury Transmit” checked and then check the box for “NDI”.
I also like to uncheck the “Disable video output when in the background” option, so that when I’m switching between apps or browsing through the Finder on my computer, my collaborators will continue to see a paused frame from Premiere.
When you’re all set, click OK.
Tip: If your video playback in Premiere ever freezes while audio continues playing, disable NDI output in Playback preferences and hit ok, and then re-enable it.
FCP X
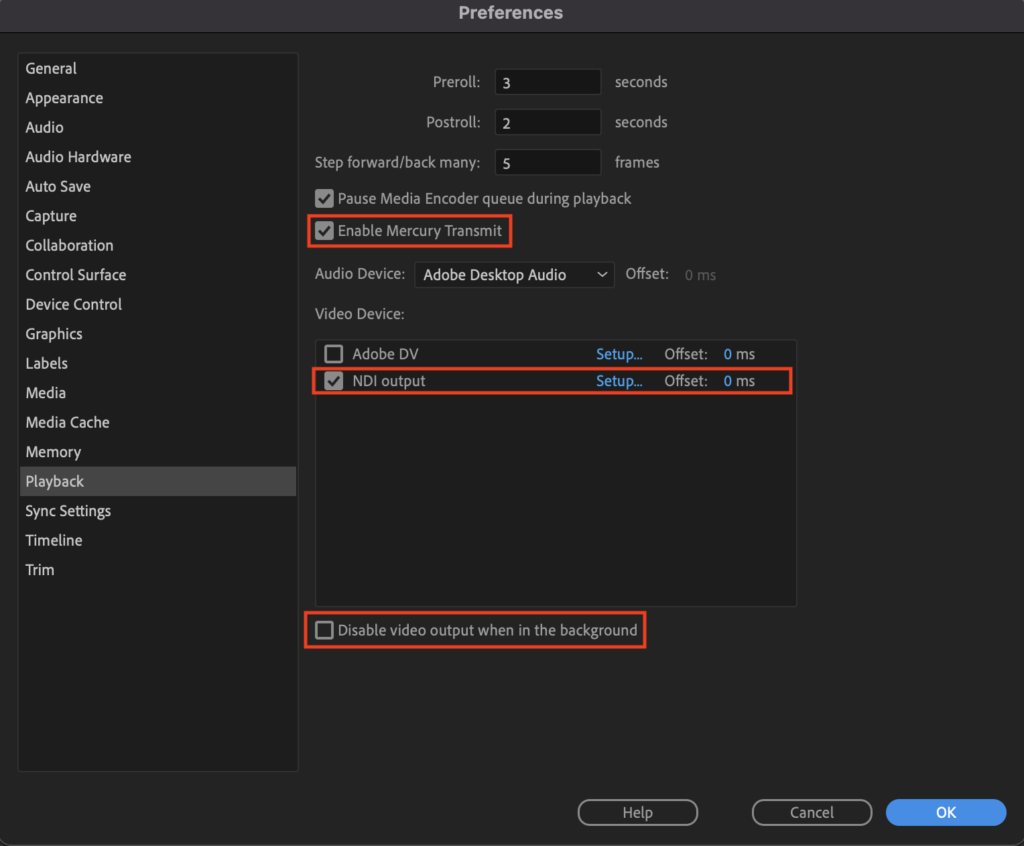
Before opening your project in FCP X, head to MacOS System Preferences and open up the NDI Output tab.
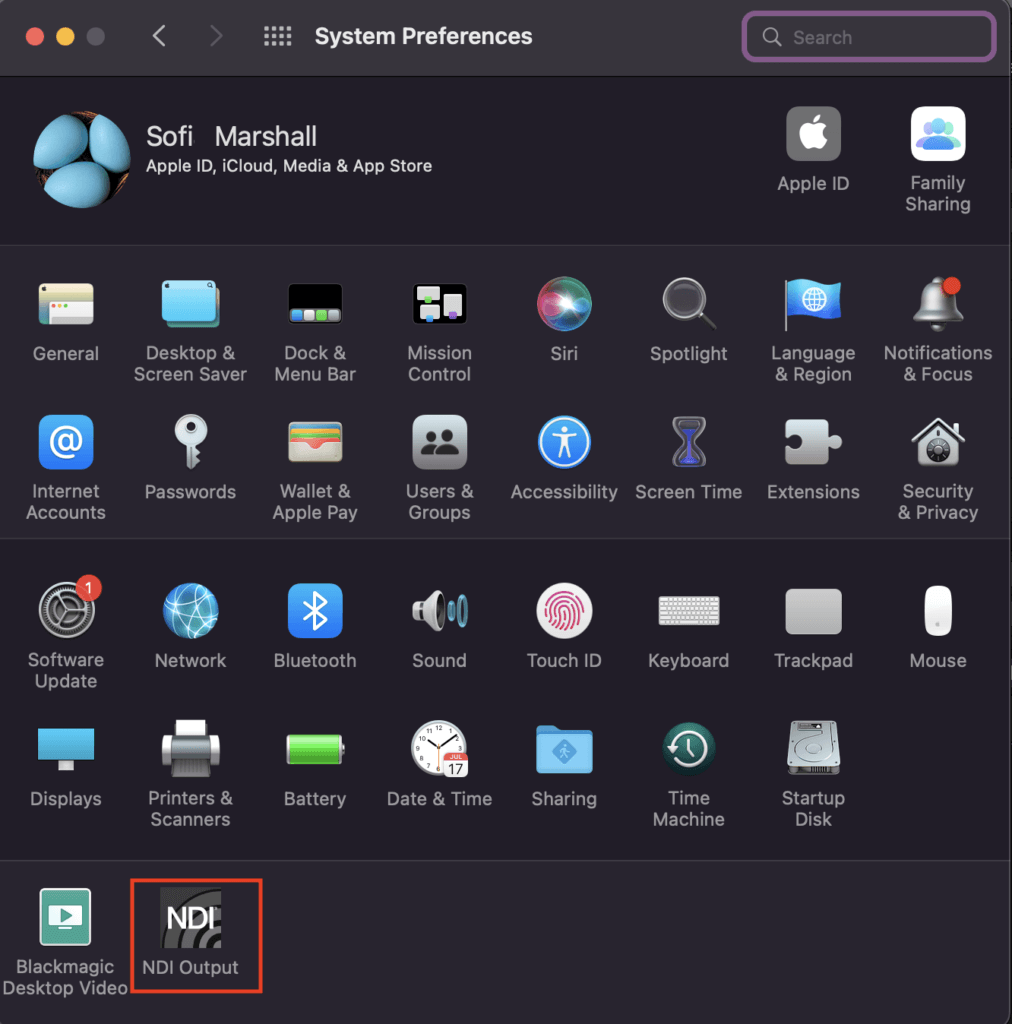
Choose the video format and resolution that matches your FCP X timeline and then hit “Restart NDI.”
Now go ahead and open your project. Navigate to FCP X > Preferences > Playback. Under the “A/V Output” dropdown, select NDI.
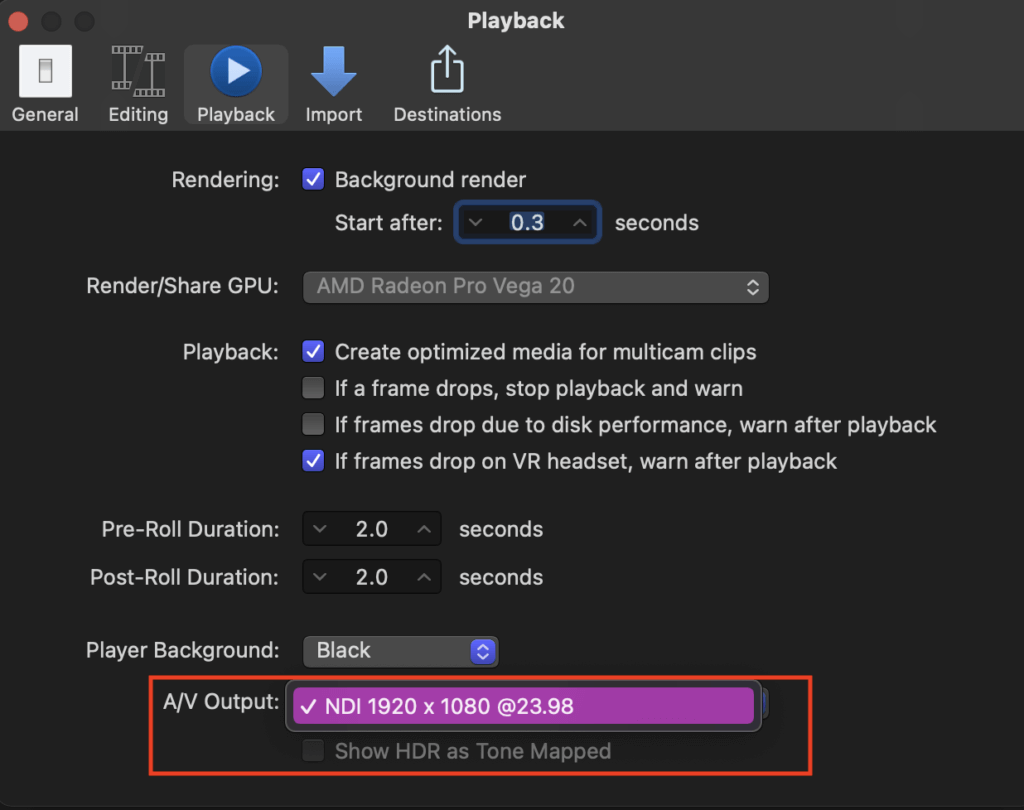
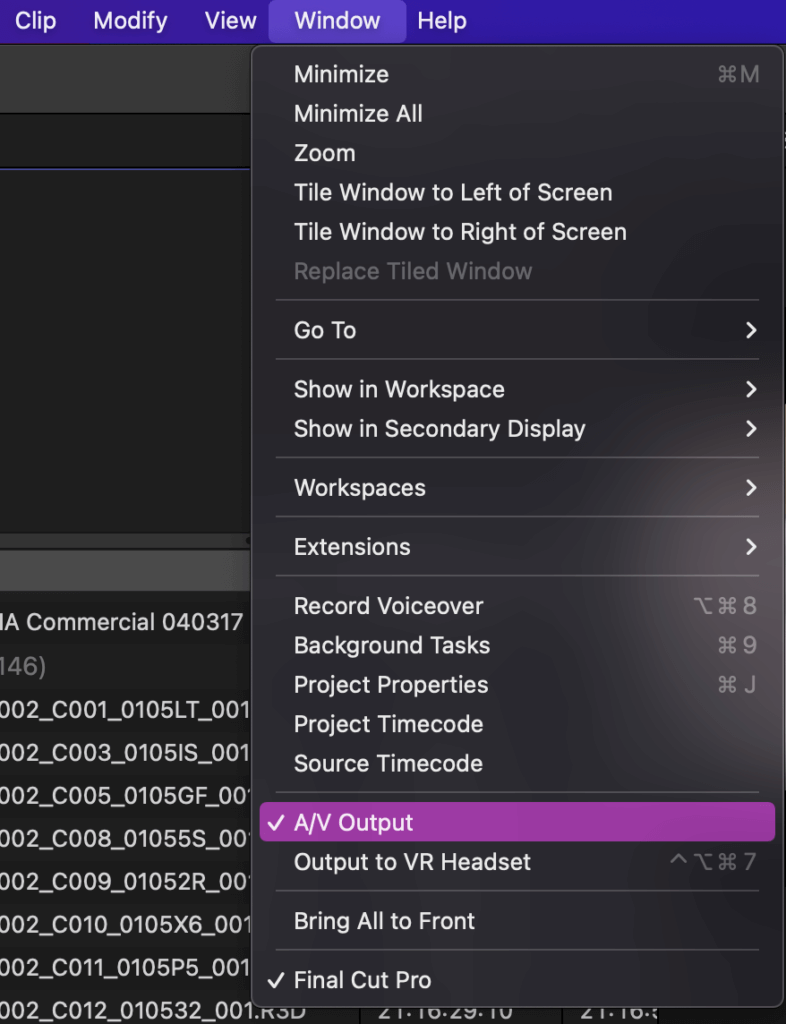
Now, go to the Window menu and make sure “A/V Output” is enabled with a checkmark (note that no actual window will popup when you select it).
Avid Media Composer
With your project open in Avid Media Composer, first locate the HW/SW icon above the timeline, right-click it, and check that “OpenIO_NDI” and “Play local audio when broadcasting” both have a checkmark next to them.
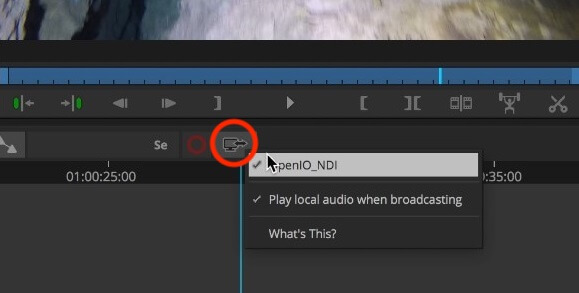
Then simply click the HW/SW button. The arrow will blink red to indicate an active NDI stream.
Enjoying this article? Subscribe for more exclusive content!
Audio setup
There are a handful of different ways to set up our audio routing and each NLE engages with NDI audio slightly differently. To pick the simplest option, let’s first review our goals.
To effectively stream our timeline, we need to:
- Hear local audio playback from the NLE in our headphones
- Stream audio playback from the NLE out to our collaborators
- Stream audio from our microphone out to our collaborators so they can hear us talking
It is actually possible in both Premiere and Avid to feed audio directly from your timeline into an NDI Audio stream.
In Premiere, you would open back up Preferences > Playback and then change the “Primary Audio Device” to “NDI output.”
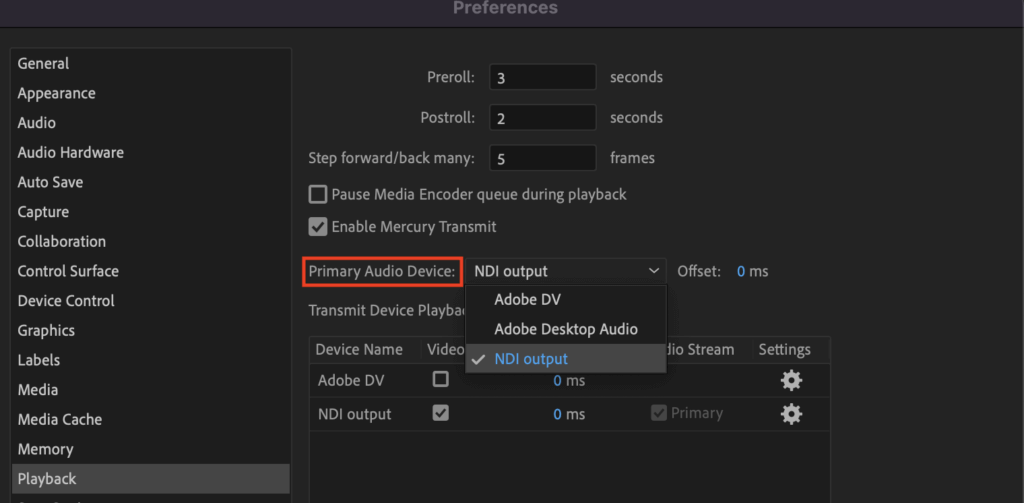
Note: When you make this change in Premiere, you’ll no longer hear the timeline playback in your headphones. One way to restore local audio monitoring is to open up the NDI Video Monitor app (NDI Studio Monitor on Windows) that installs along with NDI Tools and select Adobe Premiere Pro as your source via the NDI menu in the top bar.
FCP X doesn’t currently output NDI audio at all, whereas in Avid, audio is automatically sent out to an NDI Audio stream when you activate the HW/SW button.
Having a direct NDI Audio stream is useful in some circumstances (I’ll talk about those later on), but in our case, only gets us halfway there.
Technically, we could feed the NDI Audio stream right into Zoom, which would successfully bring in our NLE’s audio, but we wouldn’t be able to talk to our collaborators, since the NDI input would take the place of our microphone input.
Luckily, there’s a simple solution.
Create virtual device in Loopback
We’ll use virtual audio routing software to combine our NLE’s playback audio with the audio from our microphone. We’ll then select this combined device in Zoom as our audio input.
First, download and install Loopback (MacOS only) as instructed. Loopback alternatives for Windows include Virtual Audio Cable, VB-Audio, or OBS, which I’ll cover later on.
Tip 1: A Loopback license costs $99. You can start with the free trial if you want to test everything out, but note that the trial version degrades audio quality after 20-minutes of continuous use.
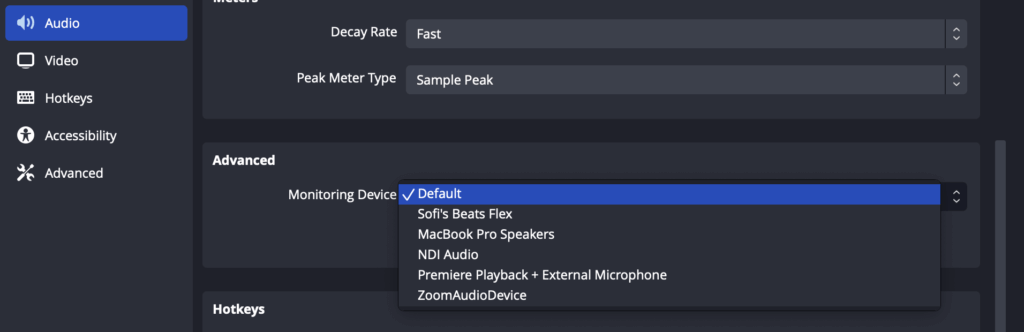
In Loopback, click on “+ New Virtual Device” in the lower left hand corner. A new “Loopback Audio” device will pop up. Name this device something like “Premiere Playback + External Microphone” using your preferred NLE.
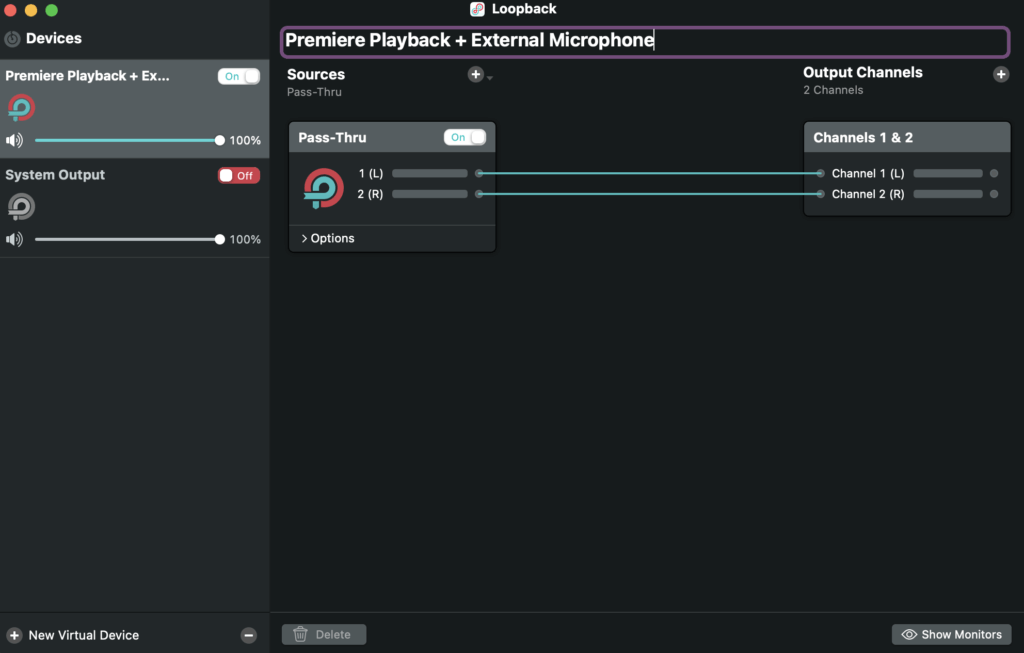
Now, click the little + sign to the right of “Sources.” Under “Running Applications,” select your NLE (“Adobe Premiere Pro 2023” in the example below). You should see a new source box pop up.
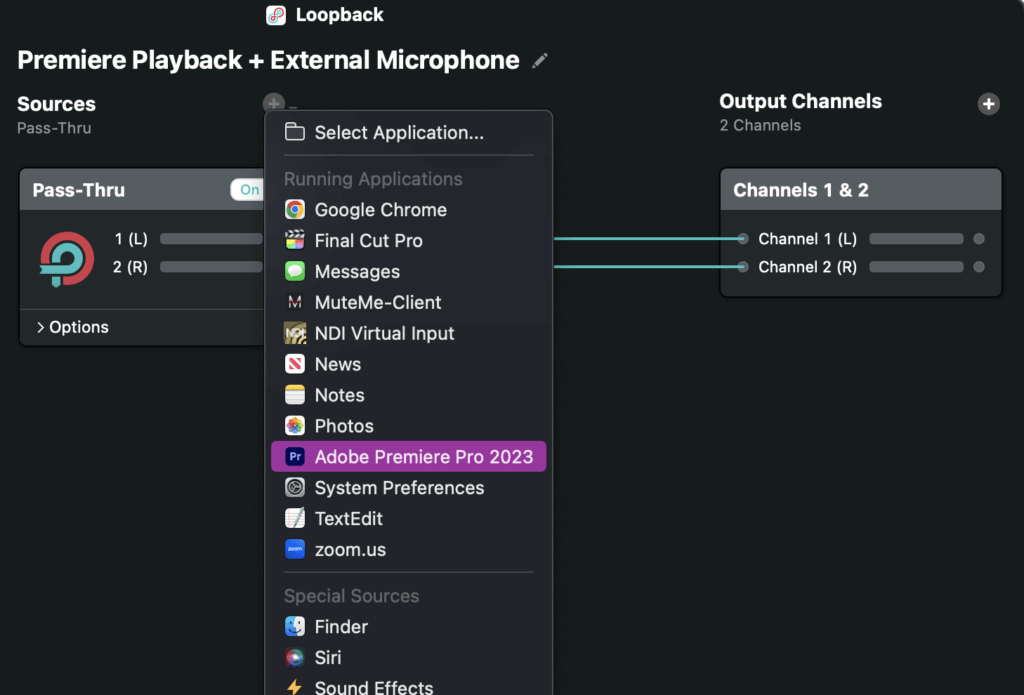
Tip: If you don’t have your NLE running, you can still select it under “Select Application…”
In that box, twirl open the “Options” and uncheck “Mute when capturing.”
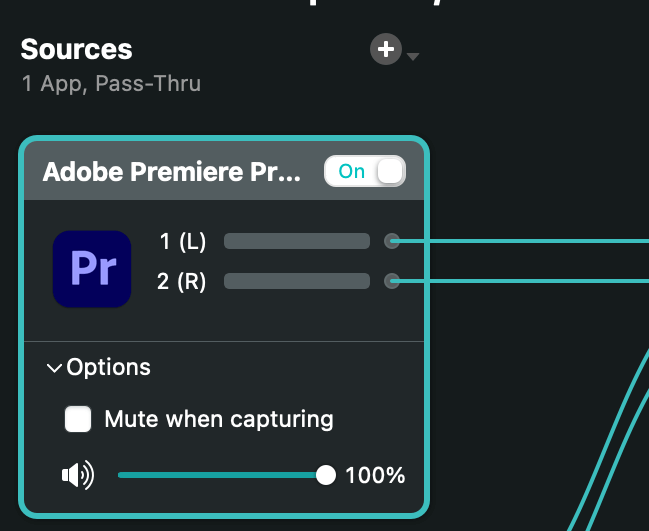
Unchecking this option will make sure we can still hear audio playback from our NLE in our headphones while it’s running through our virtual device.
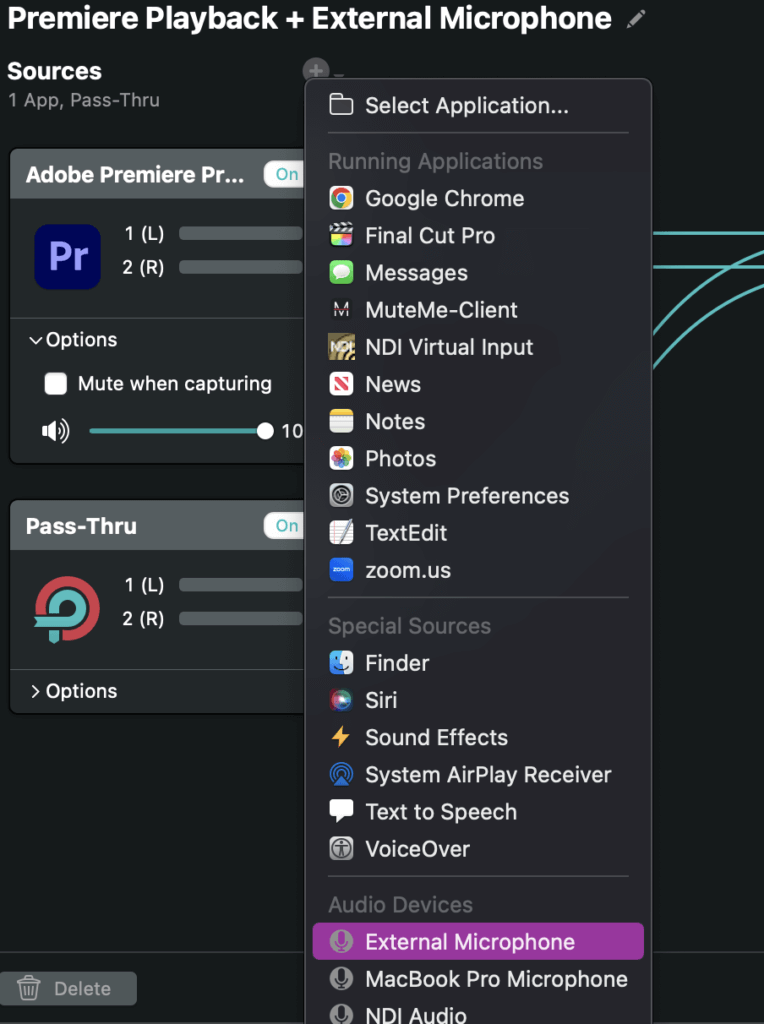
Now, make sure your headset with your microphone is plugged into your computer and then click the + sign to the right of “Sources” one more time. This time, choose “External Microphone” as the source.
Your final setup should look something like this:

Tip: The teal lines running from the “Source” boxes on the left to the “Output Channels” box in the middle represent channel mapping. For example, if you look at the “External Microphone” source box in the image above, you’ll see that it’s a mono audio signal, but the teal lines show it’s being mapped to both stereo channels for output. That’s great! It means our collaborators will hear our voice in both ears. You can alter channel mapping by clicking and dragging new teal lines, or clicking existing lines and deleting them via the trash can icon towards the bottom of the app.
That’s it!
We’ve just created a virtual device that combines the audio playback from our NLE’s timeline with the audio from our external microphone. Once you’ve completed these steps, you can close Loopback – the virtual device you created will remain available even if Loopback isn’t running.
Activate NDI Virtual Input to stream your timeline
Just one last, but very important, step before we can pick up our NDI video stream in Zoom – we need to activate it as a virtual camera.
NDI Virtual Input (NDI Webcam on Windows) is one of the apps that installs with the NDI Tools package. Locate it in your applications folder and open it up.
There’s not much to this app on MacOS. It’s really just a top menu bar.
Navigate to the NDI menu, then select your computer, and then select your NLE as your NDI source. Avid and FCP X may shows up as macOS AV Output.

Keep the app running in the background while you’re streaming, and don’t forget this step each time you want to stream your timeline!
Tip: If you’re ever faced with a blank NDI video screen in Zoom, forgetting to set the NDI Virtual Input is most likely the culprit.
Zoom settings
All we need to do now is select the appropriate audio and video sources in Zoom.
Video settings
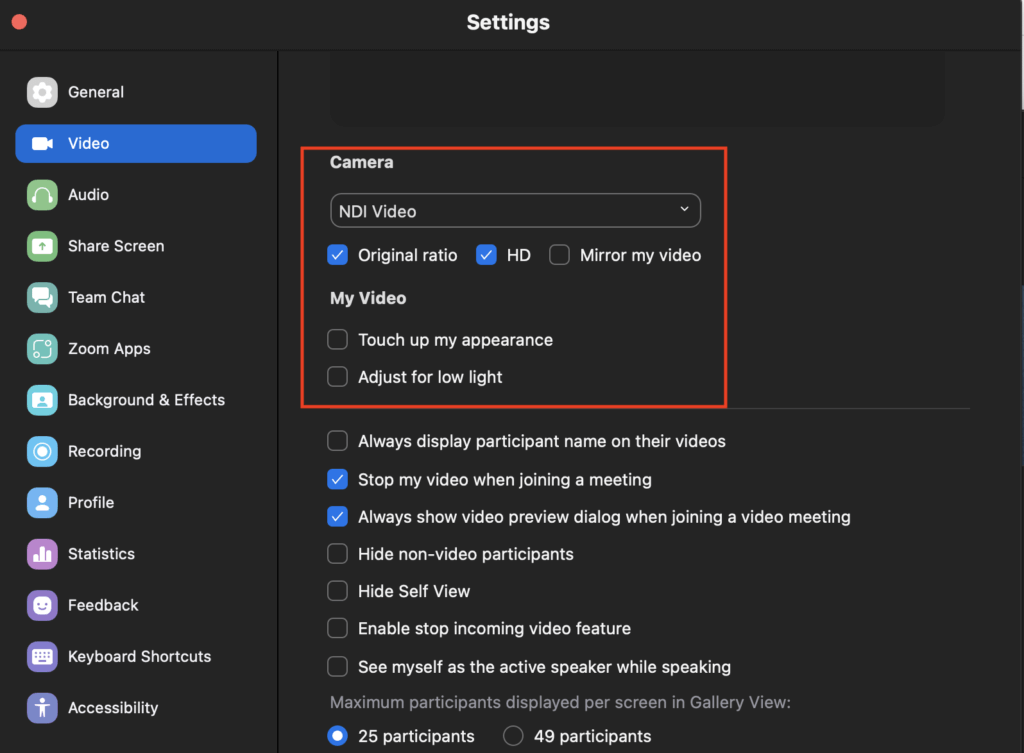
In Zoom, navigate to zoom.us > Preferences > Video tab.
Under “Camera” select “NDI Video.”
You should now see whatever frame the playhead is parked on in your NLE as your Zoom video source!
There are a few other important settings to select here as well:
- Original ratio. This will preserve the original aspect ratio coming from your NLE.
- Enable HD. This enables HD video streaming, but only if specific requirements are met.
- Touch up my appearance and Adjust for low light. Make sure to uncheck these options so Zoom doesn’t alter the appearance of your video feed.
Tip: You can change your video and audio sources at any time in Zoom, so if you want the director to see you instead of your timeline’s playback while you chat for a few minutes, just go ahead and set the camera source back to your usual web camera. You can even use the keyboard shortcut shift+apple+n to switch between cameras.
Audio settings
Now click on the Audio tab in Zoom’s Settings dialogue box.
Under “Microphone” select the virtual audio device you created in Loopback – in this case, it’s “Premiere Playback + External Microphone.”
A few more important settings to note:
- Automatically adjust microphone volume. I work with this option disabled because it tends to distort loud sounds and the films I cut generally have a lot of added sound effects that are meant to be loud.
- Original sound for musicians. I always work with this audio profile enabled. This option allows you to disable Zoom’s audio-enhancing features, including noise suppression. Remember, our “microphone” includes our audio playback from our NLE, so using this option will make sure that your audio doesn’t come through distorted. Once you enable this option, you’ll have the follow settings as well:
- High fidelity music mode. This option optimizes the stream for high quality music playback – very useful once you’ve got music/score tracks cut into your edit.
- Echo cancellation. Experiment with this one and see if you need it.
- Stereo Audio. If you enable stereo, you’ll be able to properly hear all panned audio and sound effects from your Premiere timeline. Just note that enabling stereo greatly increases CPU usage on both ends of the meeting. If you’re experiencing sluggish performance, or if stereo sound isn’t particularly important to you, try turning it off.

Just remember that you have to manually turn on “Original sound for musicians” at the start of each Zoom meeting. As long as this audio profile is enabled in Zoom’s settings, you’ll see the option to turn it on or off in the top left corner of your Zoom meeting.

Tip: If it seems like your NLE playback audio isn’t coming through into Zoom, make sure “Original sound for musicians” is enabled. Depending on your edit, Zoom may be noise cancelling most, if not all, of your audio.
Optional MuteMe button
The MuteMe button is one of my favorite recent purchases. It allows me to mute just my external microphone with the tap of a finger, without muting my playback audio. (And no, this article isn’t sponsored by MuteMe either.)
The button is green when I’m live and pulses red when I’m muted, quickly letting anyone who walks into the room know my status, which happens more often than I’d like when working from home.
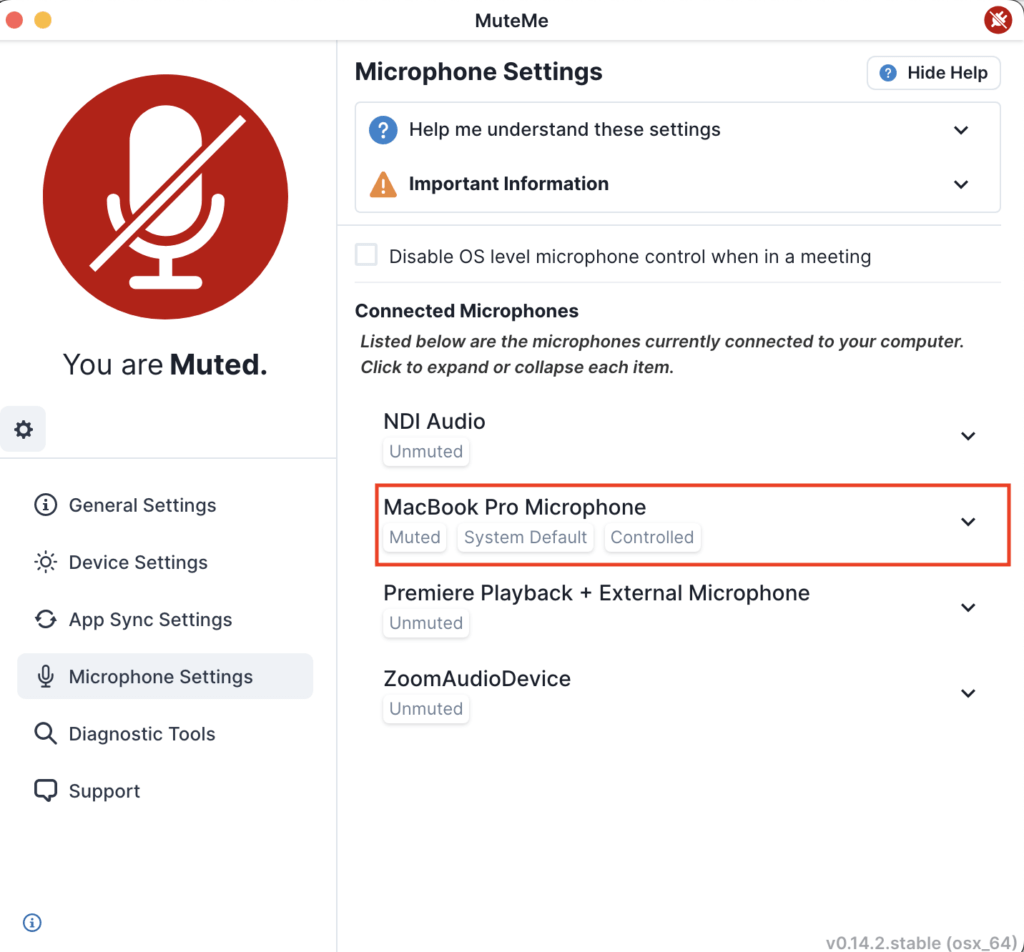
Here are my microphone settings in the MuteMe app. You can see that I set the “System Default” output to “Controlled.” That way I can use the button to mute my built-in microphone if I’m not using headphones, and it will automatically switch over to control any “External Microphone” that I plug into the computer.
If I’m playing back a scene for my collaborators, I’ve made it a habit to hit the space bar for playback, then immediately hit the mute button to kill my mic, getting rid of any breathing, coffee sipping, or background noise that may come through so we can all focus on the cut.
Going deeper with OBS
If you’ve ever used a post-production streaming service like Evercast, Pixelview, or Louper.io, then you’re already familiar with OBS – it’s the same software these platforms use to stream.
Open Broadcaster Software (OBS) is open source software for video recording and streaming. OBS allows you to combine multiple video and audio sources for live streams on supported platforms like Twitch, Youtube Live, and Vimeo.
You might choose to use OBS over Zoom if you want to stream to any of these servers or if you want to live switch between multiple video and audio sources or add video effects like picture-in-picture, transitions, or color correction.
Getting started
Exploring the full capabilities of OBS is beyond the scope of this article, but I’ll go over the basic steps to start streaming your timeline.
First download and install OBS (it’s available for both MacOS and Windows).
Then, download and install the NDI OBS Plugin for Mac or Windows from GitHub. Make sure to restart after installing the NDI OBS plugin, even if you’re not prompted to.
OBS setup for Zoom
Now open up your NLE and start your NDI stream as described in the previous sections. Then, make sure you’ve created a Loopback virtual audio device that combines your NLE playback and your external microphone.
You can skip running the NDI Virtual Camera App for now. We’re going to use OBS’s virtual camera feature instead.
Go ahead and launch OBS.
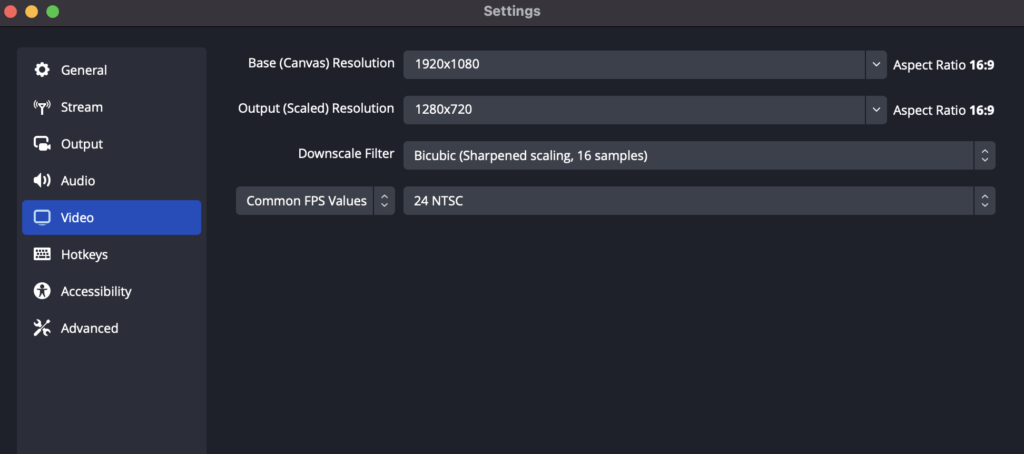
Before we do anything else, first head to OBS Studio > Preferences > Video
Choose the “Base (Canvas) Resolution” that best matches your source media (the resolution of your NLE’s timeline) and then choose the “Output (Scaled) Resolution” that you’d like to send to Zoom.
Finally, choose the “Common FPS Values” (frame rate) that matches your source media, and click OK.
Back in the main OBS window, you’ll see the canvas area on top along with a few panels underneath, starting with “Scenes.”
Scenes are groups of audio and video sources that you can switch between during a stream. For our purposes, we’ll work within the default scene, which we’ll add our NDI video source to.
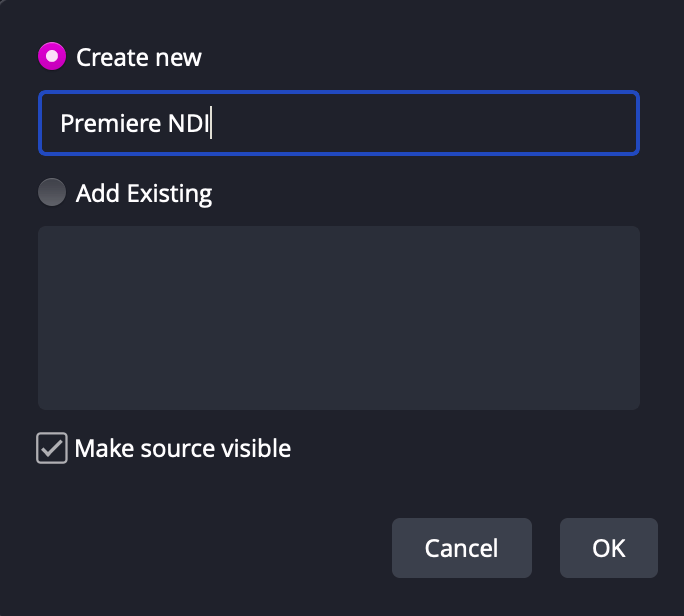
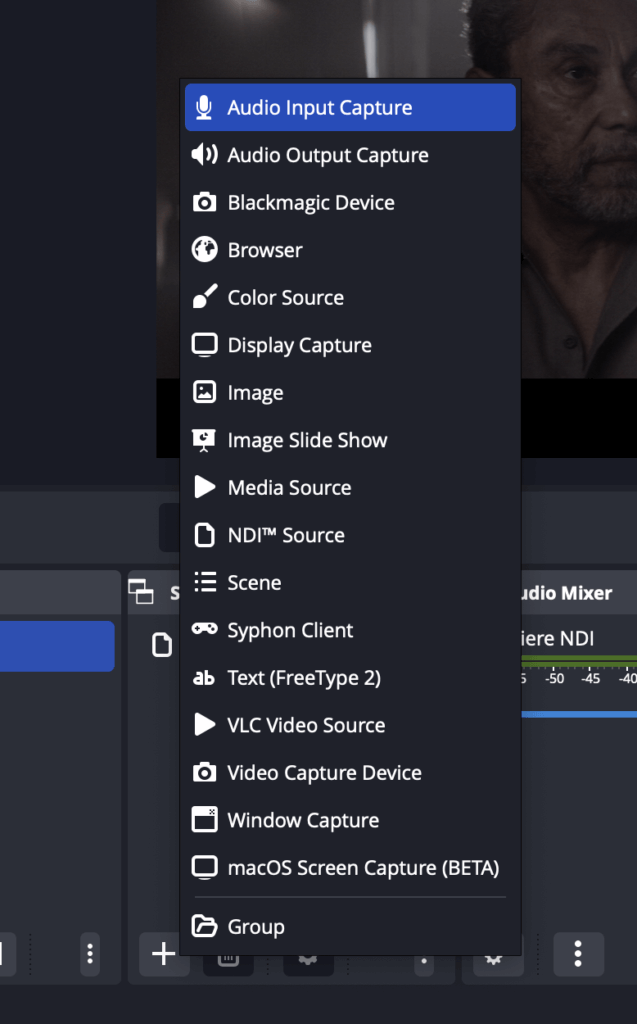
In the “Sources” panel, click on the + sign at the bottom left and then select “NDI Source.”
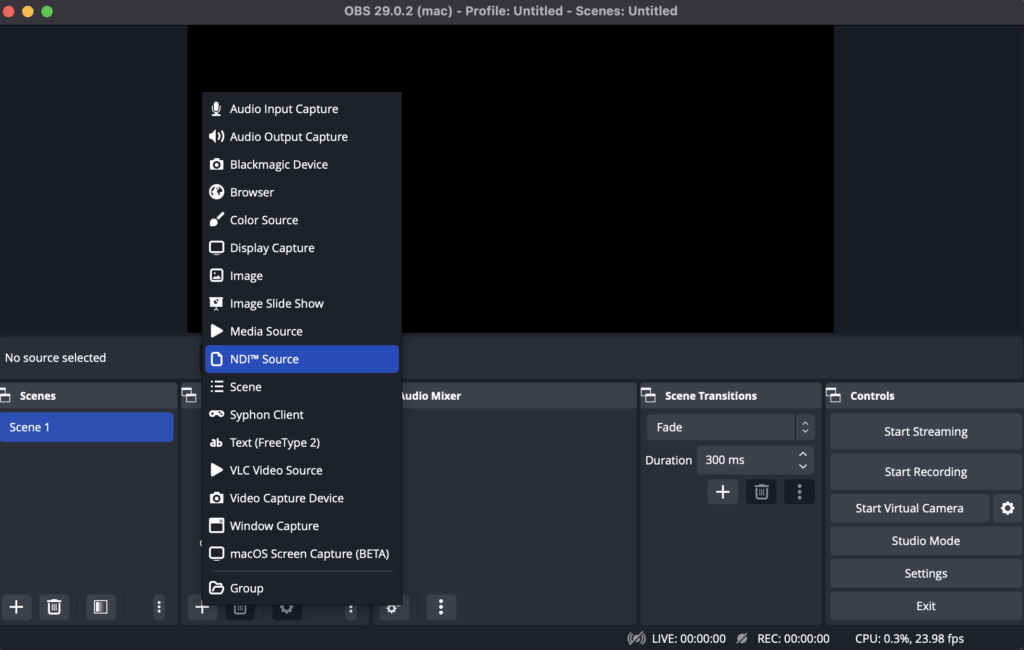
Name the source something that makes sense to you, like “Premiere NDI” and leave “Make source visible” checked. Hit OK.
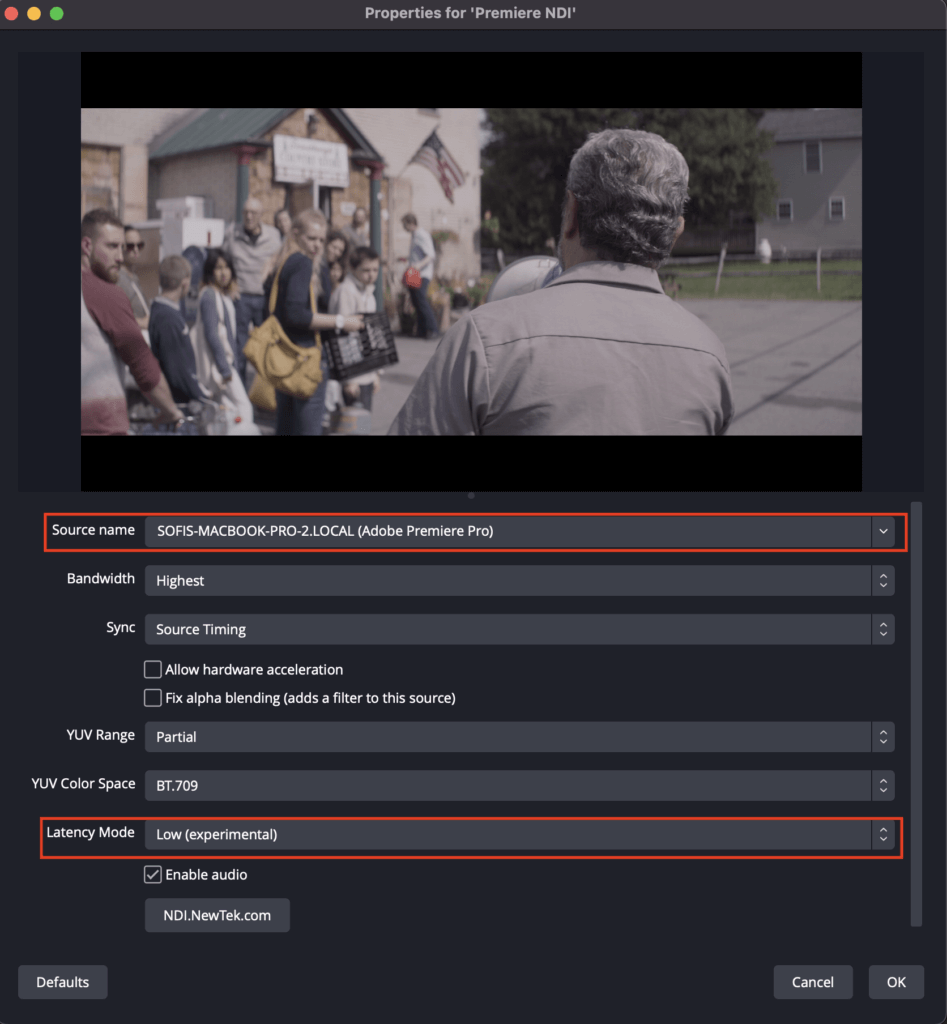
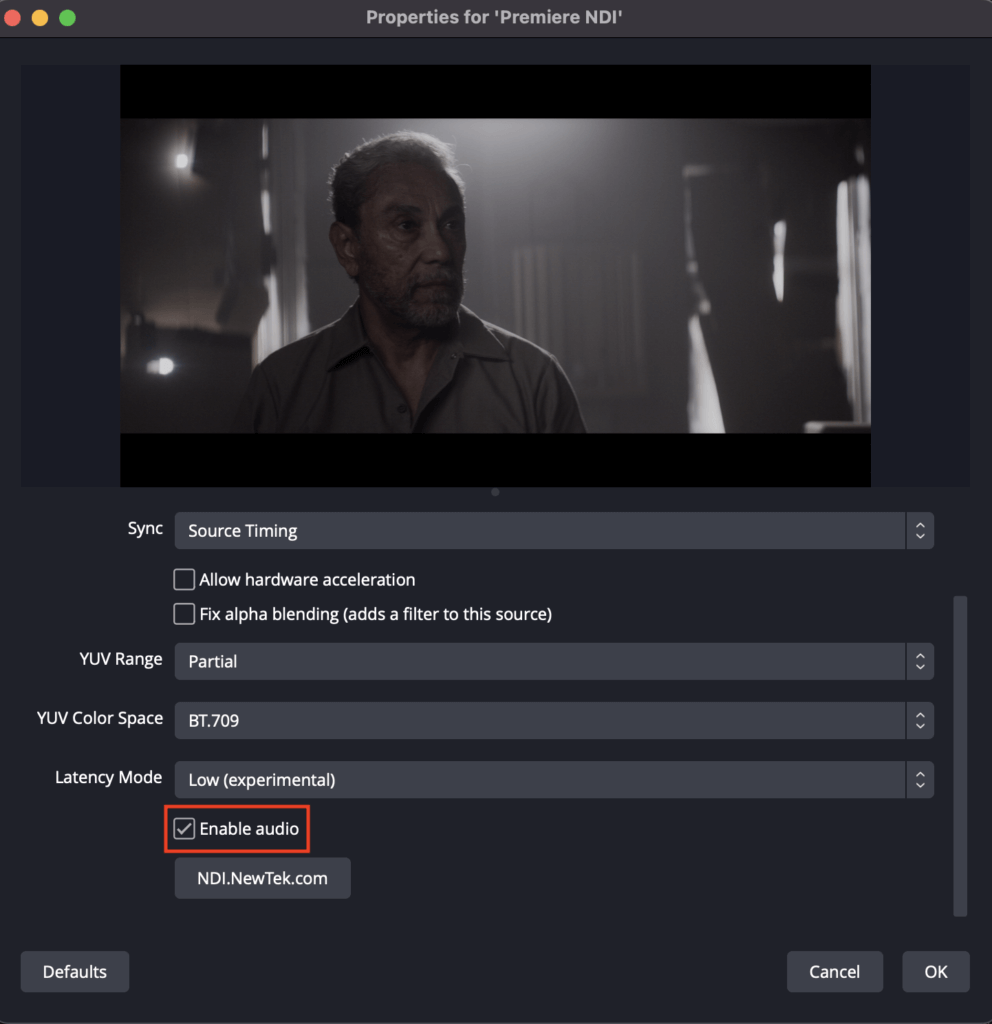
In the dialogue box that pops up, select your NLE from the “Source name” drop down and then change the “Latency Mode” to Low (experimental). Leave “Enable audio” checked. Then hit OK.
You’ll now see the NDI video source listed in the “Sources” panel, as well as your NLE’s video playback in the canvas.
Tip: Here’s where you can experiment with adding more video sources, like your computer’s built-in camera, or even adding video effects like color correction, if desired. You can also build out more scenes to live-switch between.
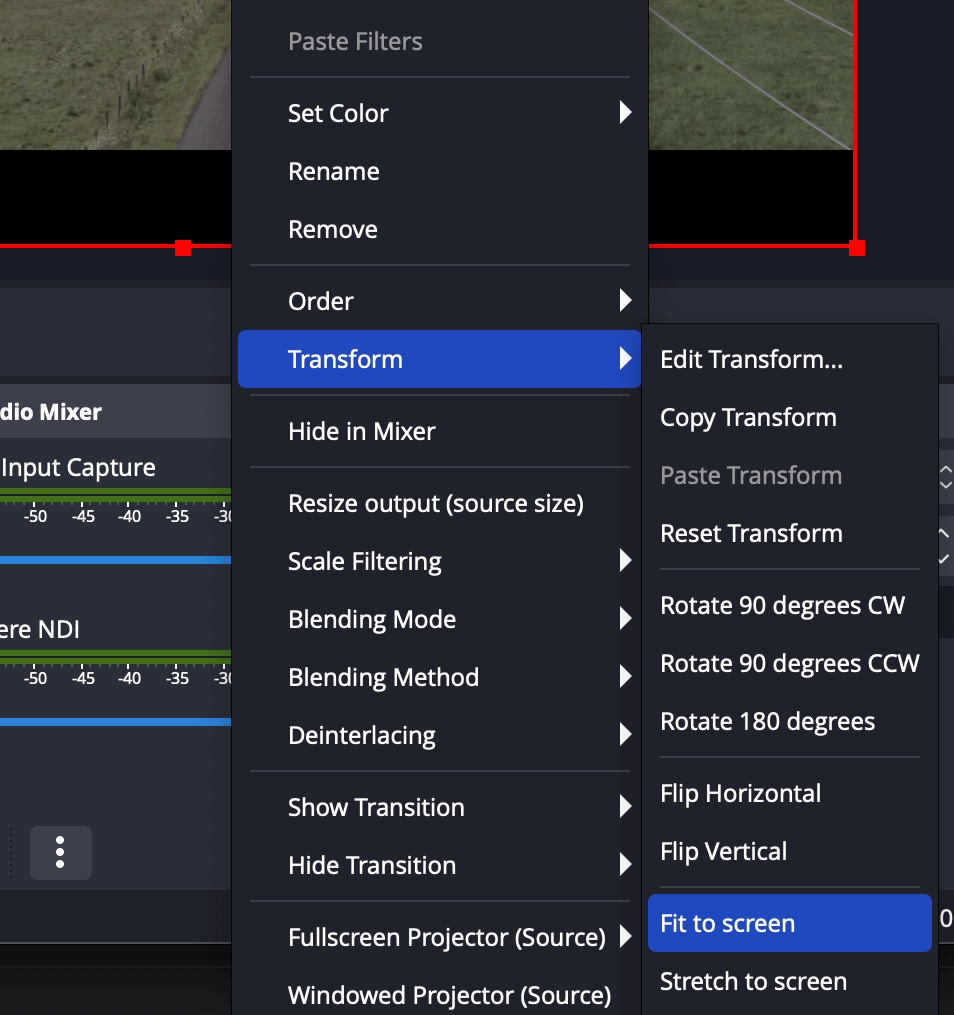
If the video playback from your NLE doesn’t properly fill the canvas, just right-click it, select “Transform,” and then select “Fit to screen.”
You may also notice that an NDI audio source has been added to the Audio Mixer panel. OBS’s virtual camera doesn’t support audio, so you can ignore the Audio Mixer for now. It’s easiest to handle audio routing via Loopback (or VB-Audio or VAC in Windows) when feeding OBS into Zoom.
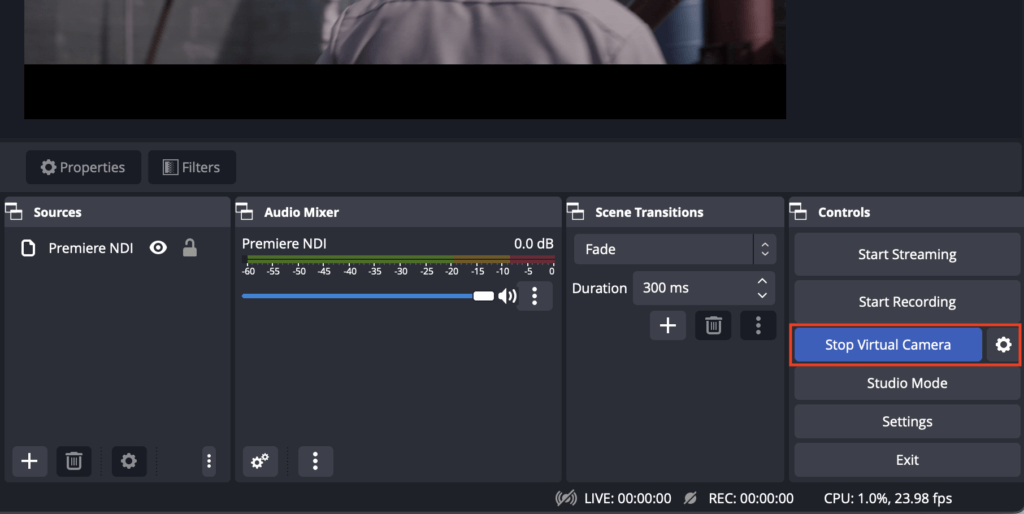
In the Controls panel, you’ll see a button to “Start Virtual Camera.”
Click the button to activate a stream that we can pick up in Zoom. Once you click it, you’ll notice it changes to say “Stop Virtual Camera” so you know that the stream is active.
Now open up Zoom and head to Preferences > Video and select OBS Virtual Camera as the camera source, minding all of the video settings previously discussed.
Tip: If you’re getting a blue OBS error screen with a crossed out camera on it, quit and relaunch Zoom. In the future, start the OBS virtual webcam before launching Zoom.
Next, head to the “Audio” tab in Zoom’s settings.
Since OBS’s virtual camera doesn’t support audio, so we’ll simply select our Loopback virtual device in Zoom to bring in the audio from our NLE and our microphone (ie – the device we previously named Premiere Playback + External Microphone). Again, use the audio settings previously discussed.
That’s it! From here, you’re ready to start your edit session!
OBS setup for streaming servers
In addition to offering different feature sets than conferencing software, streaming services may also give you more control over the quality and resolution of your stream, since you can control these settings manually. Just remember that higher resolutions will require more internet bandwidth.
To get started, follow the steps listed above up through adding your NLE as an NDI video source.
Since we’re not using the Virtual Camera feature when streaming to a server, we need to manage all of our audio from within OBS to make sure it broadcasts along with our video.
There are a few different ways we can do this, and you’ll likely want to experiment to find the method that makes the most sense for your workflow.
Using Loopback
The absolute simplest option is to add the Loopback virtual audio device we previously created as an audio source in OBS, which will give us playback in our headphones while simultaneously streaming our NLE’s audio, as well as allowing us to communicate via our external microphone.
To do this, click the + sign in the bottom left of the “Sources” panel and then select “Audio Input Capture.”
Name the device – I used the same name as my Loopback virtual device, “Premiere Playback + External Microphone” – and click OK.
In the dialogue box that pops up, choose the appropriate Loopback device from the dropdown menu and click OK.

You’ll see the audio device populate in the “Audio Mixer” panel.
If you play your NLE’s timeline or speak into your microphone, you should see the audio meters bouncing in OBS.
Using NDI Audio
Remember how I mentioned earlier that both Premiere and Avid are capable of sending audio directly into an NDI stream? If you’re streaming from either NLE, you can take advantage of this feature to both bypass Loopback and to separate your NLE’s playback and external microphone into two distinct audio sources.
For Premiere, first follow the instructions on changing the Primary Audio Device and then make sure to open up NDI Virtual Monitor and set your input source to Premiere to regain local playback.
Now go ahead and add a new NDI Source as described above for your NLE (Premiere or Avid), making sure “Enable audio” is checked in the “Properties” dialogue box.
As I mentioned earlier, you’ll see that an NDI source gets added to both the “Sources” panel and the “Audio Mixer” panel.
If you playback your timeline, you should see the audio meters bouncing in the Audio Mixer, as well as hear the playback in your headphones.
Tip: If the above method is giving you any trouble, or you don’t have the “Enable audio” option, you can also manually add the NDI Audio stream as an audio source. To do this, first make sure you have the NDI Virtual Input app running with your NLE selected in the NDI top menu. Then follow the steps to add a new source choosing “Audio Input Capture” as the type and setting “NDI Audio” as the device.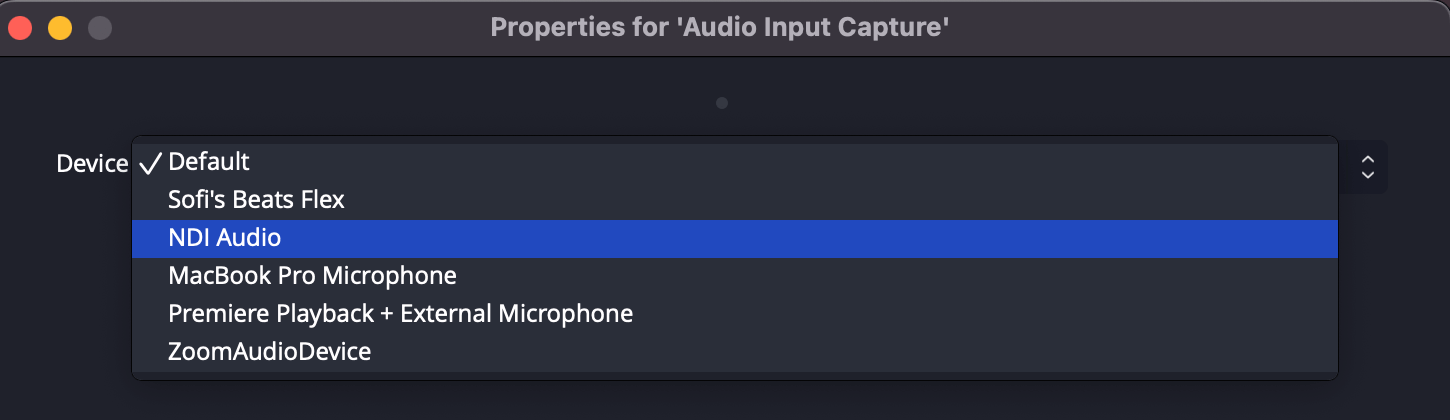
You can make adjustments to the audio stream by clicking the three dots next to the volume slider and selecting “Advanced Audio Properties.”
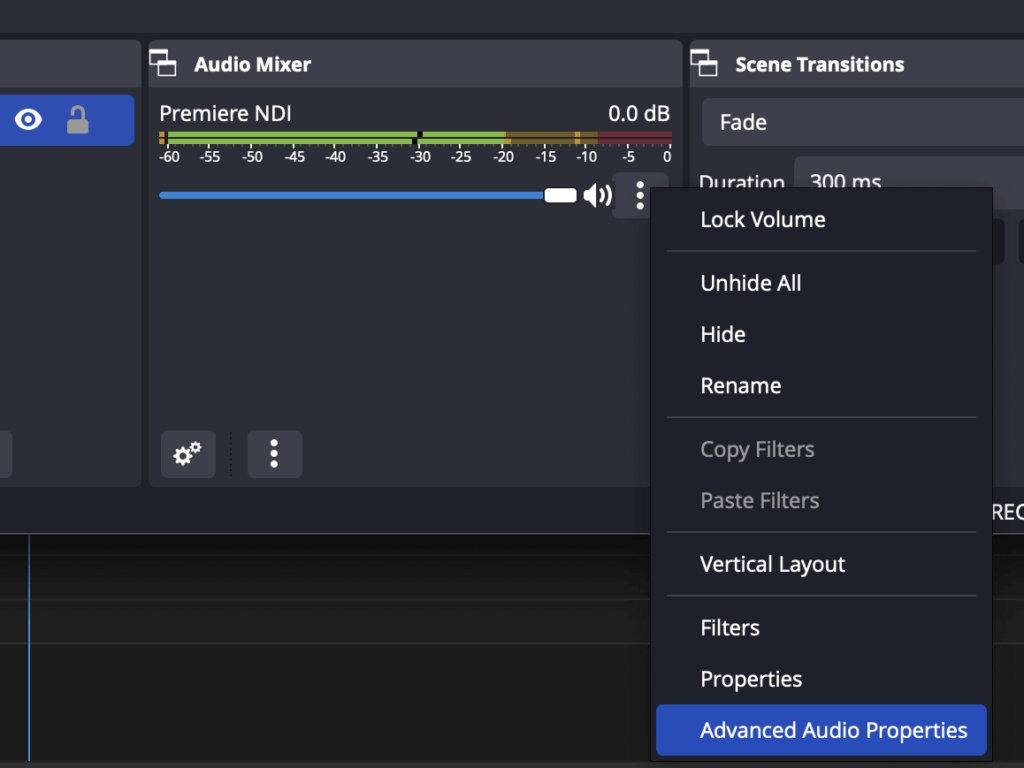
In “Advanced Audio Properties” you can adjust the pan balance as well as add a sync offset if necessary.
You can also enable monitoring for an audio source here, which can be useful if you’d prefer not to run NDI Virtual Monitor to hear your local Premiere playback. Instead, you can simply turn on “Monitor and Output.” Just be sure you also head to OBS > Preferences > Audio and designate the appropriate monitoring device.

Finally, don’t forget to add your microphone as another audio source so that collaborators can hear you speak during your stream. Follow the steps to add a new source and choose “Audio Input Capture” as the type. Then, select your external microphone as the device.
Tip: If you’re on FCP X and want to separate out your playback audio from your microphone, first set up a Loopback device where you add FCP X as a source, and make sure you’ve unchecked “Mute when capturing.” In OBS, simply add this Loopback device as an audio input source, and then add your microphone as a second audio input source.
Additional Streaming Settings
The settings for each individual stream should be tweaked depending on your workflow needs, but here are a few guidelines to get started.
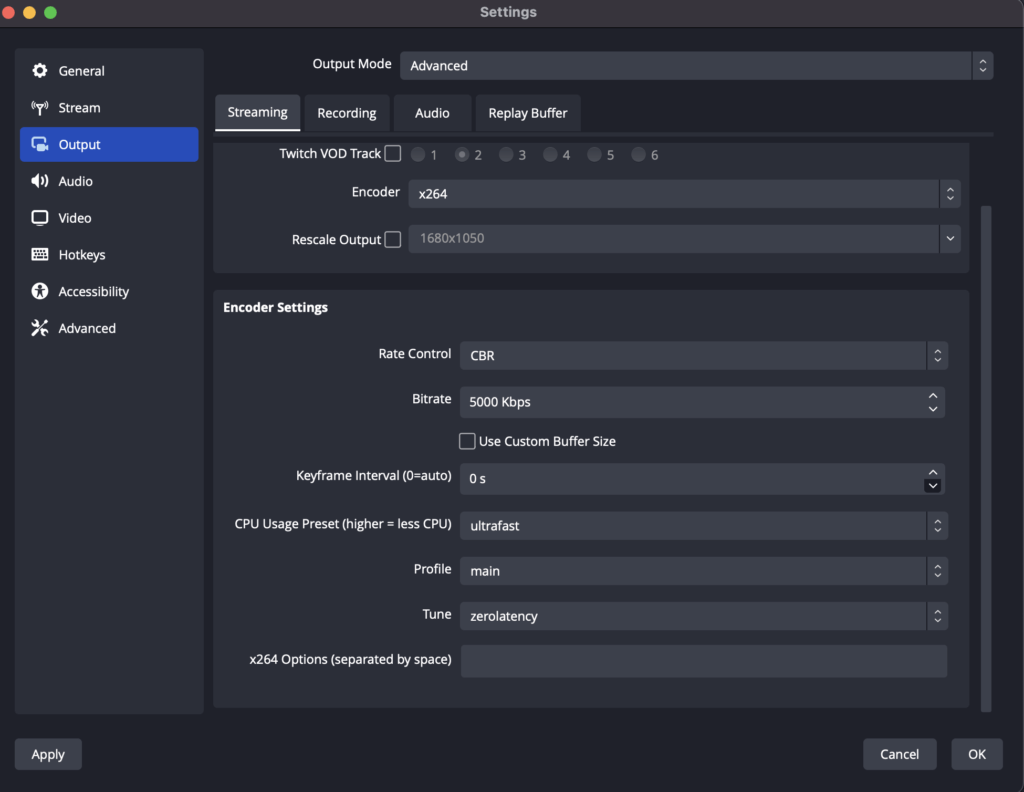
Go to OBS Studio > Preferences > Output and change the “Output mode” to “Advanced.”
The settings below are a starting point for a solid stream. You’ll likely want to adjust the bitrate, ranging anywhere from 2500 to 12000 Kbps to suite your workflow and network settings.
From here, head to the “Stream” tab and input the appropriate information for your streaming service. Then start broadcasting!
Tip: If you’re really industrious, you might even look into setting up your own white-labeled streaming portal via services like RedPro5 and Ant Media Server.
Final thoughts
One quick note before we wrap up..
It’s worth mentioning that any computer on the same network as a computer outputting an NDI stream will be able to view the stream via NDI monitor software or NDI enabled hardware. If that poses a security risk for you, you might want to check out the hardware-based version of this workflow.
On another note, this feature also means you can easily output the NDI stream on one computer, while hosting your streaming session on another if processing power is limited.
That about wraps things up! I’d love to hear how you would tweak this workflow, how you’re already using NDI, or answer any questions you have.
Please drop me a note in the comments!


