Proxies give you ultimate flexibility – they increase playback and editing speed without forcing you to sacrifice quality, allow you to edit seamlessly on laptops and portable drives, and provide a streamlined, no-relinking-necessary project delivery, whether that includes a hand off to a mixer or colorist, or exporting a full quality output for a client.
Luckily for us, Premiere Pro makes proxies easy. Really easy. Like, toggle back and forth with the click of a button, easy.
So put away those thoughts of an arduous, error-prone process and embrace Premiere Pro’s integrated, simple, and intuitive proxy workflow. With a little know-how, anybody can take advantage of its benefits.
By the end of this article, you’ll have a complete understanding of Premiere Pro’s Create Proxies, Attach Proxies, and Reconnect Full Resolution Media workflows.
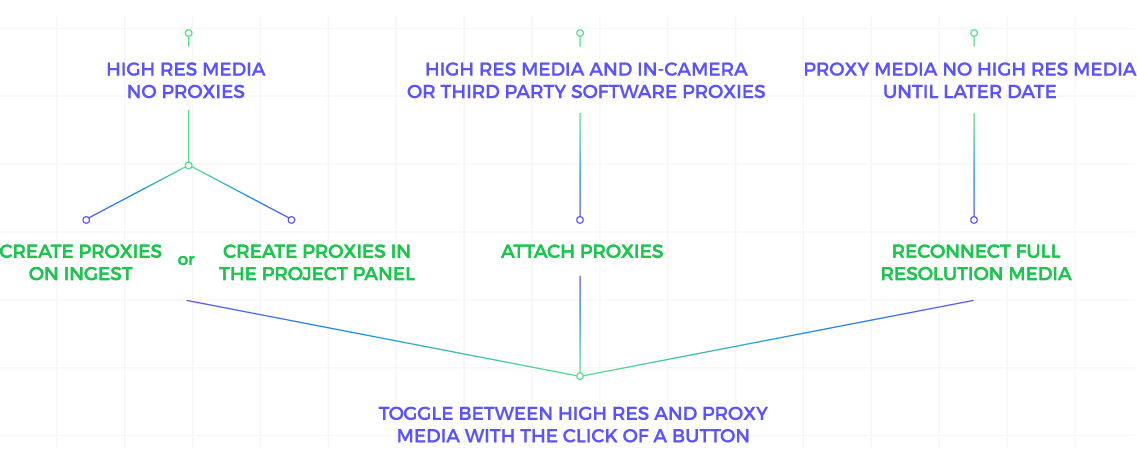
This simple chart can help you determine where to begin and which workflow is most relevant.
It all depends on your starting media. If you have…
If you can identify your workflow, feel free to jump ahead to a specific section, or read on to gain a complete understanding of Premiere Pro’s proxy workflow.
Table of Contents
- Adding the Toggle Proxies Button
- 1. Creating Proxies in Premiere Pro
- 2. Attaching In-Camera Proxies and Third Party Software Proxies
- 3. Reconnecting Full Resolution Media
- Copying Proxy Files and Relinking
- Tips for Working with Proxies in Premiere Pro
What Are Proxies Again?
Proxies are lower resolution copies of your media that are created in one of two ways – either by transcoding raw media to an intermediate codec or by simultaneous in-camera recording, a standard feature on many high end cameras.
Editing with proxy media is commonly referred to as an offline edit, while the process of relinking back to the full res media at the end of a project is called the online edit. Premiere Pro’s proxy workflow essentially combines the two, allowing you to effortlessly switch between offline and online, all within the same software.
So, how does proxy editing work? Let’s start by adding a simple button.
Adding the Toggle Proxies Button
The Toggle Proxies Button is powerful. With one click, you can seamlessly switch back and forth between proxy and full res media. By default, it’s not mapped to the monitors or the keyboard, so let’s add it.
In the bottom right of either the Source Monitor, Program Monitor, or both if you’d like, click the Button Editor (+). This opens up a panel of buttons we can add to the transport control area of the our monitors. Hover over a button icon to reveal its name, or refer to the image below for the Toggle Proxies Button icon.
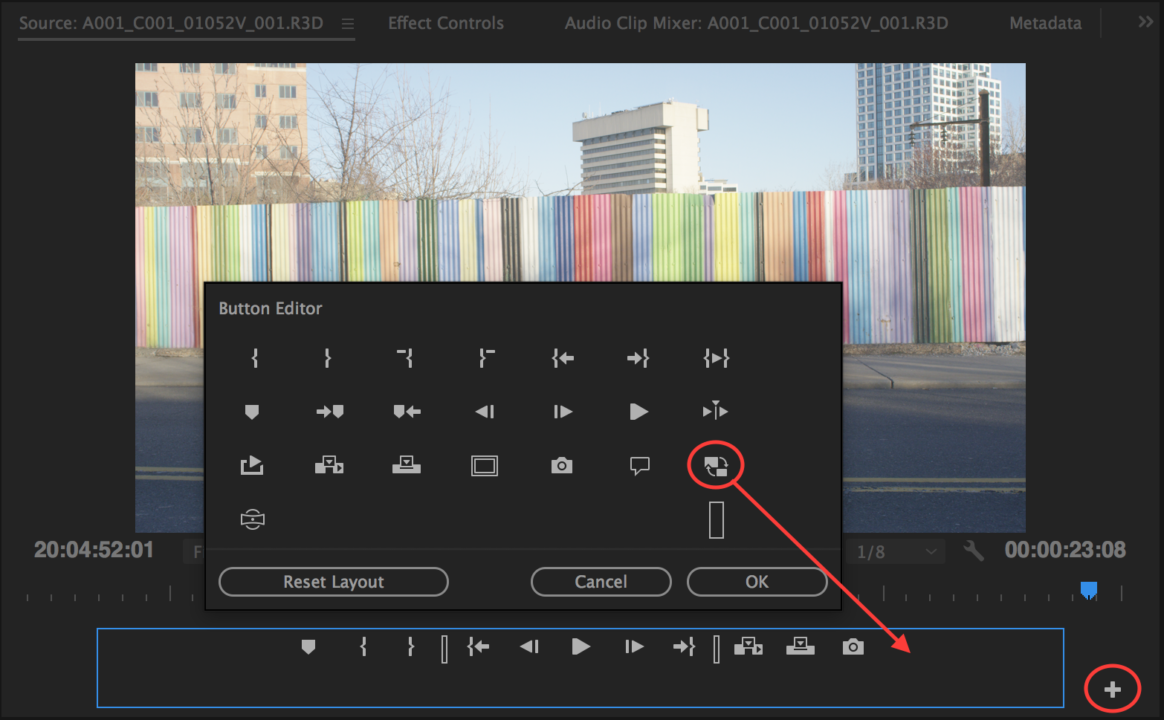
Click and drag the icon in line with the other buttons in the transport control area. When the button clicks blue, you’re viewing proxies in the Source and Program Monitors. When it’s white, you’re looking at your full resolution media.
You can also set a shortcut for Toggle Proxies in Keyboard Shortcuts, if you’d like, or alternatively, you can find the same setting in Preferences —> Media —> Enable proxies. The buttons, keyboard shortcut, and preference are all linked, so setting it in one place sets it globally.
Now that we know how to toggle proxies on and off, let’s get started creating them.
1. Creating Proxies in Premiere Pro
Understanding Ingest Settings
Most of us know a few different ways to import footage into Premiere Pro. You can choose “Import” from the file menu, double click empty space in the project panel, use the media browser to locate and import clips, etc.
By default, when we import footage, we simply create a clip in the project panel that points back to the files on our hard drives. The original media isn’t changed, duplicated, or moved in order for us to work with it in the project.
By adjusting our Ingest Settings, we can tell Premiere Pro to behave differently when we import media.
To open Ingest Settings, navigate to the Media Browser and locate the “Ingest” checkbox on the top right menu bar. Click the wrench to the right of the Ingest check box to open Ingest Settings. Alternatively, go to File —> Project Settings —> Ingest Settings.
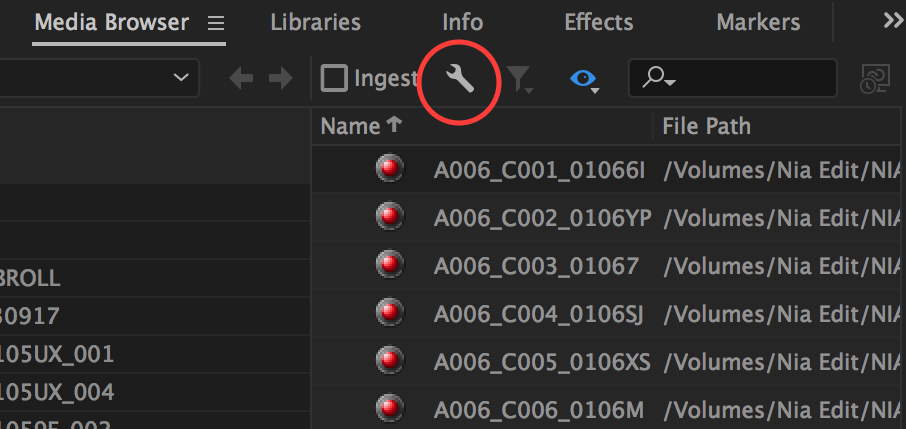
By default, Ingest is unchecked and our options are greyed out. Checking the box here will also check it back in your Media Browser, meaning that the settings you choose will be applied on your next import unless you uncheck the box.
When checked, four ingest options are available in the drop down menu. We’re mostly concerned with the last two, but let’s briefly go over each one.
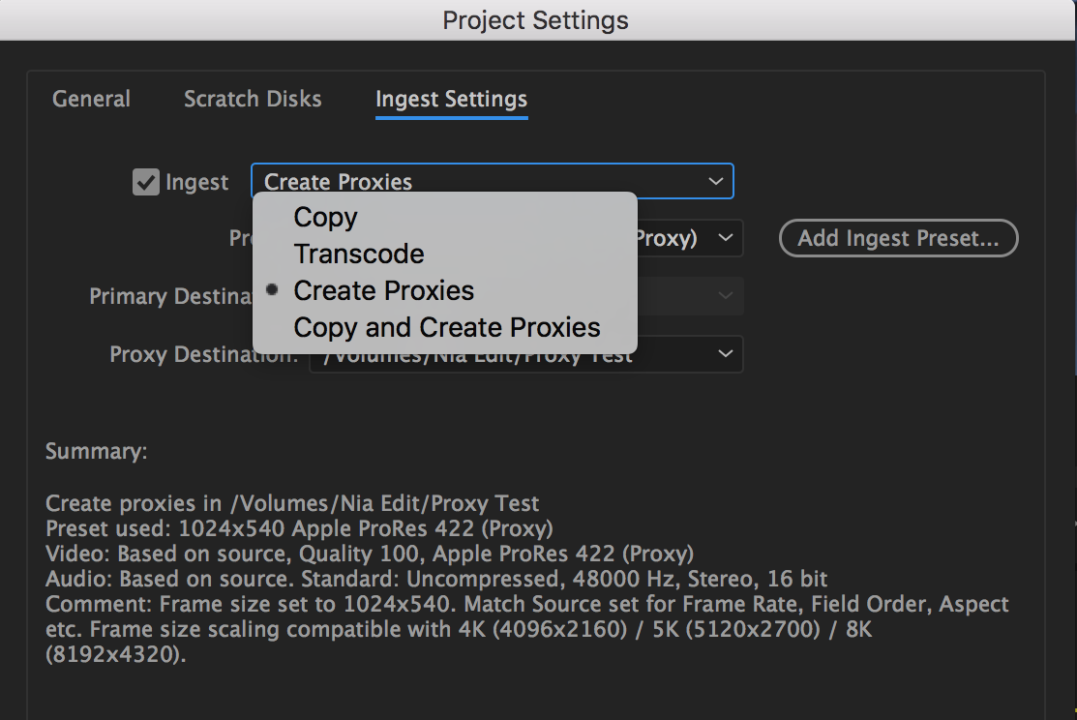
- Copy: You can use this option to copy files directly from a camera card to your hard drive, or from a backup drive to a new location. Change the copy location under the Primary Destination dropdown. The clips in the project will point to the copies of the files.
- Transcode: Use this option when you want to transcode media to an edit-friendly, but high quality direct intermediate codec that you intend to use without relinking back to the camera files. This option requires that you match the frame size of your original media, which usually isn’t ideal for a proxy workflow. Change the copy location under the Primary Destination dropdown, and the codec by selecting a transcode preset. The clips in the project will point to the transcoded copies of the files.
- Create Proxies: Use this option to create and attach lower-resolution proxy clips to your full res media for better performance during editing. You can switch back to the original full resolution files at any time. Change the location of the generated files with the Proxy Destination dropdown, and the codec and frame size by choosing a preset.
-
- Copy and Create Proxies: Copy camera media as above, and create and attach proxies for that media as above.
Creating Proxies on Ingest
Let’s choose the Create Proxies option and take a closer look, noting that Copy and Create Proxies is identical in function, with the added step of setting the Primary Destination for your copied source media.
Create Proxies is ideal when you’re working with large files, such as 5K, 6K or 8K media, with no in-camera or third party software proxies (such as proxies created in DaVinci Resolve).
Once we’ve selected Create Proxies, we have two additional options: Preset and Proxy Destination.
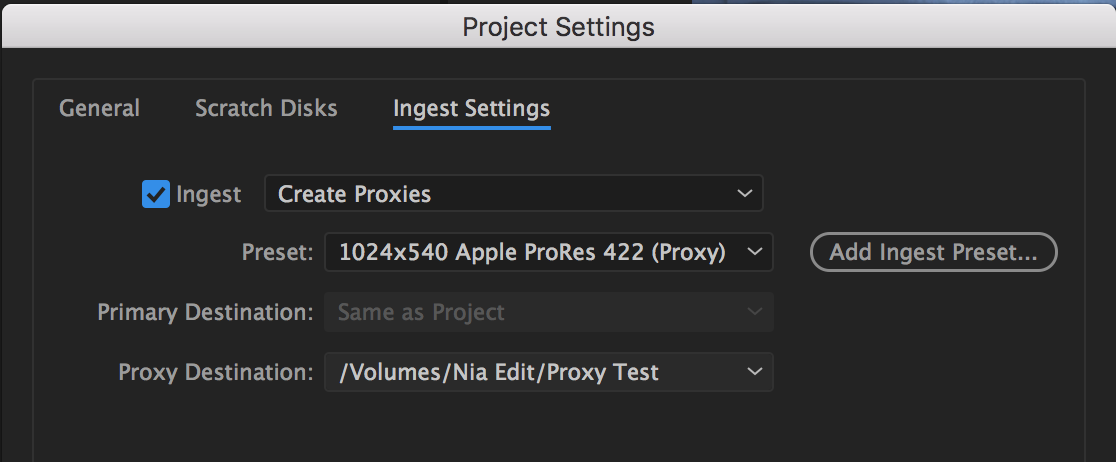
Let’s go over Proxy Destination first.
Choosing a Proxy Destination
In the drop down menu, you can determine where Premiere puts the generated proxies.
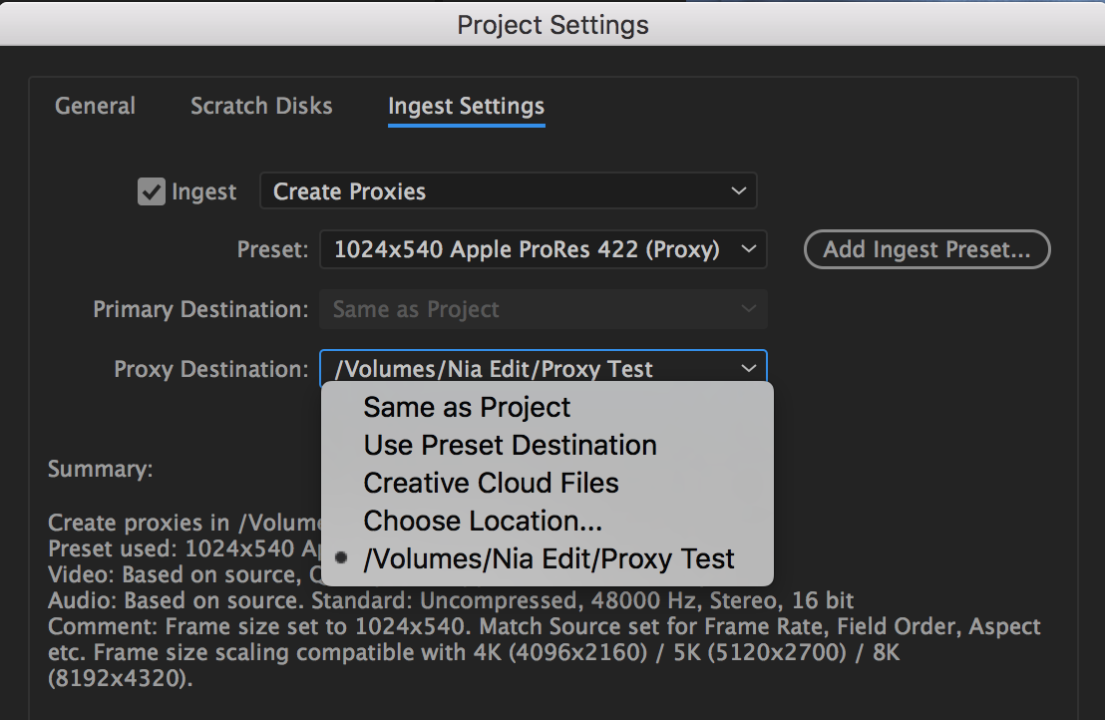
I advocate for selecting Choose Location and creating a dedicated proxy folder on your hard drive. That way, you’ll have all of your files in one place, which means you can easily copy them to portable hard drives for easy sharing or for travel.
The Creative Cloud Files option deserves a mention as well. This choice automatically syncs your proxy files to your Creative Cloud Files Folder, which in theory, means you have access to your proxies wherever you’re able to connect to your Creative Cloud account.
In reality, remember that you’ll need a significant amount of cloud storage to accommodate your files, as well as a fast internet connection to sync them across different devices.
Choosing a Preset
If you click the Preset dropdown menu, you’ll see that Premiere Pro has a list of defaults. While not comprehensive, these are usually good options to consider. If they don’t appeal to you, we’ll cover creating your own presets a little further on.
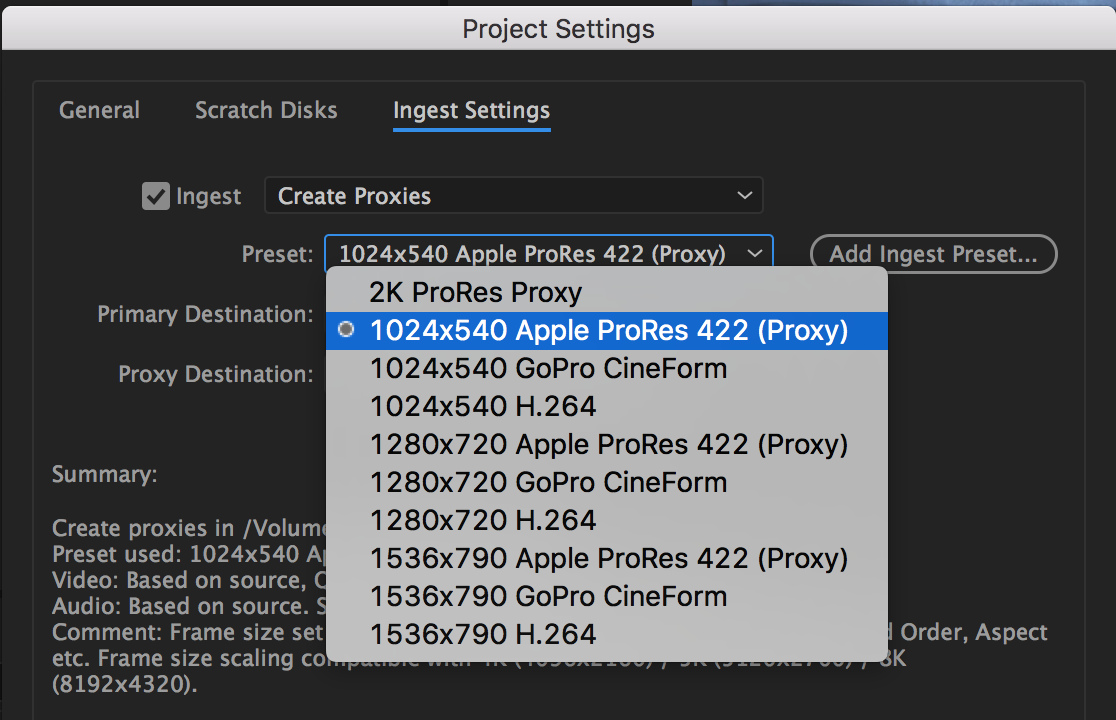
The Preset that you select will determine the codec and frame size of the proxy files. The beauty of a proxy workflow is that you always have the option to toggle back to your full res media. That means we can choose a preset that’s optimized for high editing speeds and low disk space.
You’ll notice that Premiere Pro has also preselected a few frame sizes for you. If you choose a preset, let’s say 1024×540 Apple ProRes 422 (Proxy), you can look in the Summary section below for suggestions of compatible source frame sizes.

We can see that this setting works well with 4K, 5K, and 8K media because the frame dimensions share the same aspect ratio. Matching your proxy aspect ratio to your full res media is always preferable and yields the best results.
What About HD Frame Sizes?
It’s worth noting here that frame sizes with different aspect ratios, though not ideal, can work too.
Many people prefer to do their offline edit in the standard HD sizes of either 1920×1080 or 1280×720. If you’ve worked with 4K, 5K, or 8K footage before, then you know that reducing these resolutions to fit into an HD frame creates letterboxing, which means you’ll have thin black bars on the top and bottom of the frame to compensate for the slight difference in aspect ratio.
I’ve found that Premiere can handle proxies with letterboxing, but I don’t recommend it for the following reasons:
-
- When you toggle between your proxy and high res media, you’ll see your letterboxing appear and disappear.
- If you add titles or any effects that affect only part of the image (say, a masked color correction), they may not line up as intended when you switch back to the original files.
- Premiere always uses the full res clip while rendering, so if you partially render a clip, when you play it back, your letterboxing will disappear for the rendered portion of the clip, and reappear for the unrendered portion.


