When I saw a demo of Premiere Pro’s Productions at Sundance last January, I knew it was a game changer.
Simply put, Productions offers a brand-new collaborative workflow via shared storage. Even better, Productions reimagines media handling in Premiere to fix one of its biggest and longest standing flaws – duplicate clips.
Tip: If you’re looking to collaborate for editorial review, check out The Ultimate Real-Time Remote Editing Workflow (That Won’t Break the Bank)
At least, these were the claims when Productions was officially released in April 2020. At the time, I was in the middle of a feature film edit and wasn’t ready to update.
Last month, a friend reached out about an archival-based spot for Major League Baseball’s upcoming Jackie Robinson Day.
As a feature film editor, I don’t often cut commercials, but this one had a great team (producer Alex Cirillo & director Randy Wilkins) and a powerful, timely message.
Not only that – but with a super–tight turnaround and lots of AE work, we’d need two people working on the commercial at once. It would be a perfect stress test for Productions.
As luck would have it, one of my quarantine buddies agreed to step in as my AE, meaning we’d be able to safely work together in person.
Don’t worry if you’re not isolating with your editorial team – Productions has a ton to offer editors working remotely, and even solo editors working independently.
I’ll even share the totally unsanctioned Dropbox-based workflow I ended up using on this project, which meant my AE and I could have ended up worked remotely.
Check out the finished MLB spot above, then read on below to learn about the workflow!
Table of Contents
Why Productions?
On a fast-paced, archival-based project, I knew I’d want my AE to import and organize media as it came in throughout the day, leaving me free to review footage and start building out a cut at the same time. Ideally, I’d have to access to new media as soon as my AE imported it to the project.
But Premiere is not exactly known for its robust collaboration tools. That is, until Productions.
What are Productions?
As Adobe puts it:
Productions provides a flexible, scalable framework for organizing multi-project workflows. With Productions, large complex workflows can be divided into manageable projects, for overall efficiency and collaboration using shared local storage. Assets can be shared between projects within a Production, without creating duplicate files.
At its core, a Production is a collection of multiple Premiere project files saved to a single folder – the Production folder.
The Production folder contains only .prproj files, along with one .prodset file, which holds the Production’s settings. The Production folder should not contain any other Premiere Pro files, like video or audio previews, autosaves, or any media.
To really wrap your head around Productions, it’s helpful to re-define a couple of terms:
- A Production folder replaces what we currently think of as a single, standalone project file. The Production folder houses all of the individual .prproj files that make up your edit.
- A project file (.prproj) replaces what we currently think of as a bin and lives inside the Production folder. Project files contain all the clips and sequences that make up your edit and can be considered an organizational tool. There are no limits to how many project files your Production can have.
Tip: If you’re an Avid editor, it may be useful to think of .prproj files within a Production as .avb files within a Media Composer project.
What does a Production folder look like?
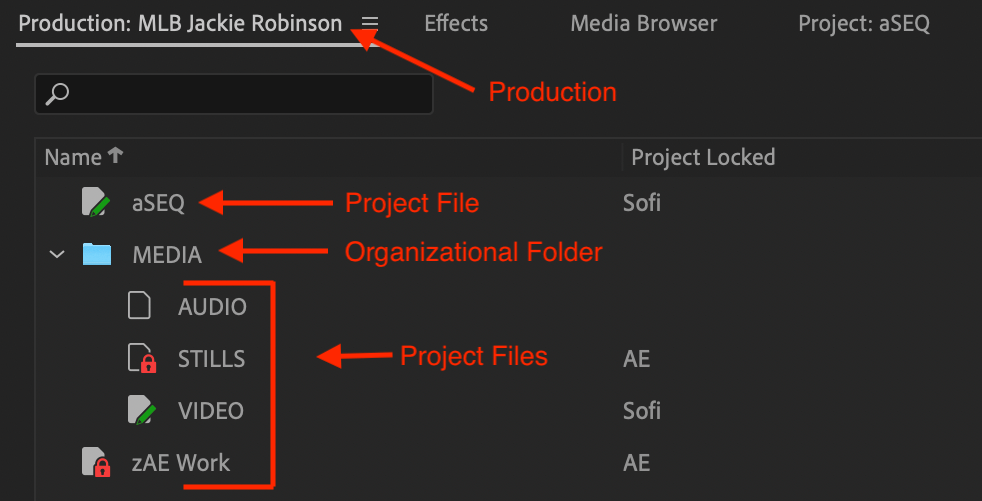
Here’s the Production for my MLB spot in Premiere:
And here’s what it looks like at the Finder level on my Mac:
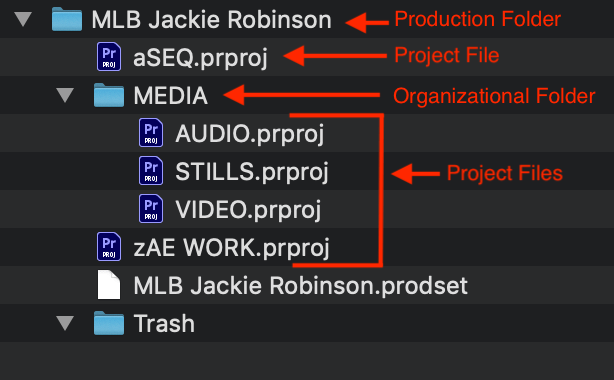
As you can see, the Production folder and file system mirror each other.
This mirroring is the backbone of Productions.
Why is this structure better than a single project file? Lots of reasons!
- Collaboration. Working in a Production allows editorial teams to share media, projects, and sequences, all while preventing conflicts or duplicates. The first editor to open a specific project in a Production “locks” it, giving only that editor write-access. Other editors can open this locked project to play a sequence, export, or copy media into other projects, but can’t make any changes. When an editor is done working in a project, they can “unlock” the project, allowing another editor to open it and claim write-access. As you can imagine, project locking is an incredibly powerful collaboration tool!
- No duplicate clips. Before Productions, every clip in a sequence needed to match back to a master clip within the same project. If you’ve ever worked in Premiere with multiple editors, then you know this requirement made it very hard to share sequences without accumulating duplicate master clips. In a Production, master clips will always reference their original location. Moving sequences between projects or copying and pasting media between sequences within a Production no longer generates duplicate clips. This is a massive improvement to media management!
- Better performance. In a Production, only the projects that are open actively use system memory and processing power. Individual projects will open and save much faster and you won’t experience project “bloating” with large edits like feature films and TV shows.
- Reusable projects. The project files inside a Production can be treated as standalone, reusable libraries. For example, you can keep one project for stock music, another one for sound effects, and one for graphics templates, and simply add these projects to any Production where you need to access these libraries.
You can see now why I was excited to try out Productions – and why it’s a great fit for collaborative, fast-paced projects like the MLB spot above!
Tip: Don’t forget – all of these improvements carry over for solo editors as well! In particular, better performance, reusable projects, and all-around better media management.
Let’s get to work setting up a new Production.
Getting started with Productions
Network attached storage (NAS)
Productions benefit all types of workflows, including those with multiple editors working in different locations, which we’ll explore later on.
First, let’s dive into scenarios with editorial teams working on shared storage, since these workflows highlight all the benefits of Productions.
For those new to shared storage, a NAS is essentially a mini-server that creates its own network. By hosting your Production on a NAS, you’ll enable anybody who logs in to share both media files and access to the Production, as well as take advantage of the full range of collaborative tools.
While it’s beyond the scope of this article to offer suggestions for NAS set ups, Adobe recommends a 1Gbps connection as the minimum, and a 10Gbps connection for working in frame sizes greater than HD. You can also take a look at Adobe’s best practices for storage for more guidance.
However, if you’re a working on a lighter project (one editor and one AE, 1080p footage), or are interested in testing out Productions, here are a few consumer NAS drives that are frequently recommended (some of these may be affiliate links):
- Synology 2 Bay NAS DiskStation
- Synology 4 bay NAS DiskStation
- QNAP 4-Bay Next Gen Personal Cloud NAS
- NETGEAR ReadyNAS
Fun side note: As I mentioned earlier, I used Dropbox as a makeshift NAS for this project! Read about my workflow here.
Once you’ve got your NAS up and running, you’re ready to open up Premiere!
Creating a new Production
Before we get a new Production set up, let’s take a minute to review Premiere’s media settings:
Navigate to Premiere Pro > Preferences > Media
Uncheck the boxes for:
- Write XMP ID to files on import
- Write clip markers to XMP
- Enable clip and XMP metadata linking
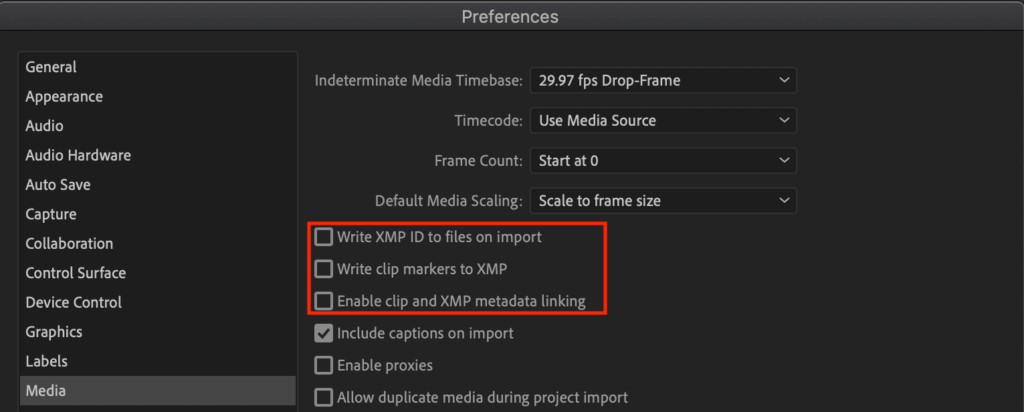
Why?
XMP is a file labeling system that embeds metadata into media files as they’re imported into Premiere. Premiere can use XMP to keep track of individual files, as well as to prevent duplicate clips in a standard Premiere project file (though if you’ve experimented with this feature, you know it hasn’t always been successful).
XMP metadata can interfere with how Productions tracks master clips and should be disabled for editorial teams working on shared storage.
Tip: If you’re using Productions to collaborate offline, follow these guidelines for XMP settings instead.
After completing the media settings, navigate to Premiere Pro > Preferences > Collaboration
- Check the box for Enable project locking
- Fill in a User Name that your collaborators will see when you’re working in the Production
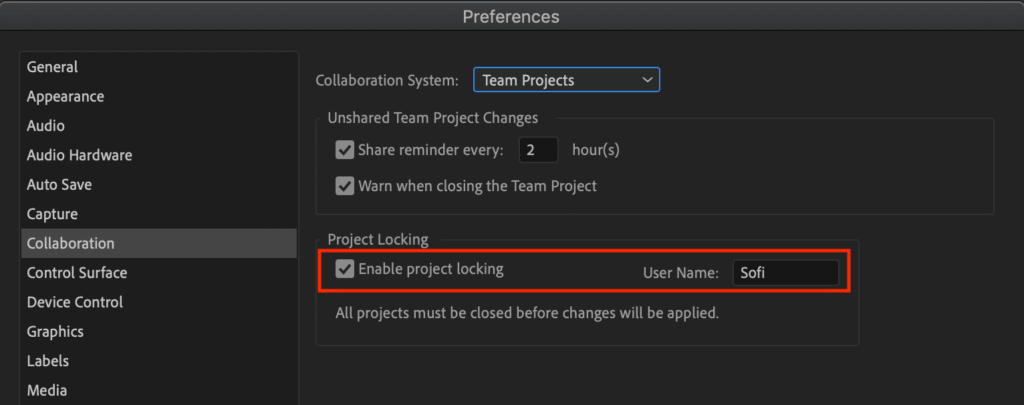
Click OK.
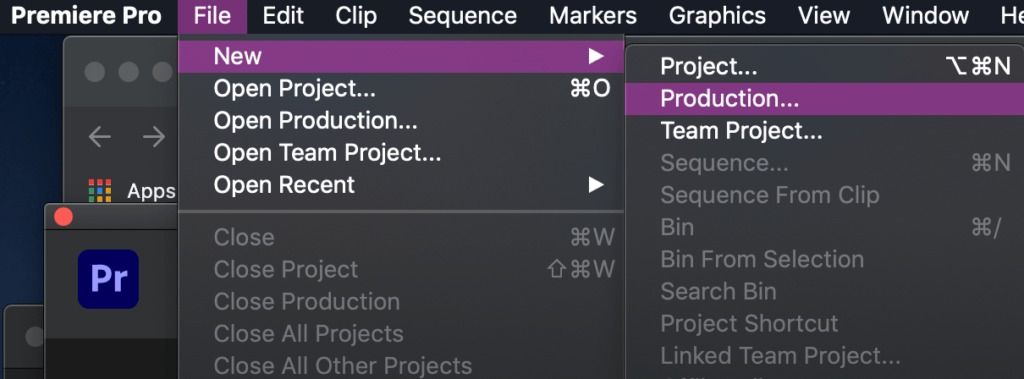
To create a new Production, Navigate to File > New > Production.
Choose a location for the Production folder on your shared storage drive.
Remember that the Production folder should only contain .prproj files and the .prodset file.
For this reason, I recommend that you create a container folder to save your Production folder inside of. That way you can put everything that doesn’t go in the Production folder, like all your media, in the container folder.
Using the Production panel
Once you’ve saved your project, Premiere will open up the Production panel, which serves as an overview of the components that make up the Production.
Again, here’s the Production panel for the MLB spot:
It may be helpful to think of the Production panel as the updated version of the project panel – everything that you’ll engage with for your edit will be located here.
Tip: At this point, it’s a good idea to navigate to File > Production Settings to verify your scratch disk, cache, and autosave settings before continuing to build out your Production.
The Production panel should feel pretty familiar if you’re a Premiere editor – you can engage with it just like you would with the project panel: right-click to bring up a context menu for creating new projects or folders, or choose an option from the icons in the bottom right of the panel.
Any new projects that you create will automatically be incorporated into the Production, rather than created as standalone projects.
There’s a lot of information displayed in the Production panel and a few new icons to show you which projects are open or closed and which projects are locked (in use by another editor) or available for editing.
Let’s break it down.
Project icons and project locking
The following icons can appear in both the Production panel and the project panel, letting you know the status of a particular project:
A solid icon shows a project that is currently open on your system in the Production.

An outlined icon shows a project that is currently closed on your system in the Production.

A solid icon with a green pencil shows a project that is open on your system and that you have write-access to. Collaborators can have the project open too, but it will be read-only and they won’t be able to make any changes. Your name will show in the “Project Locked” column in the Production panel.

A solid icon with a red lock means that a collaborator has write-access to the project, but it’s open on your system as a read-only project. The collaborator’s name will appear in the “Project Locked” column in the Production panel.

An outlined icon with a red lock means that a collaborator has write-access to the project, but it’s closed on your system. You can open it, but as a read-only project. The collaborator’s name will appear in the “Project Locked” column in the Production panel.
Project locking in Productions allows multiple editors to work at the same time without any chance of overwriting or interfering with each other’s work.
If you have an opened project with the green pencil icon, you can work in that project like you would any Premiere project – you have full write-access. You can open and edit as many projects in your Production as you’d like.
Any project that displays a green pencil icon for you, will display a red lock icon for your collaborators (indicating a read-only project), and vice versa.
Working in a read-only project
While you can’t actually edit in a read-only project (those with a red lock icon), there’s a lot you can do, like:
- Load clips and sequences into the source monitor
- Set in and out points and make edits from the source monitor into a sequence you have write-access to
- Copy project items, including media and sequences, into a project that you have write-access to
- Play back sequences
- Export media, sequences, and most data files
Adding existing projects and creating standalone projects
New projects that you create from the Production panel are automatically added to the Production ecosystem – but what if you have an existing project that you want to import into a Production?
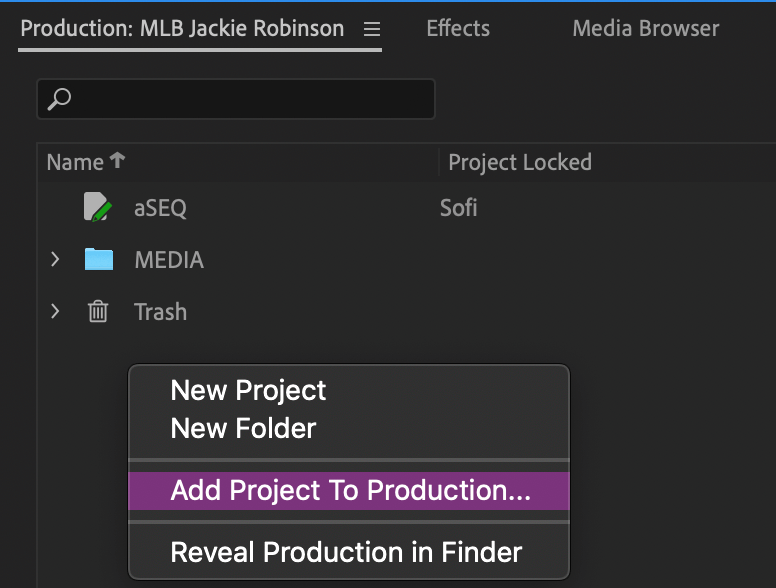
To add an existing project to a Production, right-click in the Production panel, choose Add Project To Production, and navigate to the project.
A copy of the project will be created inside the Production and if necessary, the project version will be updated. The original project file will not be altered. All assets from the project will now be available inside the Production.
What if you have a project inside the Production that you’d like to make a standalone project outside of the Production?
All .prproj files in a Production are complete, functional project files that can be copied to a new location at the file system level or by using the project manager within Premiere.
Once outside of the production, these .prproj files will open independently, however they will not contain any master clips that originated from another project.
For example, if I copy my aSEQ project from the MLB spot out of the Production folder to send to the online editor, only the sequences will appear as items in the copied project.
Since all of the clips that make up those sequences originally came from either the VIDEO, AUDIO, or STILLS projects, none of the master clips are included in the copied project.
To create a standalone project that does include master clips, you can use the new Generate Master Clips for Media command.
Select all of the clips in your sequence (cmd+a) and navigate to Edit > Generate Master Clips for Media.
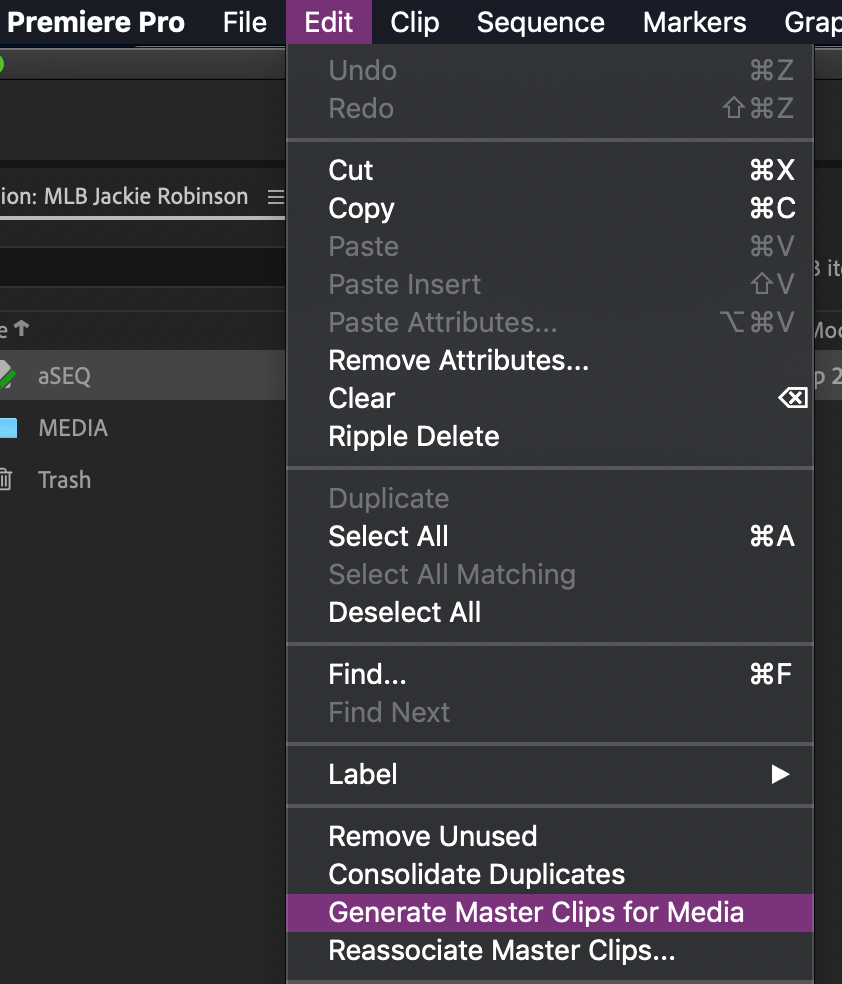
The selected media will no longer link back to the original master clips. Instead, new master clips will be created and linked to the media in the timeline, making the project fully self-contained.
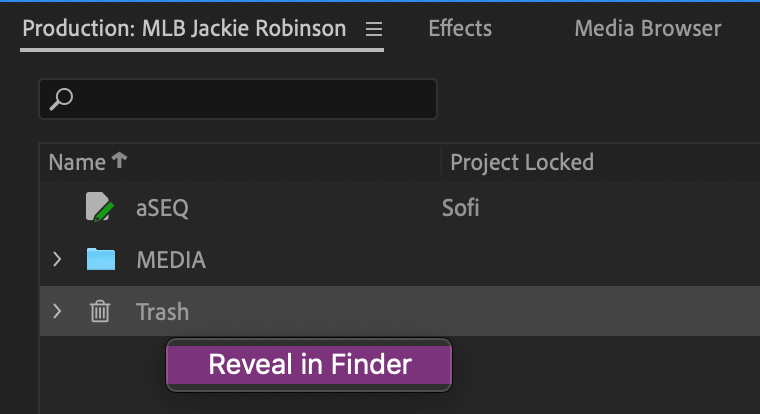
Using the trash
Another new element in the Production panel is the Trash.
It won’t show up as an item in your Production until you move something into it, which you can do by right-clicking and selecting Move to Trash or dragging to the trash icon on the lower right corner of the Production panel.
Items that you move to the trash will remain there (and can be moved back out of the trash) until you empty the trash at the file system level.
To empty, right-click on the trash in the Production panel and choose Reveal in Finder/Explorer. In the Finder or Explorer, delete the items you no longer need.
Enjoying this article? Subscribe for more exclusive content!
Editing in Productions
How do these new features actually play out in an edit?
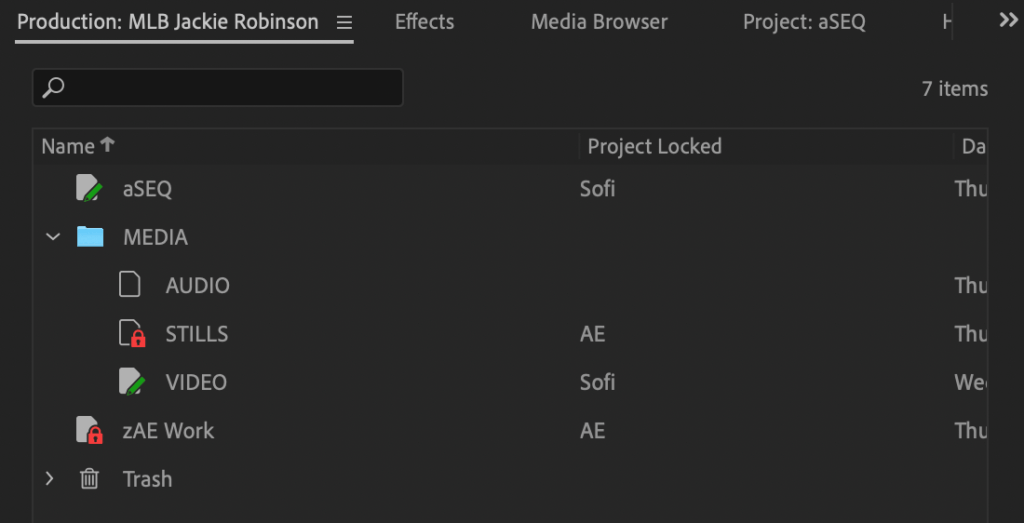
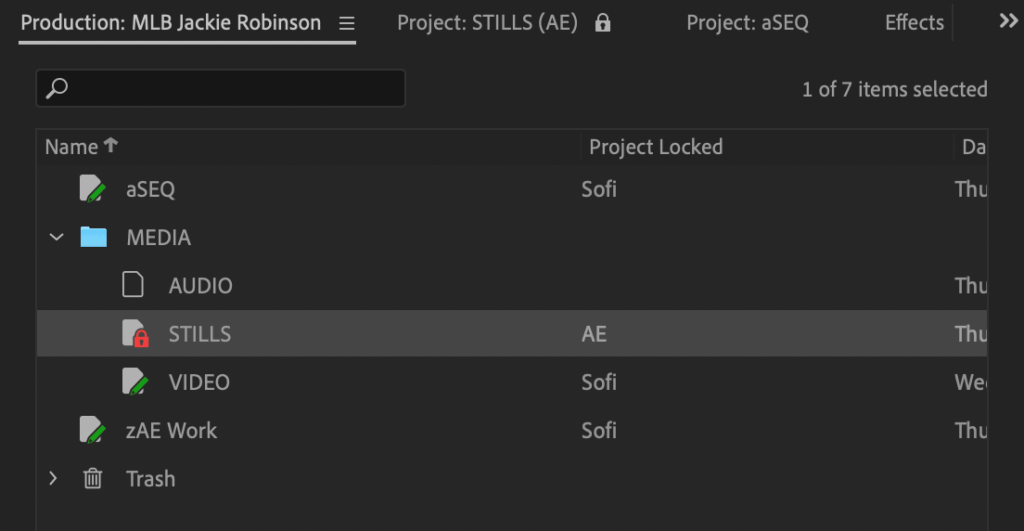
Let’s start with a more detailed look at the Production panel for my MLB project:
In the Production above:
- The aSEQ and VIDEO projects are both open on my system and I (Sofi) have write-access (solid icon with green pencil)
- The AUDIO project is closed on my system and nobody in the Production has claimed write-access to it (outlined icon, no lock)
- The STILLS project is closed on my system and my AE has write-access (outlined icon with red lock)
- The zAE Work project is open on my system as read-only and my AE has write-access (solid icon with red lock)
So, I have edit access to the aSEQ project, which contains all of my sequences to date. That’s great, because I’m racing the clock to get the next cut out to the director for approval.
Meanwhile, my AE just received a new batch of archival photos that he’s importing and organizing into the STILLS project, which I can see is closed on my system (outlined icon), but locked (red lock). The “AE” name in the Project Locked column lets me know that he’s the one working.
Let’s say I need to add one of these new photos to my current edit. I simply open (double-click) the STILLS project on my end (it becomes a solid and locked icon):
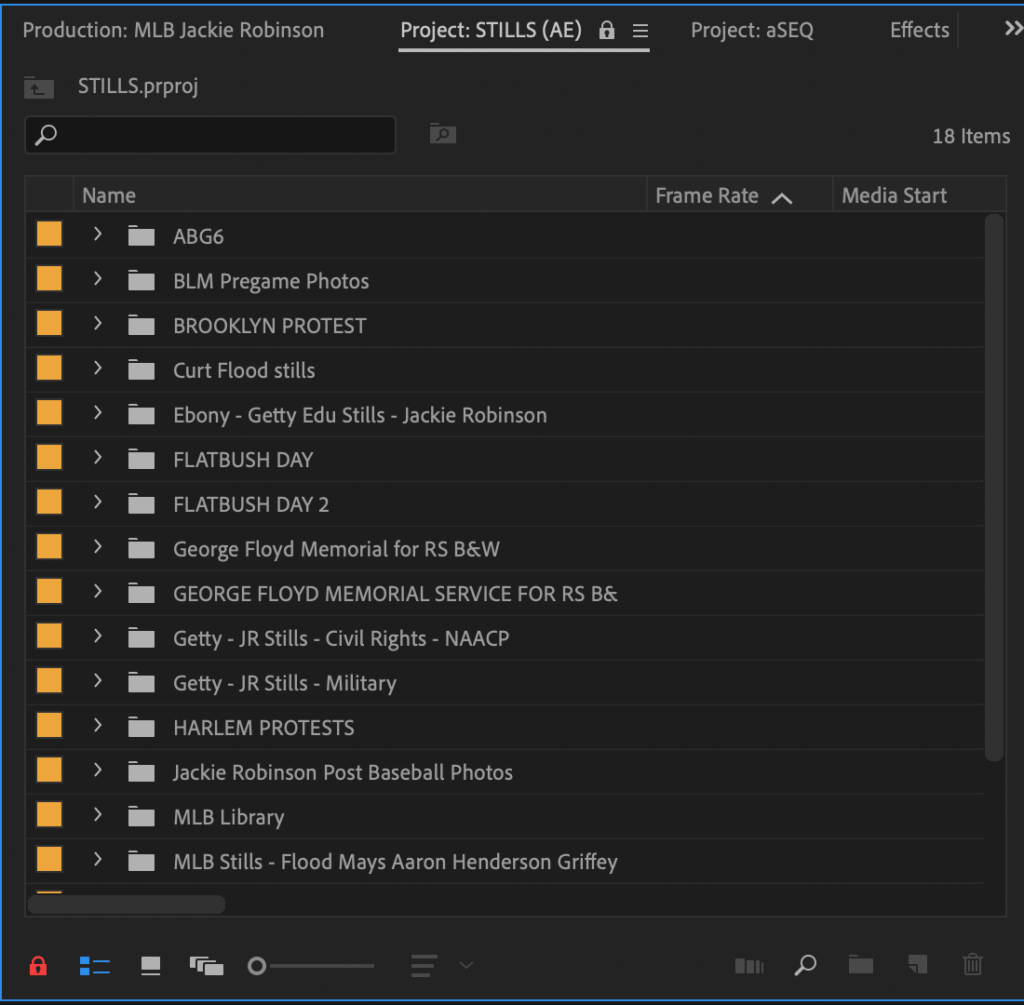
All I have to do is find the photo I want, and cut it into my sequence. That’s it!
The STILLS project remains read-only, meaning I can’t import or delete media or change file names, but I can still edit the media into any project I have write-access to.
Remember, even though I’m editing media from the STILLS project into my aSEQ project, no clips are actually moved or copied from their original location: the photo I add to my timeline remains in the STILLS project.
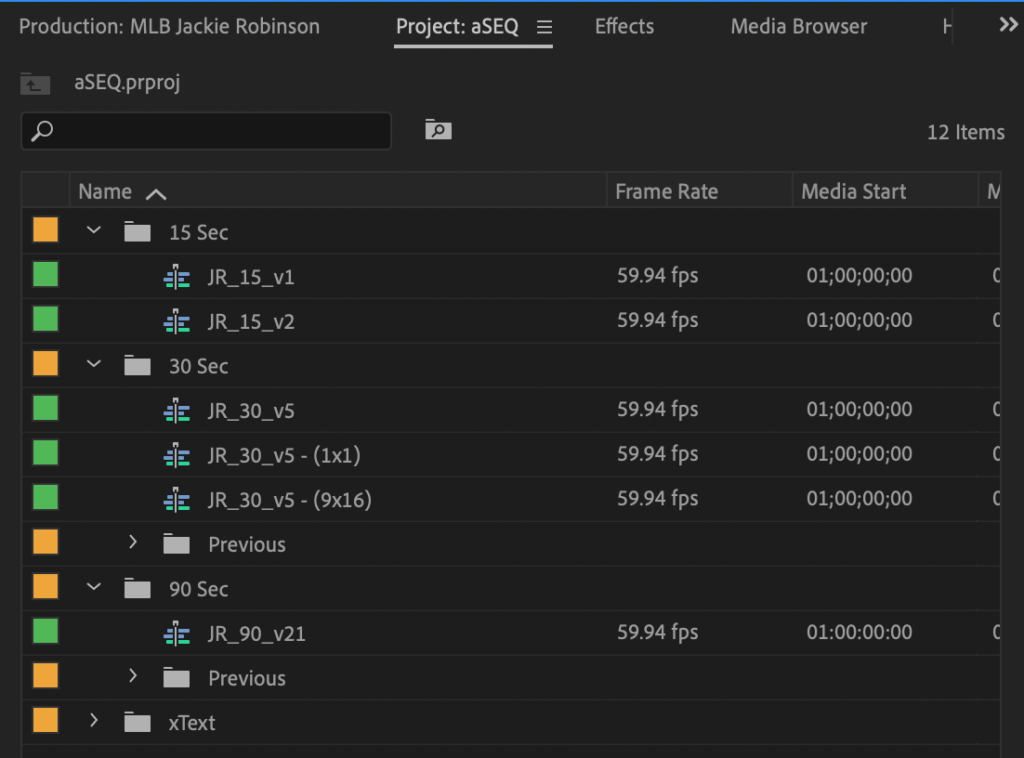
If you take a closer look, my aSEQ project actually contains no media clips at all – it only houses my edited sequences:
Now, if my AE makes more changes to the STILLS project while I’m working, I’ll be notified in one of two ways:
- In the Production panel, the project name will be displayed in italics:

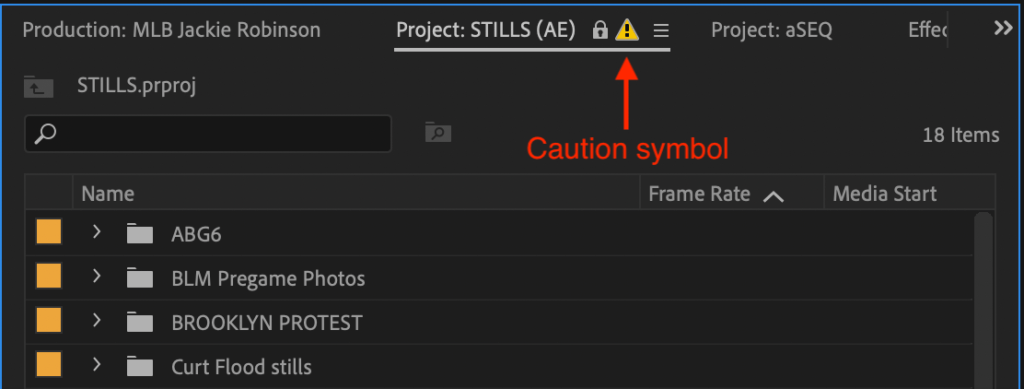
- In the project panel, a yellow caution symbol will appear next to the project name:
To work from the latest version of the project after getting one of these notifications, either:
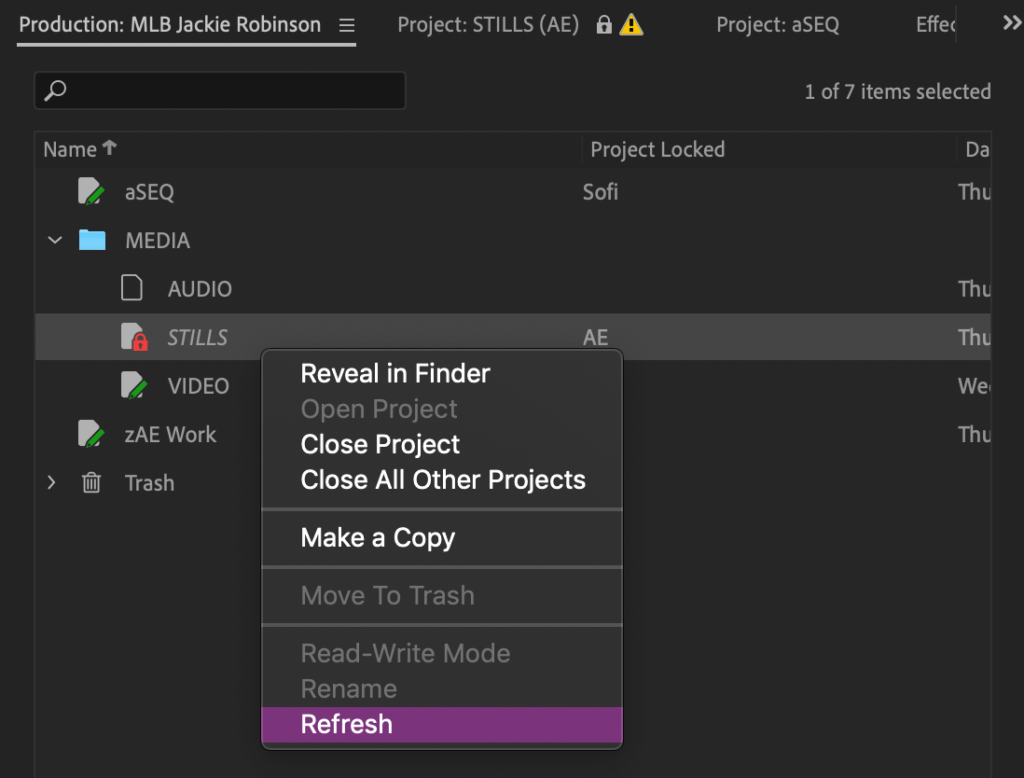
- Right-click the project in the Production panel and choose Refresh:
- Navigate to File > Refresh All Projects
Now, let’s say I’ve finished my latest cut in my aSEQ project and want to pass it off to my AE to lay in a few sound effects and then export and upload for review.
To allow my AE to make changes in the aSEQ project, I need to make the project read-only on my system, either by:
- Right-clicking the project in the Production panel and selecting Read-Only mode:

- Clicking the green pencil icon in the project panel so that the icon switches to the red lock:
So far we’ve been walking through my short-form MLB Production as a use-case.
Let’s switch gears for a minute and imagine how these new features will scale up for long-form edits or projects with multiple editors.
Organizing Productions for long-form projects
Productions are the Premiere-based organizational tool that long-form projects like feature films and TV shows have been waiting for.
So what’s the best way to organize a long-form Production?
The key to successful collaboration in a Production is to keep projects small. With smaller projects, you’ll be less likely to have two editors trying to work in the same project at the same time.
As a starting point, I suggest creating separate projects for at least your top-level bins like video, audio, VFX, music, etc. It may take some getting used to, but don’t be afraid to add a ton of individual projects to your production.
Remember that project files in a Production are small, lightweight, and help you collaborate effectively. You won’t run into any performance problems by loading up your Production with tons of projects – in fact, you’ll see performance improvements since you’ll likely never have more than a dozen projects open at once.
With that said, you’ll likely need to experiment and find the structure that works for you.
You may have noticed that in my MLB Production, I was somewhat conservative with the amount of project files I created. I separated out sequences, video, stills, and audio files into separate projects, and within those projects, I used bins for further organization. I also had a separate project for my AE that he used for creating string outs and pulling selects.
I chose this structure because:
- It seemed unlikely that my AE and I would need simultaneous write-access to the subfolders within single projects – for example, there wouldn’t be too many scenarios where my AE would want to edit a specific subfolder with the STILLS project, while I wanted write-access to another subfolder.
- At the same time, it seemed useful to allow my AE to have write-access to let’s say, the VIDEO project, to ingest and organize media, while I was moving things around in the STILLS projects, or adding new VO takes to the AUDIO project. Since this was a very fast-paced project, I sometimes ended up doing some AE tasks like importing or labeling if my AE was working on something else. If I had grouped all media into just one project, only one of us would have write-access at a time.
There’s really no right or wrong way to organize a Production – it all depends on what suits you and your workflow.
I haven’t cut a feature with Productions yet (though I’m planning to use it on the next one!), but I’ve already started thinking about how I’ll organize the edit.
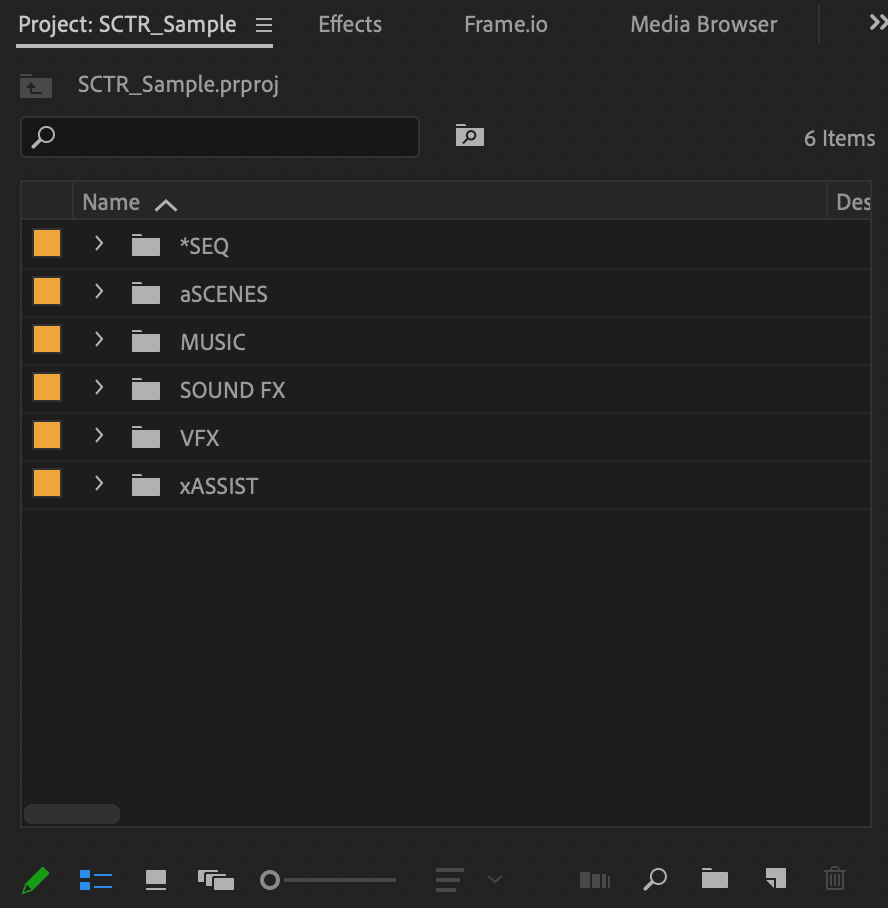
Here’s the structure of the last feature I cut using a traditional standalone Premiere project:
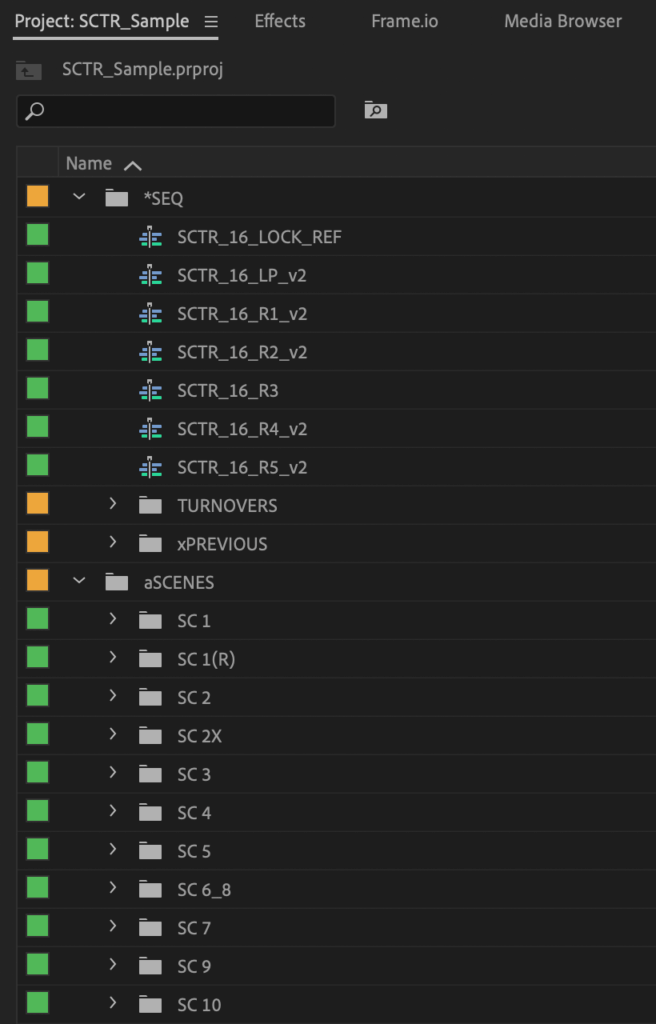
Here’s what I imagine the Production version of this edit might look like:
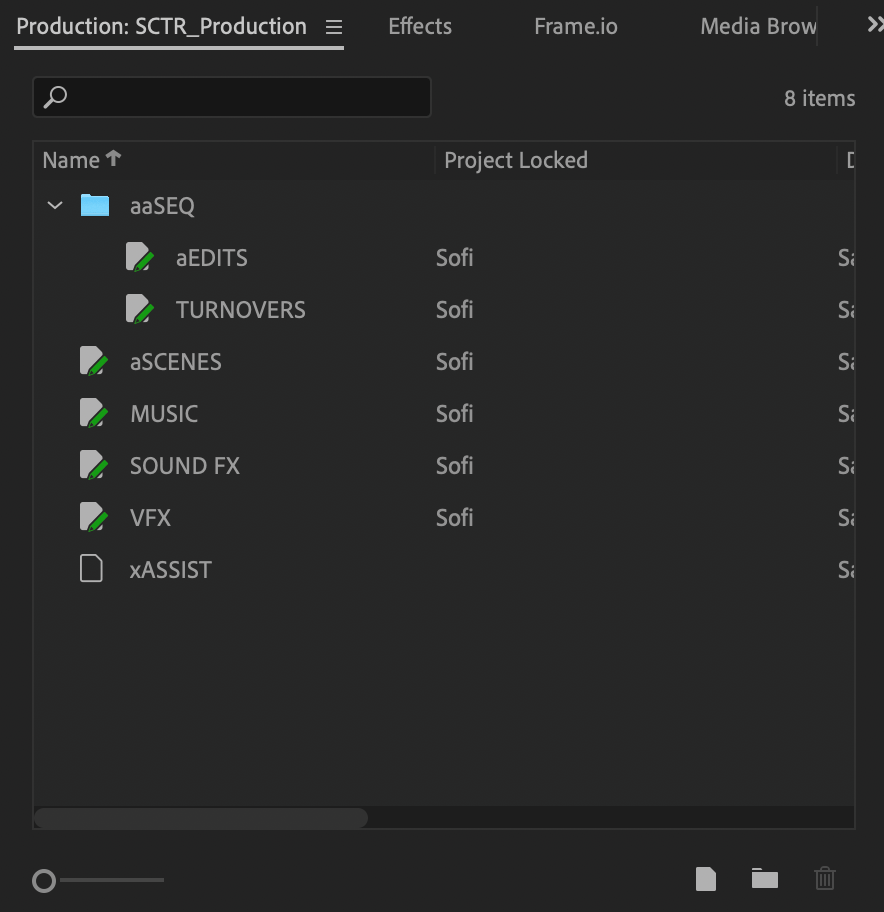
You can see it looks more or less the same, but with each top-level bin now as a separate project. Some bins are broken into more than one project, like the aaSEQ folder, which now contains separate projects for aEDITS and TURNOVERS, because I anticipate that my AE will need write-access to the TURNOVERS project, while I’m working in the aEDITS project.
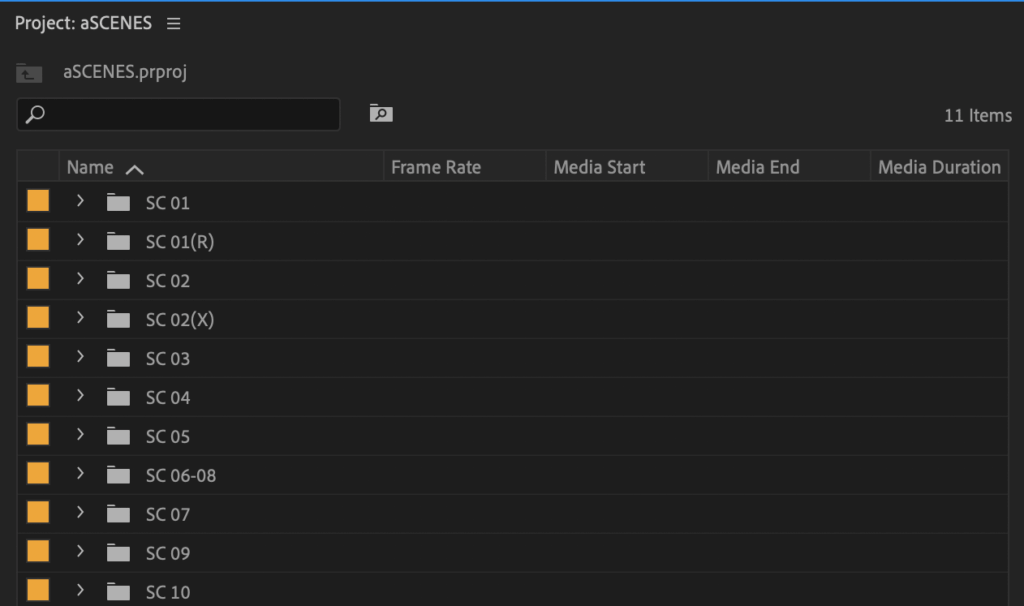
You may also notice that I kept all of my scenes in a single project organized into bins, rather than creating new projects for each. Why?
I like having all my scenes accessible in a single project window. This is just a personal preference, but I like to scroll through the scene list as a whole while seeing the content of each scene bin.
Sidenote: The ability to twirl open projects in the Production panel and see their contents would be a very cool feature for Adobe to implement. Request it here!
It’s also quite rare that I need write-access to the scenes bin while I’m editing. My AE will be importing and labeling new scenes daily, but I’m simply cutting footage from the previous day’s scenes into my sequence.
Remember, you can edit from a locked project without any limitations – the only thing you can’t do is make a change to the project (like renaming a clip, or importing new media). These are tasks I rarely, if ever, need to do while in the early stages of a feature edit, since they’re all handled by my AE.
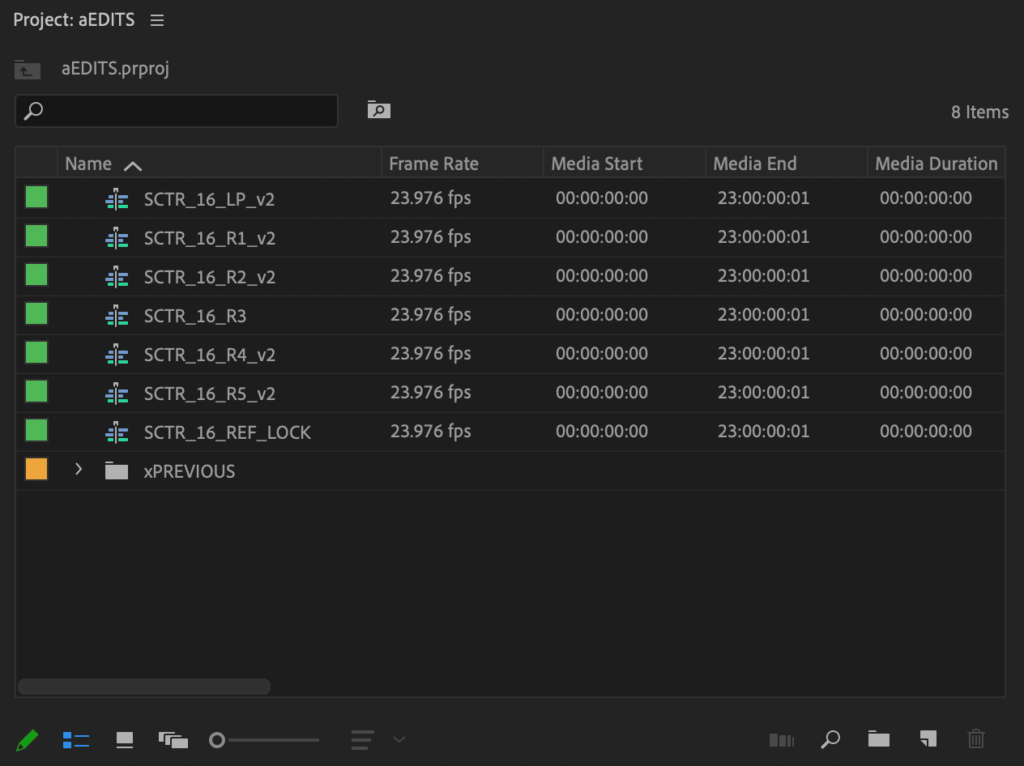
What I do need in a feature edit is write-access to all of my sequences, so those are housed in their own project, separate from any media at all.
Tip: If you’re an editor who likes to make stringouts or selects sequences inside of each scene bin, you’ll benefit from creating scenes as separate projects.
Productions with multiple editors/AEs
Now imagine a scenario with multiple AEs working on the same film. In this case, it would make perfect sense to make each scene its own project. That way, only one scene is ever tied up at a time, and two AEs can divide and conquer importing and binning footage.
Projects with multiple editors may benefit from separate scene projects as well, depending on how likely each editor is to be importing, moving, or renaming footage as they work.
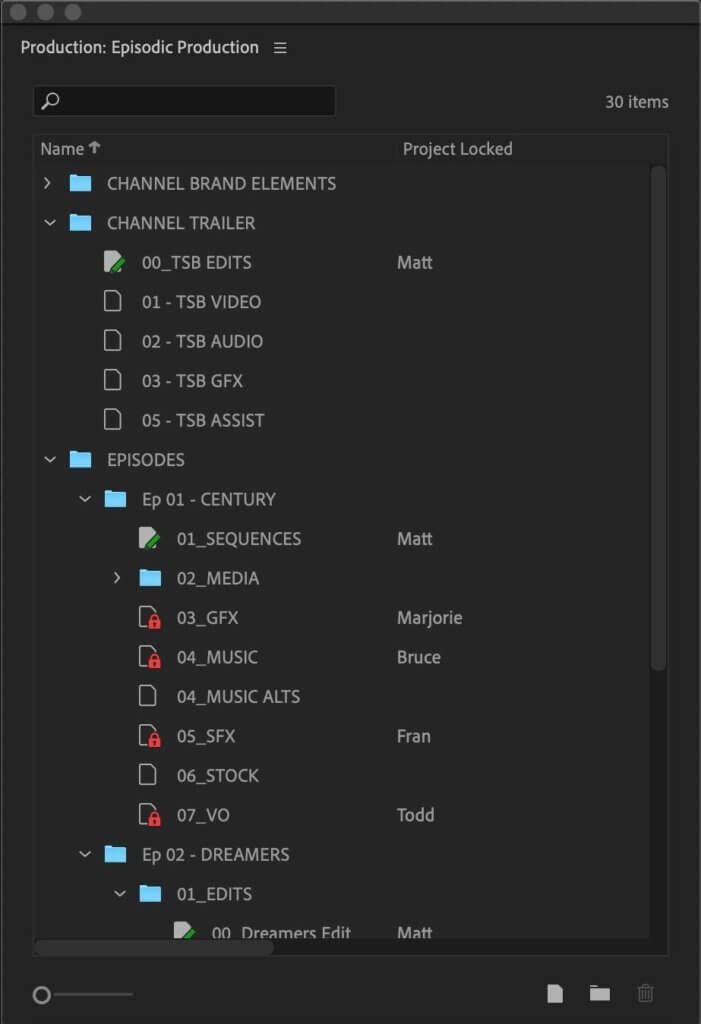
Now consider a Production that holds an entire season of a TV show.
Inside the Production, you might have individual projects for all of the assets that get shared between different episodes – graphics, text, music, sound effects, etc. You might have separate project files for each episode, or even break each episode down into multiple project files per scene. It all depends on your workflow.
Here’s an image from Adobe depicting an episodic Production, with both shared assets and individual episodes:
The bottom line – don’t be afraid to experiment!
Editing in Productions without shared storage
What if your editorial team isn’t working in a single location, making shared storage impossible? A lot of people had this question when Productions first launched and figured that it wouldn’t benefit their workflows.
You will still benefit from using Productions!
In a remote workflow, using Productions is nearly identical to using a standalone, single project, but with one massive improvement – no duplicate clips.
If you’ve tried using XMP in the past to mitigate duplicate clip issues, then you’ll likely be familiar with some of these steps.
The big difference with Productions is that Premiere now actively searches for existing media, rather than relying on a combination of luck and meticulous file management to find it.
For this workflow, the majority of the media should be imported by one editor into one Production.
Before importing, navigate to Premiere Pro > Preferences > Media
Check the boxes for:
- Write XMP ID to files on import
- Enable clip and XMP metadata linking
These settings will help Premiere keep track of master clips.
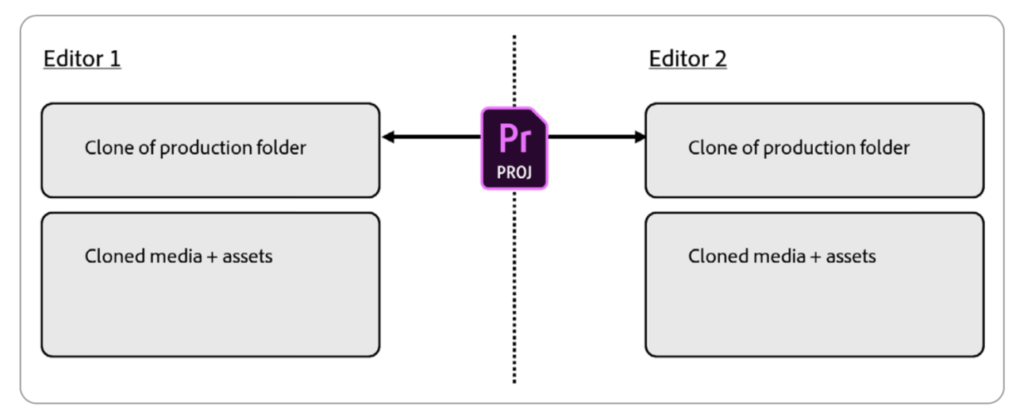
After the media is imported and organized in the Production by one editor, clone the media and entire Production folder for the other collaborators. From here, each editor works in their own copy of the Production, with an identical set of media:
When an editor is ready to share sequences or clips, they can copy them into a new project and send that project file to their collaborators.
The collaborators can use the Add Project command to bring the project into their copy of the Production. The existing master clips will automatically link to the imported clips, preventing duplicates from being imported.
This may not seem like a big deal, but believe me (and anyone else who’s been collaborating in Premiere) it is. Being able to quickly and efficiently swap sequences and project files back and forth without creating duplicate clips is a game-changer!
If you need to add additional shoot days to the Production after the edit is underway, designate one editor to do the importing, and then clone the media from that editor’s drive to send to the remaining collaborators.
Tip: Consider storing frequently growing files like music tracks, VFX comps, and sound effects on reliable cloud storage of some kind, like Dropbox. That way, these files are always up to date for all collaborators and no manual syncing needs to occur (assuming, of course, that you have enough local storage).
To complete your remote setup and seamlessly collaborate with a director or producer, check out The Ultimate Real-Time Remote Editing Workflow (That Won’t Break the Bank).
Cloud-based solutions
Dropbox to the rescue?
To make a long story short, the MLB project came on so fast that I literally couldn’t get a NAS drive delivered in time.
But I really wanted to try out Productions. I did a quick search.
Adobe’s official stance on Dropbox for Productions is:
While it is safe to store a production in a consumer file syncing service (Dropbox, Google Drive, etc), doing so is not recommended to simulate a shared storage system. Collaboration with Productions is not designed to work with these services.
Hmm. Okay. Dropbox probably won’t work because the file paths would be different between users. But then I came across this from Adobe:
Premiere Pro can handle translating path differences between macOS and Windows. For best results on macOS make sure the same volume name is used on all systems. On Windows make sure to map the share to a drive letter that is the same on all systems.
That gave me more confidence. I decided to go for it! And it worked!
Premiere had no issues differentiating between the two file structures on our computers. My AE and I were both on Macs, and both had our Dropbox folders in their default locations (in the Home folder). We did end up putting the shared MLB folder in different places in our respective Dropbox folders, but that didn’t cause any issues.
Project locking worked great – we sometimes had to wait 30-45 seconds for updates on locked or unlocked projects to ripple through, but that didn’t impact our workflow. I should mention that we were working on consumer speed Verizon Fios wifi.
Tip 1: I quickly realized that my Production was syncing both to Dropbox AND to Creative Cloud for automatic backups. I paused syncing to CC to give the full upload bandwidth to Dropbox.
Tip 2: The “sync now” feature in Dropbox can be useful if you have a larger media syncing and want to sync an updated project file first.
Now, I want to be very clear – using Dropbox was a last ditch effort. Yes, it worked. But there are a lot of potential problems with this workflow and you shouldn’t use it without a clear understanding that:
- It’s not supported by Adobe, so likely won’t get any help if you run into issues.
- It’s not easily scalable, unless you have massive amounts of local disk space. The MLB project used archival material that was relatively small in file size, meaning I could store the entire Production and all the media on my computer’s internal drive. But even with a small project, my disk started getting too full for comfort. You can attempt to sync Dropbox to an external drive, but that comes with its own list of potential issues.
- If one collaborator experiences issues with syncing, you may experience issues with project locking or end up creating duplicate projects, which can be resolved, but are no fun.
- Performance is severely limited by each collaborator’s internet speeds. Turning off bandwidth limits on uploading and downloading in Dropbox will help, but ultimately, if your collaborator has a slow connection, your Production will suffer and features may not work as expected.
So, would I use Dropbox with Productions again? Yes, I probably would, with the following conditions:
- The raw media or proxies were small enough to store on my local drive (and that of my collaborator)
- We could afford the inevitable syncing delays that might arise with both the Production and media syncing to Dropbox simultaneously
- We had ample time to test run the entire setup
Postlab Drive
Postlab Drive has the potential to offer all the benefits of Productions, without needing to be in the same location as your collaborators. You can use it just like I used Dropbox in the above workflow, but without any of the quirks (disclaimer: I haven’t had a chance to test it out yet). It’s also very well priced with no surprise fees. Check out their fantastic writeup on developing Drive and the challenges of cloud-based storage in general.
Premiere’s team projects
Whereas Productions is designed primarily for collaborators working on shared local storage, team projects are designed for remote collaboration where assets are stored locally and project files are stored in Creative Cloud. Depending on your workflow, you may decide that team projects are a better fit. At this time, team projects can’t be used in conjunction with Productions. Team projects also require either a Team or Enterprise license.
Bebop Technology
Another innovative approach to working remotely is combining Productions with a third-party solution like BeBop Technology. BeBop is a software ecosystem that lets you remotely access your edit via a virtual computer, and can take the place of a shared storage device. Bebop can give you the full benefits of working in a Production without needing to be in the same location as your collaborators. The only downside is that the service can be pretty pricey.
Tips for working with Productions
- Productions introduces some new commands to Premiere – consider mapping them to your keyboard shortcuts, particularly the Save All and Refresh All Projects commands.
- While technically possible, making changes to your Production at the file system level is not recommended. Productions uses a unique ID system for projects to make sure duplicates don’t occur. Making changes to project file names or creating copies of projects at the file system level can interfere with this tracking. Instead, make these types of changes via the Production panel.
- If you find yourself in a project that doesn’t have a red lock icon, but you aren’t able to make changes, either click the project lock icon at the bottom left of the project panel until you see a green pencil icon, or right-click the project in the Production panel and select “Read-Write Mode.” Projects can sometimes be open in read-only mode even when only one editor is active in the Production.
- Both the Match Frame and Reveal in Project commands work as expected, regardless of the master clips’ location. Using Reveal in Project on a clip in a sequence will reveal the clip in its original project, and open that project if it’s closed.
- In the rare case where a clip in a sequence becomes detached from its master clip, you can use the Reassociate Master Clips feature by selecting the problem clip or clips and navigating to Edit > Reassociate Master Clips. Premiere will search all projects in the Production for the missing master clips.
- To add or adjust Masterclip Effects in a Production, you need to open the original master clip in the source monitor, as opposed to match-framing a clip from a sequence. If you’re attempting to edit Masterclip Effects and the options are greyed out, use the Reveal in Project command to locate and open up the original master clip.
- I occasionally experienced “Recovered Clips” popping up in the project that contained my sequences. I wasn’t able to isolate a common cause, but in all cases, I was able to simply move these recovered clips back to their original location and delete the duplicates without any issue.
- For even more details on using Productions, check out Adobe’s Workflow Guide
Is Productions really a game-changer?
Yes! At least, I would say so.
I didn’t skip a beat using Productions to cut a national spot for MLB (watch it here, if you haven’t yet), and was thoroughly impressed with all the new tools at my disposal. Productions helped my AE and I work quickly, efficiently, and simultaneously, all while on a very tight schedule.
That’s a huge win in my book for a feature-set that’s only been around a couple of months. I really can’t wait to use Productions on my next feature film edit.
If you’re a long-time Premiere user, it will take a minute to adjust to the new file structure and terminology, but after your first Production, I doubt you’ll go back to working in single project files.
Implementing true collaboration and tackling long-standing issues with media management are massive steps forward for Adobe. These features have been two of the biggest hurdles preventing Hollywood from adopting Premiere Pro for studio films and TV shows.
But make no mistake – Premiere is continuing to gain steady ground. In fact, 56% of the features shown at Sundance this past year were cut on Premiere – including Save Yourselves!, which I’m very proud to have edited.
Not only that, but major films Terminator: Dark Fate, Dolemite is My Name, and David Fincher’s MANK were all edited with Productions as part of beta testing. Impressive!
Productions can only improve from here, especially as more and more editors use it. Will you?
Let me know in the comments below!


